The archives
Return to the
Now spinning
page
More spring explorations
May 2007
28 May 2007

Guess what I'm doing??? ...I'm spinning with both hands!!
And let me tell you, it's exciting in more ways than one. You know how in the circus you sometimes see a woman dressed in spangly clothes, standing on two horses (one foot on each) and galloping around the ring? ...Except for the spangles, two-handed spinning is kind of like that!
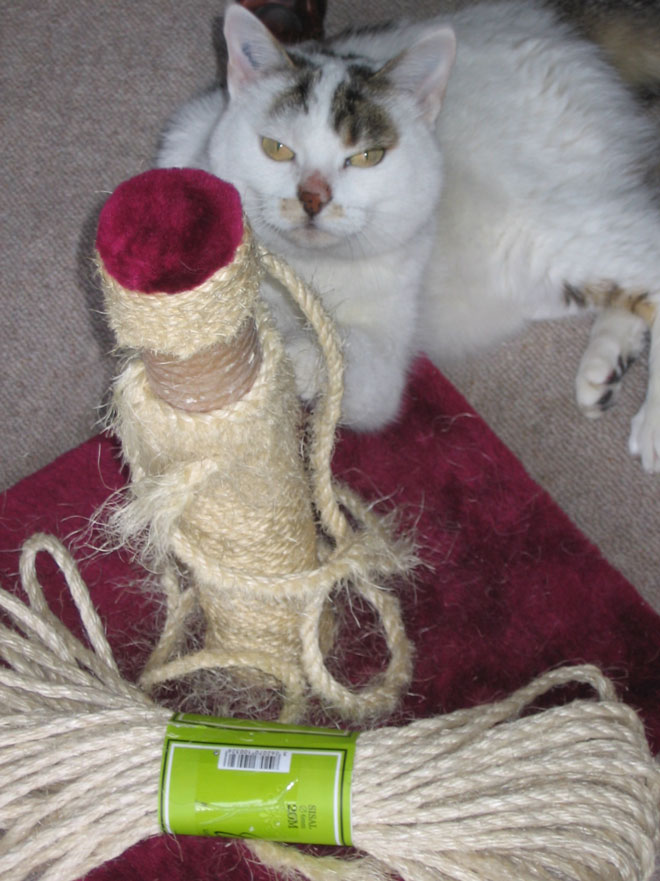
Partway through last night's session, the wheel looked like this (right). In the photo, the longest flax fibers have already been spun from the distaff; only the medium-length fibers and short bits are left. I'll keep spinning until the medium fibers are gone, then I'll save the rest to spin as tow.
To back up a little, the flyer I've been working on these past weeks was finally finished (except for staining and all that); and after slimming down its arms with sandpaper, the new flyer's weight differed from that of the original by only one gram! Installed on the wheel, it has the same feel as the other flyer -- and that's just as it should be.

Getting the flyer finished and in place was just one of the things needed before starting to spin; I also had to set up the drive bands. The wheel and I finally agreed to use two drive bands (left) instead of one.
The reasons were pretty straightforward. First, there are two grooves around the outside of the drive wheel. Second, the two spinning heads are offset slightly (you can see this in the photo above), so the centerline between the flyer and bobbin whorls on each head hovers directly above one of the two grooves on the drive wheel. Third (and very convincingly), the left-hand spinning head refuses to cooperate when both heads are driven by the same band and are in use (this is perverse on its part, because it looks like it works just fine until you start spinning on it).
If you ever find yourself trying to decide how an old spinning wheel prefers its drive band, remember this: the spinning head will behave differently when you're spinning with it than when you're just making the wheel go around.
Learning to spin with both hands is interesting, especially when you're still fine-tuning the set-up of the wheel. ;-) I was so eager to get started that I didn't dress the distaff as well as I could have -- and I paid for that while spinning (not to go into too much detail, let's just say the fiber supply was either "feast" or "famine"). Clearly, when you're pulling from the fiber supply on both sides, it's really important that the fiber be nicely arranged!
The drafting itself wasn't too difficult; each hand already knew what was expected, so it was just a matter of getting them both to do it at once. With the distaff in the center, I'd pinch a few fibers (on each side), draw them downward, and let the twist run into them as I moved my hands up toward the distaff for the next pinch. I spun the fiber dry.
The first yarn going onto the bobbins was pretty awful: knots, snarls, thick spots, thin spots, and messy joins mixed liberally with the good stuff.
The spinning itself was rough at first, too. When the yarn on one side or the other broke, it was stressful to fetch the end back off the bobbin and join it to new fiber -- all the while tending the "good" yarn on the other side. With all my attention focussed on my side of the orifice(s), I'd forget to move the yarns from one hook to another on the flyers. ...The spinning finally fell into a rhythm, though; and though the yarn from the end of the session still could be improved, it's darned decent.
It takes a surprising amount of concentration to spin this way; and it's going to take a bunch of practice before I'll be ready to add an additional element (like my water pot for wet-spinning).
But am I hooked on two-handed spinning?? ...You betcha! :-)
25 May 2007
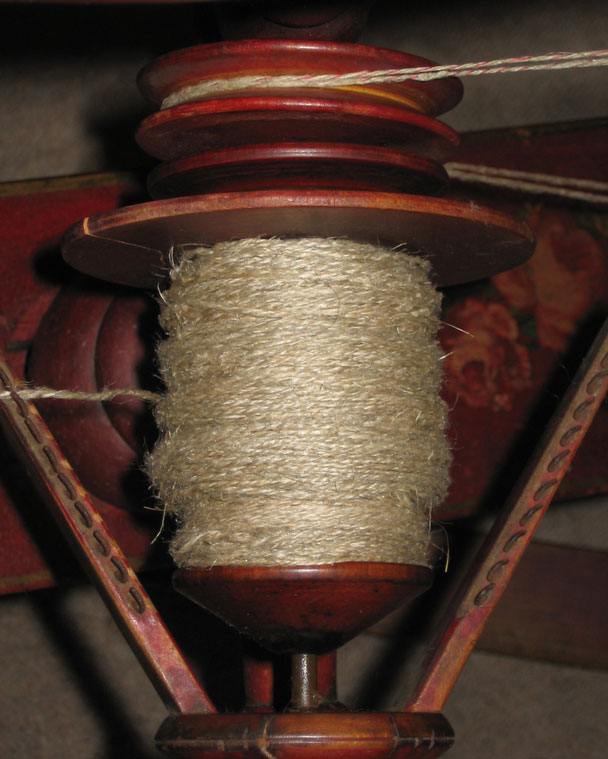
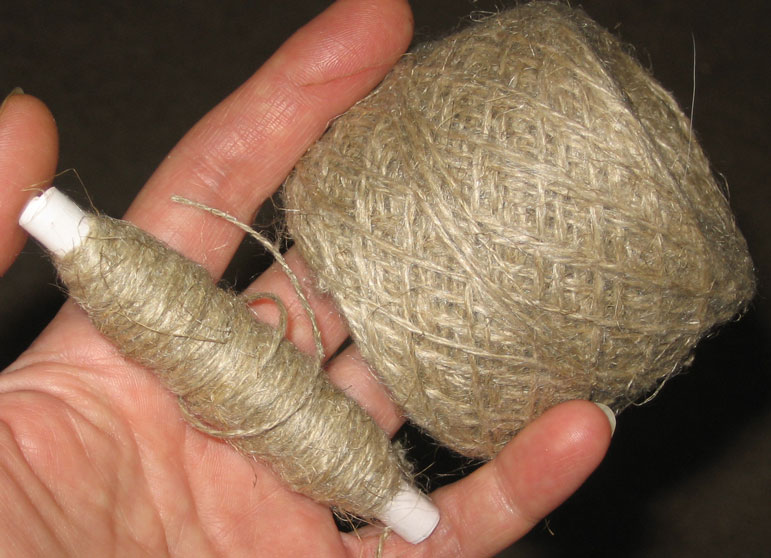
When you use yarn, sooner or later you use it up: it was clear I'd soon need more of the thickish "tow" yarn for my towel-in-progress, so yesterday I set up the red wheel (perfect for tow spinning!) and got to work.
The first batch of tow yarn used in the towel had been dry-spun, and it was plenty strong, but (for want of a better word) "fluffier" than a wet-spun yarn would have been. That yarn had been made for a drive band, and its "fluff" was intentional: it meant the yarn would squish nicely into the groove of the spinning wheel's drive whorls and would give positive traction without any added belt dressing.
For last night's batch, though, "fluff" wasn't necessary; so I spun the singles dry, then moistened the yarn as I plied it.

The result (right) is exactly what I'd expected, but striking enough to be worth a photo. The ball on the left is "Mr Fluffy", and the one on the right is from yesterday's spinning session. They were spun with the same amount of twist and are about the same weight. The only difference between them is that one was wet-plied and the other was not.
Isn't that fun?? You can't always point to something and say, "Look, that's what this technique is for!" But this time, you can. :-)
21 May 2007
Sometimes it's time to change partners and dance with someone else.
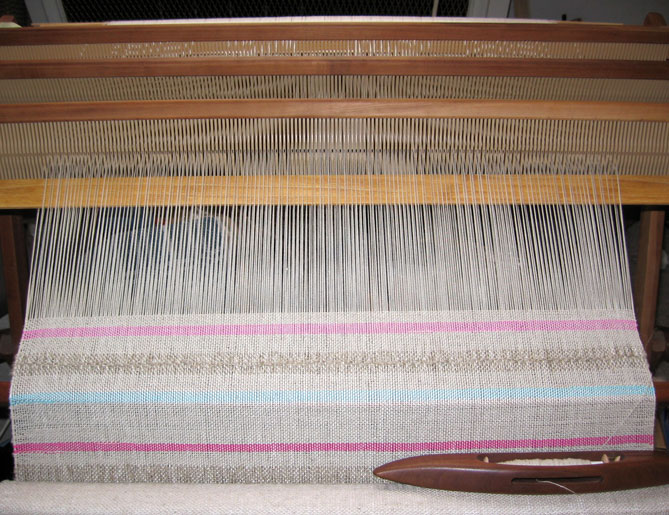
This (left) is the first part of a new kitchen towel, and it emerged from a spring restlessness that made me want to tidy things up.
To make that a little clearer: there's something about weaving that encourages orderliness. Maybe it's the clean way the threads interlace or something, but it frees up my resistance to tackling disorganized piles of stuff in the apartment -- I can weave for half an hour, get up and stretch (and put things away), then come back to the loom; and it all just happens. I like that!
This particular weaving project has a shady past. First of all, this warp is threaded in Crackle weave (a twill derivative) and started life as the warp I used to weave samples for a swap. It's perfectly possible to weave crackle on a rigid heddle loom (and I have swatches to prove it!); but to be completely honest, it's not a lot of fun. Thus, when I'd woven enough for the samples, I cut them off -- and the cut warp ends dangled there on the front of the loom for, um, two years, I think.
The warp had become a dog. A dangling dog.
Last night I reasoned that one of the best ways to tidy the area around the loom was to actually use it; so I finally tied the ends of its warp onto the front beam and started weaving.
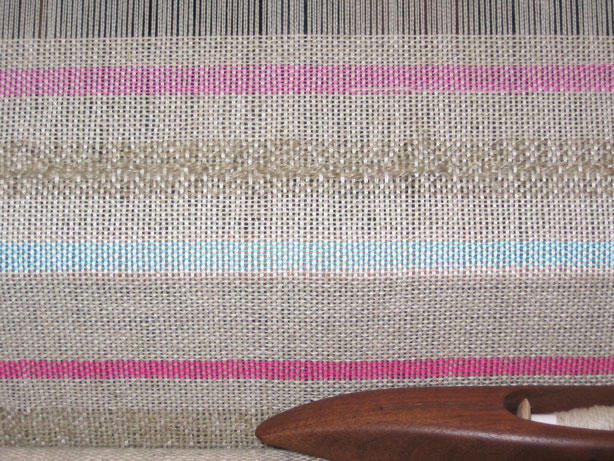
The Crackle threading allows true plainweave sheds; and that suited me just fine, because I was suddenly thinking of my desperate need for kitchen towels, and plainweave would be perfect: simple, smooth, straightforward. I had a basket full of partial bobbins of colorful cottons, a big cone of cottolin, and a few odd skeins of linen -- and this looked like a great opportunity to tidy up those odd lots of yarn, too.
The warp and most of the wefts are commercial yarns (10/2 cotton and 22/2 cottolin), but the darker beige stripes are a thickish handspun tow linen left over from the drive band material spun a couple of months ago. And dang, this tow yarn is such a nice textural accent that I now need to make more of it!
So the plan has changed slightly: I'm now taking breaks from weaving to spin more of the coarse linen yarn! Two steps forward....
But guess what?? It's working: order spreads through the apartment with every new woven inch. :-)
18 May 2007
A Tale of Two Flyers
The dastardly cold and flu season draws to a close, and I think it's finally safe to say our side is winning. ('Nuff said.) Between nose-blowings and cups of tea, this week brought new adventures with flyers....
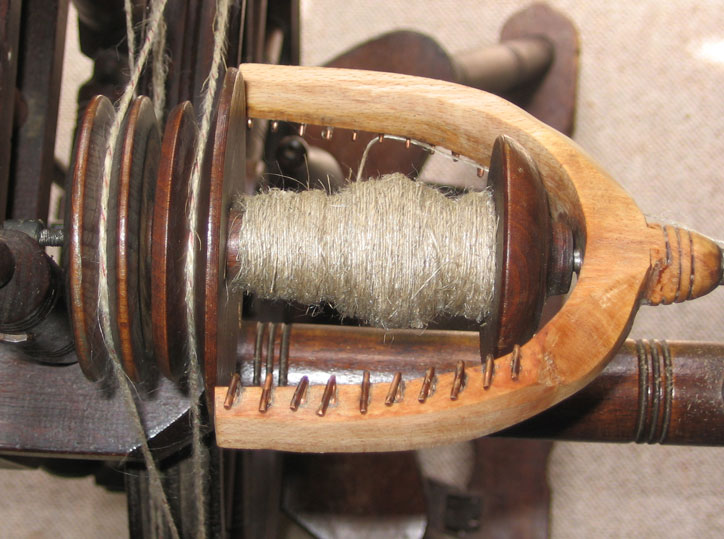
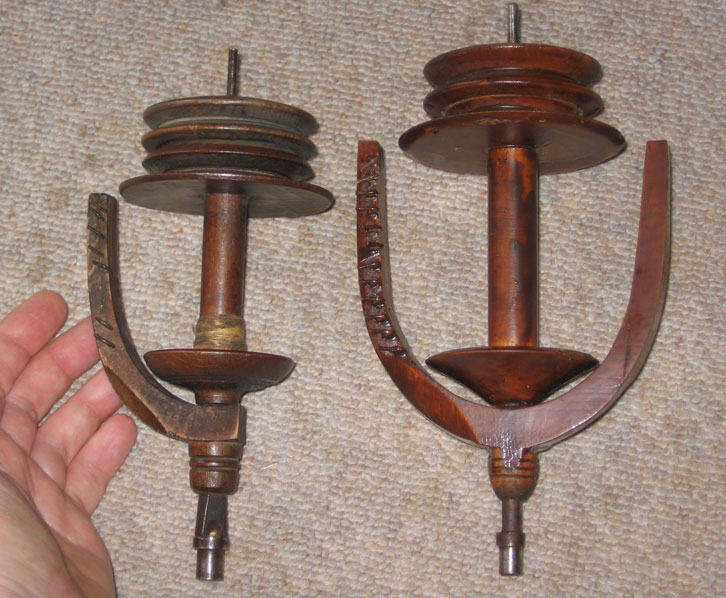
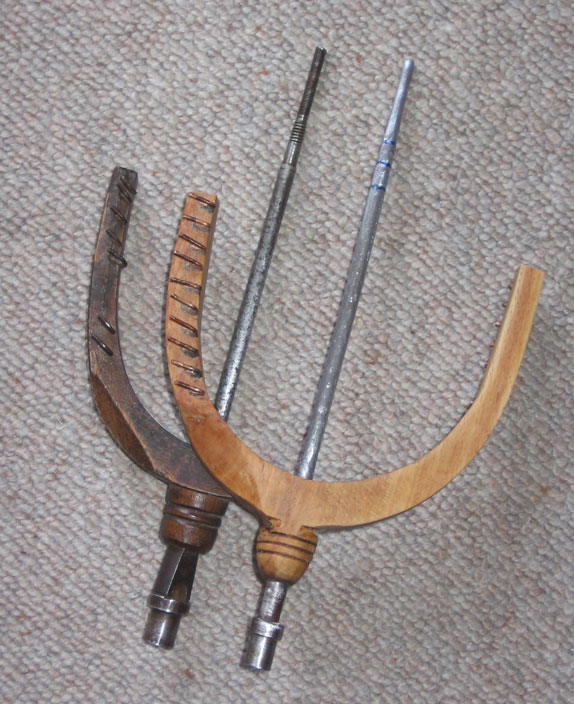
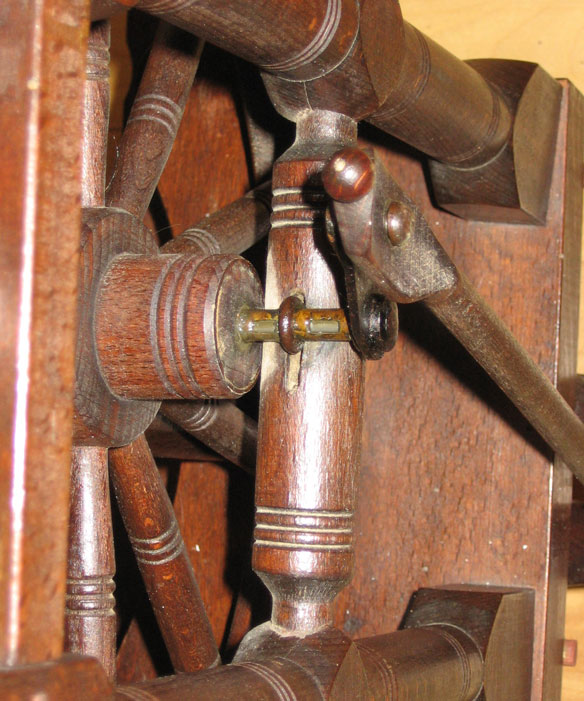
The wheel, Em, came with both original flyers (one good, one broken) plus a third that was longer than the others -- too long, in fact, to be usable on the wheel. (At left, the broken Em bobbin and the "odd" one.) After measuring it turns out the regular Em flyers and bobbins are shorter and narrower than any I have on hand; so the substitution I'd cheerfully envisioned at the start just won't work.
I gazed at these two flyers for several days before I realized their arms followed almost identical curves.
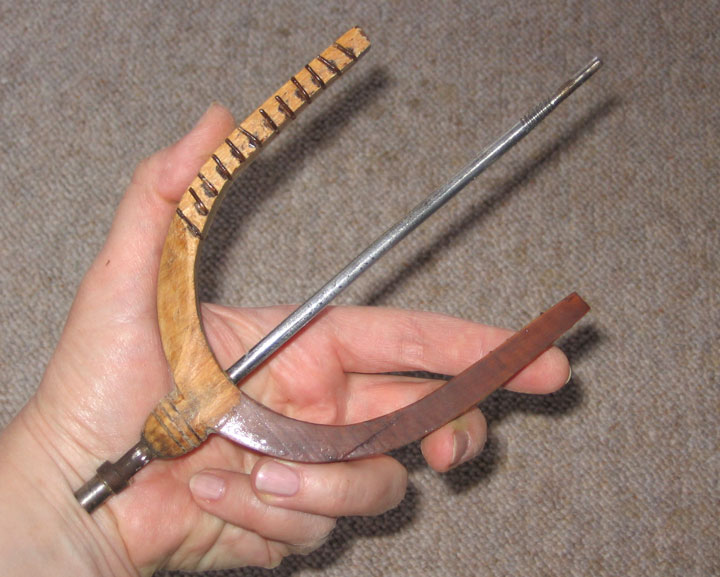
My woodworking skills aren't good enough for me to manufacture a flyer from scratch (a non-wobbly flyer, I mean); but I was pretty sure I could strip the finish off one and cut it down to size! So I proceeded to do just that (right). I started out with sandpaper, then realized the tool of choice was my MaxiCraft (a less expensive version of the Dremel mini-tool). That mini-tool would let me go a little faster, and I had a small abrasive head that would let me strip the finish in the hard-to-reach spots.

After stripping, it looked like a completely different flyer. Not only was the pleasant light-colored wood exposed, but I discovered (surprise, surprise) that its hooks were made of copper wire rather than steel (and now knowing they're relatively soft, I won't strip the finish off them until everything else is done). Finally, taking a deep breath, I trimmed each of the flyer arms to a length that matched Em's originals (left).
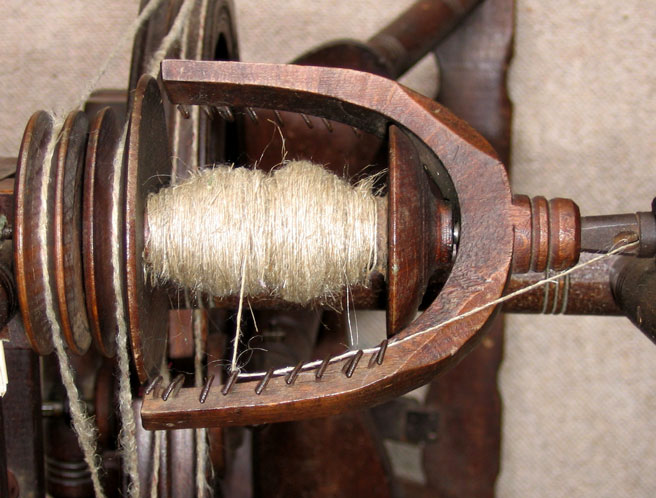
The next steps took me into uncharted territory: metal work. More precisely: real metal work, with cutting and grinding and who-knows-what-else, not the kind I'd already done with friendly snips and pliers and wire.

It turns out it wasn't so bad (right). Again, the MaxiCraft tool came to the rescue, allowing me to cut the steel spindle to length without fear (I love tools you can hold like a pencil!), then with a simple change of head, letting me grind the spindle down to the smaller diameter I needed. In the photo you can see how rough the spindle surface was right after grinding. That smoothed out easily with fine sandpaper.
And that brings us up to date! The "revised" flyer now needs only minor work before it's ready for service.
First, I'll need to cut threads on it (so I can screw the flyer whorl into place). That involves using a die (as in tap and die) and makes me nervous because it's an unfamiliar tool, and mistakes are pretty much irrevocable. Nail-biting stuff.
And second, I'd like to take some wood off the back of each flyer arm, because it's a little heavier than the original Em flyer and I'd like it to match as nearly as possible. ...That step, at least, I understand!
It's on its way. Stay tuned for the next installment....
13 May 2007
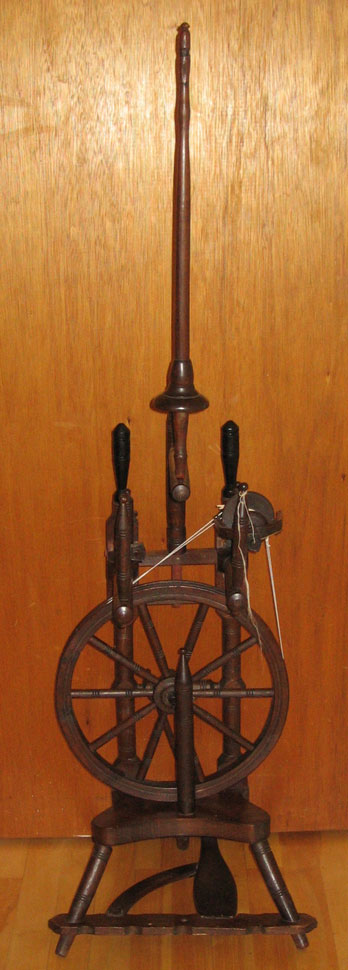
I mentioned this newest member of the wheel family a few days ago; and it now seems time for a more formal introduction.
This wheel's exact history is unknown. I purchased it from a nice woman in New York state; but no one knows whether or not that's where the wheel began its existence, or how long ago it might have spun its first yarn. ...Enter the detective! All older wheels reveal things about themselves, if only you'll listen; and this wheel is no exception.
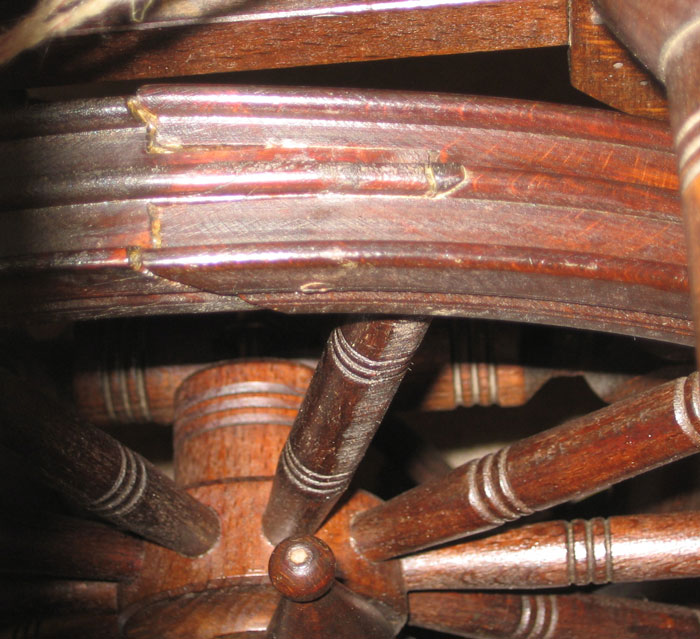
Consider first of all the question of age. They say a woman's age shows most clearly in her hands (though as I get older I'm questioning that); a wheel's age shows most clearly in its more complicated joints -- in the wheel itself, the spokes, or the wheel's hub; or in the turned wooden screws and their attendant pieces. On this wheel's rim (right), you can see pegs holding the ends of the spokes, other pegs holding the joinings between the rim pieces, and a certain amount of "ease" that's come into the rim join. In this case it looks like the "ease" is simply the settling of old joints into more comfortable positions -- there's no sign of moisture damage, and the joins themselves are still solid.
Judging just by the drive wheel, it would look like this wheel was quite old; but the way the wheel has been mounted onto its supports (right) belies that with an air of youth. The wheel's axle, in both front and back, is set into a metal sleeve equipped with "windows" to make lubrication easy. The metal sleeves are fixed to the support posts with small bolts. ...That's more modern than the pegged construction of the wooden parts would suggest -- and it's also very cleverly thought out.
I'm not an expert in antiques; but I think the cleverly engineered wheel "improvements" point to a birthdate for this wheel of sometime in the late 19th or early 20th century -- but probably not before.
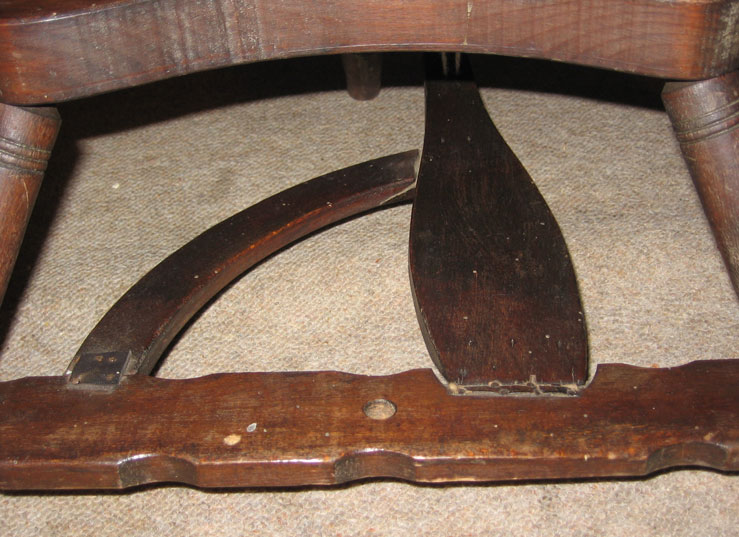
The next question, after age, involves the kind of "life" the wheel has led up until now. These are the marks I find so endearing in old wheels: varnish worn away by repeated touches of the hand; cuts made in the flyer by miles and miles of yarn; hollows in treadles made by a foot's patient pulsing....
Looking at this treadle, though (left), there's no evidence of a previous spinner's foot. One of the leather hinges has been replaced, the other is a bit stiff; but they're not worn. And the flyer (right) also is remarkably intact; there's some rust on the wires, but no strong visible history of use. The second flyer (with the broken arm) also shows no sign of heavy use; its break follows the wood grain and was probably caused by a bump or fall.
In any case, whatever else we might learn, one thing is sure: this old wheel is practically new!
It hasn't seen many rough times, either; its profile is smooth and straight (left), and even with its eased-to-comfort joints, the wheel runs true. There is a tiny amount of insect damage here and there (which will be treated); but the wooden adjustment screws, usually most vulnerable to insect attack, are clean and in perfect shape. Wherever it's been these past decades, this wheel has been indoors, clean and dry.
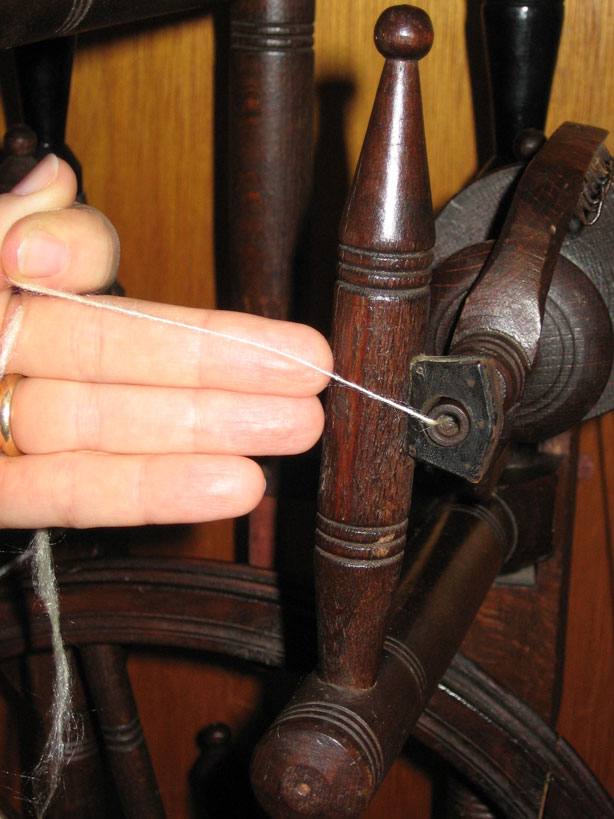
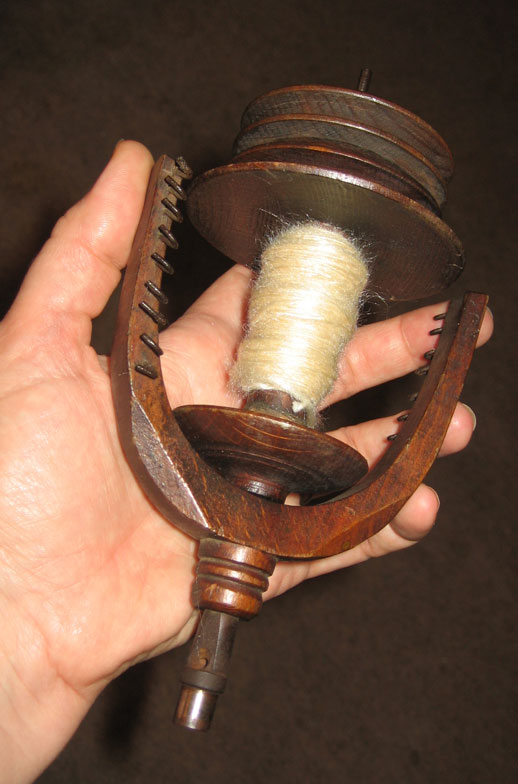
The wheel was designed for spinning line flax: those long, fine fibers used to make the smoothest, strongest linen yarns. The relatively low drive ratio is one clue (line spinning doesn't require a lot of twist), as is the tall, straight distaff.
The biggest clue, though, is in the size of the orifice (right). Its inside diameter measures less than 1/4 inch. That's the strongest indication possible that the wheel was intended for spinning line flax -- not tow, not sliver, but line. ...My fetch hooks are small, but I needed to make a special, tiny one before I could spin the first yarns on this wheel!

In its new corner, it's in good company (left) and awaits its next adventures: insect treatment, wax, and a new flyer.
...And on the subject of the flyer, one more clue has surfaced to indicate the origins of the wheel: the screw-threads on the spindle (where the whorl screws onto the flyer) are not metric -- so this wheel was likely made in North America (or possibly Britain), not continental Europe.
Post Script. I don't usually name my wheels. They tend to all go by some descriptive term, preceded by "the" -- as in: The Louet, The Red Wheel, The Morvan Wheel.... It's not a particularly clever naming system, but up until now it's worked for me.
This wheel had been named Emily by its previous owner. I can see why: the tidy lines of the wheel do seem quite feminine. (I'm even starting to think of it as "she".) The problem for me is that this wheel was made for production, not for sitting daintily in the parlor; and "Emily" seems intrinsically delicate, with a faint aura of violets and ruffled organza. I imagined myself making afternoon teas -- for the wheel.
Still, my old system clearly wasn't going to work: The Double-Flyer Wheel just isn't an appealing thing to say or think. So.... Sometimes you just have to do the right thing: the name has been shortened to "Em".
Em. Just Plain Em.
Like Auntie Em, or "M" (think Judi Dench), or the Divine Miss M.
She's a working girl!
07 May 2007
Jet lag can lead to unusual things. There's a nine-hour time difference between the place where I was at the start of the week and the place I am now -- so I'm sleeping at odd times, behaving a little strangely, and generally leading a not-as-usual life.
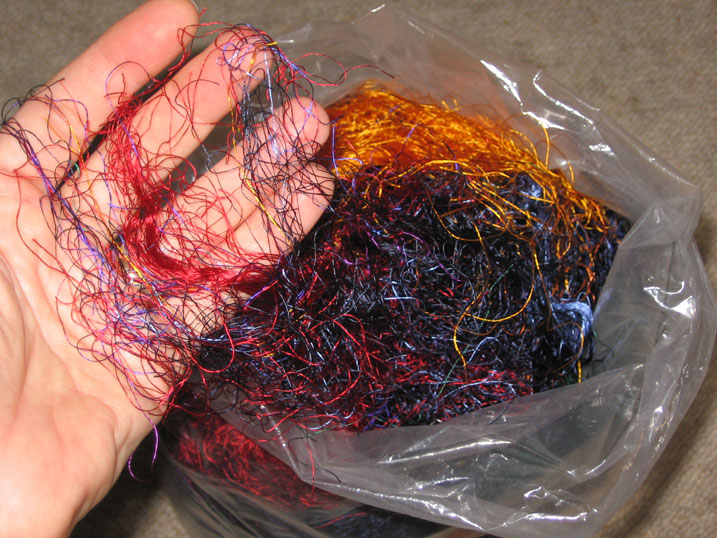
The oddest of this week's odd activities has been {gasp} "tidying up". That's something I've heard a lot about, but seldom seen.... Anyway, it turns out interesting things come to light when you do it -- and this bag of fine silk threads (left) was one of them.

These threads are all about 7 inches long, and they're so sleek and smooth that even when they're tangled they fall easily free of each other. They were purchased a few years ago: I'd been planning to card a small number of them together with some white Cheviot wool, hoping to make a pretty wool yarn with bright specks of color. ...And I did quite a bit of that blend, and it worked very well! (Click the cat to see a close-up of her blended batt.) The yarn turned out exactly as I'd hoped: lofty, soft, elastic, and flecked with color; but when I'd finished there was quite a lot of the silk left over. And it surfaced as I was prowling the living room at 3 a.m.
Of course I had to do something with it, now that it had come to light; and in my wobbly state of being, I decided to spin it "undiluted".
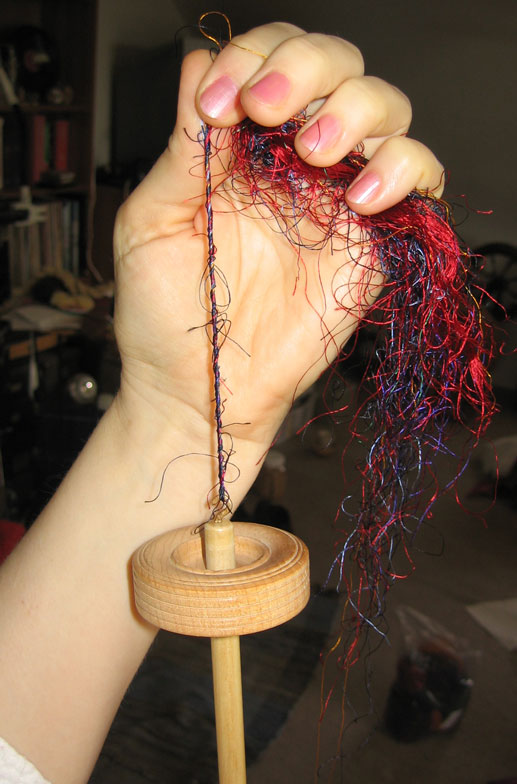
It was exactly what I needed to soothe my bleary mind! Grabbing a spindle, I went straight to work, bypassing any kind of fiber prep and spinning directly from a handful of the silk threads (left). The slickness of the threads was tricky, and it took serious concentration to keep the yarn from slipping apart abruptly. A substantial amount of twist needed to go into it to make a viable yarn. There were occasional snarls that forced me to stop and pick them apart; and each time I stopped, the partially-spun threads would rearrange themselves and slide into more comfortable positions.... But the colors were superb, and I liked it!
As a singles, the yarn is dense, firm, and cool, with little snarls and eyelashes sticking out of it. It also unfurls itself (read: untwists) as soon as it's released or set aside; so I decided to go ahead and ply it to itself straightaway, without messing around or waiting for a better time.
What a pleasure: as a 2-ply yarn, it's sublime. Its eyelashes are so soft that they're imperceptible against the skin (not tickly like the eyelashes on a synthetic yarn), and the yarn has a supple heaviness that I like very much.

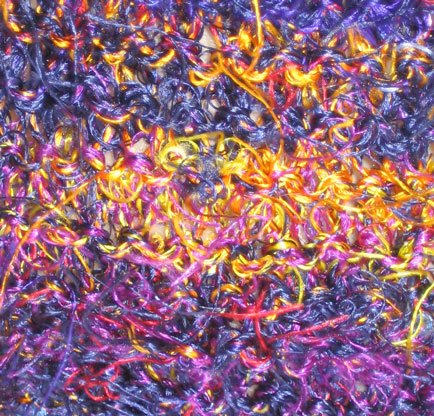
And of course once it was spun, I had to try it out (right). To my surprise and delight, it behaved beautifully both in the hand and on the needles! I'd expected -- I'm not sure what; but the yarn really was much nicer to work with than I'd thought it might be.
The overall feel of the sample swatch is so pleasing that I think it will keep going until it's scarf length; it's soft, supple, and dense, and I think it will drape beautifully over the shoulders.
 I must say, though, that when knitted this yarn doesn't show itself off quite as well as it could (left). To be really "showcased", I think it would work better as a high-texture stripe in a woven fabric, maybe even a series of narrow stripes at the cuffs of a jacket, or as vertical accents on a tailored vest.
So many projects, in so many time zones!
End notes, for inquiring minds
♦ The colorful silk threads are sold as "silk mill waste" by Fibrecrafts in Surrey, England (click here for more information). The colors available depend on what they have in stock at the moment; but silk being what it is, it's hard to go wrong.
♦ The spindle shown is one of the ones I make for my spinning classes. If you'd like one of your very own, they are available (click here for more information).
05 May 2007
I'm back from my travels, and someone lost no time in reminding me of the promise I made a month ago (a promise she obliged me to make):
Bast fibers. (purr, purr, purr)
Sisal. (purr, purr, purr)
Don't tell her, but I have been thinking about bast fibers lately, and despite all her nagging, plan to spend quite a bit of the next few months spinning those wonderful, tough plant fibers -- but I'll be spinning flax, not sisal. ...I insist that I made this decision completely on my own. ;-)
For a while now I've been hungering to weave some handspun linen -- elegant, fine stuff, suitable for napkins and "nicer" table linens. There's a long tradition of beautiful and simple weave structures that would be heart-stoppingly lovely woven of smooth, fine handspun linen singles. (Even the words sound nice, don't they?)
The thing is, fine linen yarn takes a long time to spin. By the yard, when you're looking at the yarn on the bobbin, it's not so bad; but when you consider the amount of fine yarn contained in a yard of weaving, it can shake you to your foundations. My current wheels are good, and one especially is well-suited for spinning fine linen; but to pursue this kind of weaving I need to be more seriously productive than I've ever been in spinning flax.
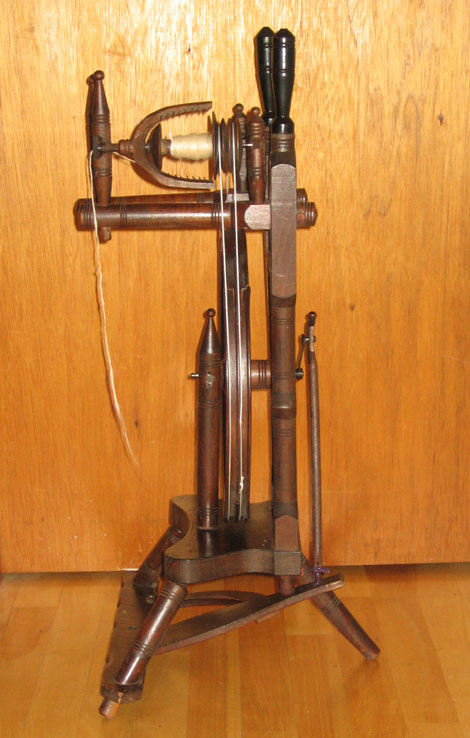
And so began my quest for a double-flyer wheel.
After many dead ends and false starts -- guess what followed me home??
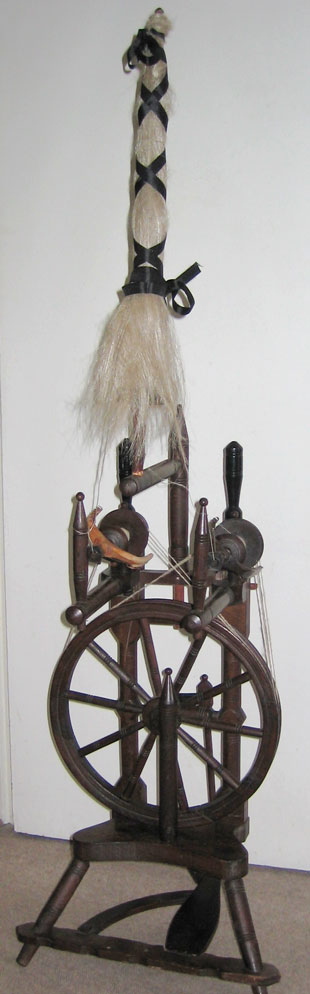
This wheel (right) is a double-flyer wheel (though sharp eyes will see it's set up with just one flyer in the photo). It was complete, all parts accounted for; but one of its original flyers had a broken arm. You'll be seeing more of this wheel as it gets buffed, polished, and cajoled into shape over the next few weeks....
When I was learning to spin and first came across double-flyer wheels, I was told they were "gossip wheels", created so that two people could spin on the same wheel at the same time. That's an appealing idea: to be sitting close to a friend and spinning together from a shared distaff as just one of you runs the treadle.
Thinking about it practically, though, such an undertaking would be very awkward; and as I've gotten more experienced (and seen more wheels), I've come to dismiss this idea as very pretty, but not realistic. ...The spacing of the flyers on this wheel (and on others I've seen) bears that out: the distance between the two orifices is quite a bit narrower than my shoulders -- comfortable for one person, much too crowded for two.
Double-flyer wheels enjoyed a bloom of popularity in the 18th and 19th centuries in Europe. Documents from that period bear witness that these wheels were made to be used by a single spinner, as a way to make yarn more quickly -- and thereby increase the family income. With a distaff dressed with long flax fibers positioned in the center, the spinner could spin with both hands: one hand for each flyer. Spinning in that way wouldn't actually double the output for any given spinning session, but it would increase it significantly.
I'm going to learn to do that. :-)
Return to top of page
Return to the Now spinning page