The archives
Return to the
Archive directory
Return to the
Now spinning
page
Explorations - Winter into Spring 2012
10 February 2012
The proof
When you're honing a technique, or trying to teach your old-dog self new tricks, it's important to prove that the technique you're honing actually works -- repeatedly.
And so it was that I decided to dye more hankies in the microwave, just to be sure that I'd really, truly "got" it.
You can see that I'm fond of multi-coloured hankies. They're amusing, interesting, nice to work with, energizing --
 and you can never completely be sure what kind of multi-coloured yarn they're going to give you. If you change the colourway just a little bit, you've changed everything.
Dyeing hankies as I've done these past several batches, with a splash of colour in the center, another around it, and a third like a frame running all around the outer edges, it's the outermost colour that dominates the yarn. The colours in the middle appear in the yarn as highlights, as suggestions of other thought patterns, as surprising turns of events -- brief, but significant.
I find it endlessly fascinating. :-)
07 February 2012
Cold days - so it's back to the kitchen!
The wind is coming from Siberia. (No, really, it's true!) The snow makes the days bright, and the now-clear skies keep them cold.
Indoors, the heaters are radiating happily, and soup burbles on the stove. What better time to try my hand at microwave dyeing (again)?
This time I planned to be more methodical. I decided to increase the quantity of vinegar in the pre-soaking bath, to be a little more careful in arranging the hankies in the dish, and to be more painstaking in applying dye to each layer. With those objectives in mind, the new experiment began....
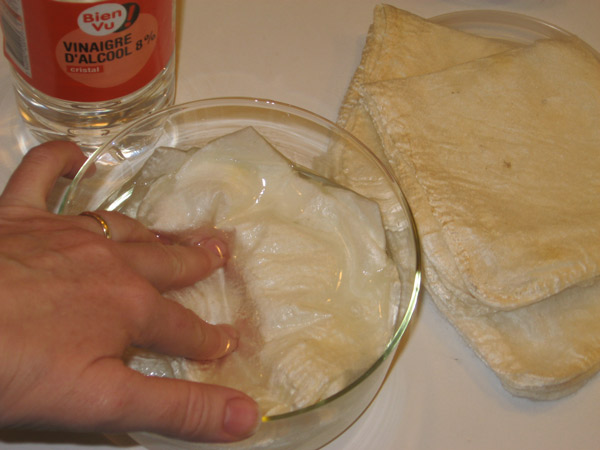
The process began, as before, with a "pre-soak" (right). The hankies were folded in quarters to fit the dish and submerged in a solution of vinegar and water: one part vinegar and two parts water. As before, I decided the batch size would be five hankies (for easy comparison with earlier batches).
At first, the hankies resisted the soaking liquid, especially along their edges; but after about fifteen minutes they were obviously wetted clear through.

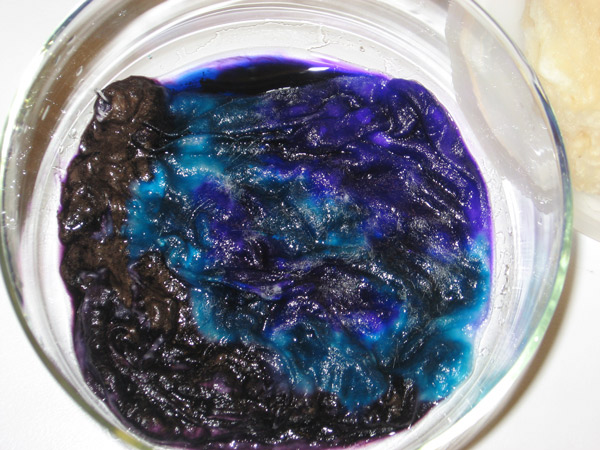
When the hankies were clearly saturated, I lifted them out of the solution, squeezed them to remove excess liquid (but making sure they were still almost-drippy wet), and poured most of the liquid out of the pyrex dish -- keeping just enough liquid in it to cover the bottom of the dish. I laid the first hankie flat in the dish, patted it into place, drizzled dye onto it, then repeatedly poked it with a chopstick to remove bubbles and encourage the dye to flow through the hankie (left).
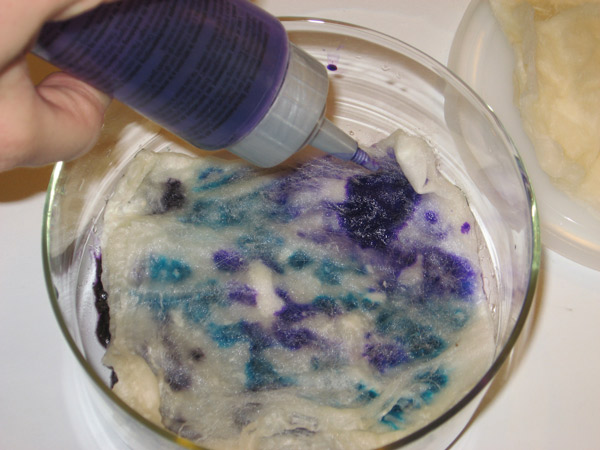
When there were no more visible bubbles, the "poking" step was over, and it was time to lay a second hankie on top of the first. I then drizzled dye onto it, following the same colour patterns I'd used for the first hankie (right). The patterns show clearly through the new hankie layer, making the task easy.
Again, after applying the dye solution, I poked the hankie repeatedly with a chopstick. Poke, poke, poke, poke, poke.
 You may feel a little silly doing this poking, but I'm convinced it makes all the difference in the world for good dye penetration. You can actually see how the dye is flowing through the hankies as the layers build up (left).
Keep adding layers of hankies, drizzling dye onto each layer and poking it until it's bubble-free. When you've placed the final hankie, added dye and poked it repeatedly, the dish is ready for the microwave (right). Make sure you can see some liquid around the hankies in the dish. In the microwave, a little extra liquid is a good thing!
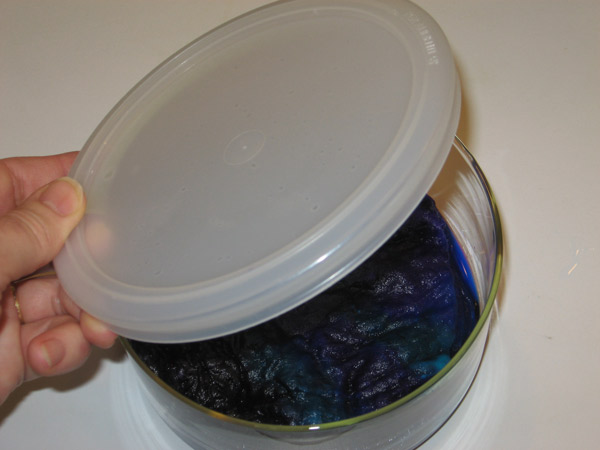
Some people cover the dish with cling film at this point -- but I dislike handling hot cling film, so I prefer to simply lay a plastic lid on top of the dish. I set it at a slight angle so the dish won't seal itself as it heats up. The lid on top of the dish will protect the oven (and the dyer!) from unwelcome splashes -- but an actual seal is not necessary.
Microwave ovens vary a lot, so it's hard to predict just how much time will be "enough". In our oven I gave the dye dish 2 minutes at full power, then pulled the dish out to check the progress.
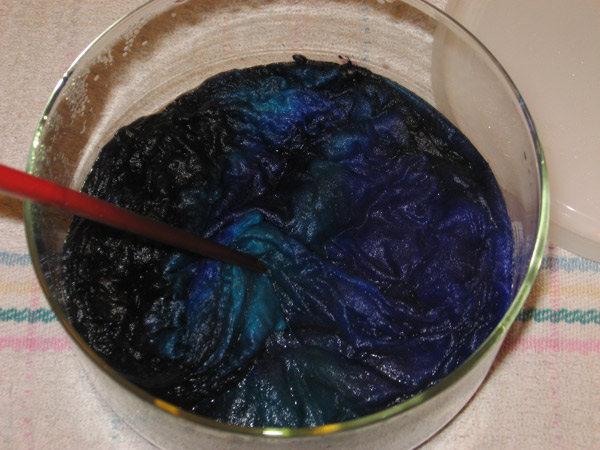
There are good reasons to pull the dye dish out and check it partway through the process. First, you'll get a clear idea of the temperature of the dye batch (at this point, my batch was hot, but not yet boiling). Second, you have the chance to peek between the layers of hankies by prodding them with a chopstick (left), which will let you know for sure whether or not you've used enough dye solution. If you see unwanted white areas, this is your last chance (in this batch) to fix them.
When all looks good in the dye dish, return it to the microwave, set the lid loosely on top of it, and microwave it for an additional minute or two. Stand near the oven and watch the dye dish as this time unfolds. If you see the liquid starting to boil (it will look like the pile of hankies is swelling), interrupt the microwaving. The job is done.
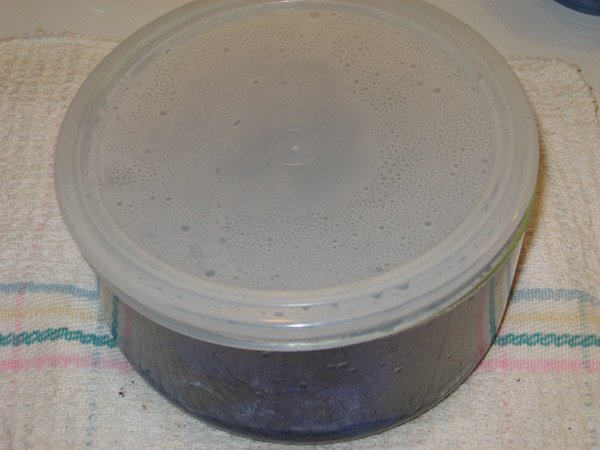
Remove the dish from the microwave (use oven mitts -- it will be very hot!) and set it aside to cool on its own, with its lid set lightly on top. The lid will slow the cooling a little, which is good: it allows the dyeing process to finish itself in an orderly way. By the time the dish has completely cooled, there should be no more colour in the liquid around the hankies.
It was very hard for me to wait until the dye dish was cool. Very hard. I'd been so disappointed with my first batch of microwave-dyed hankies that I wanted to see how this one had turned out -- especially as it had looked so very promising all the way through the process. The clock moved slowly. The dish was taking Forever to cool!

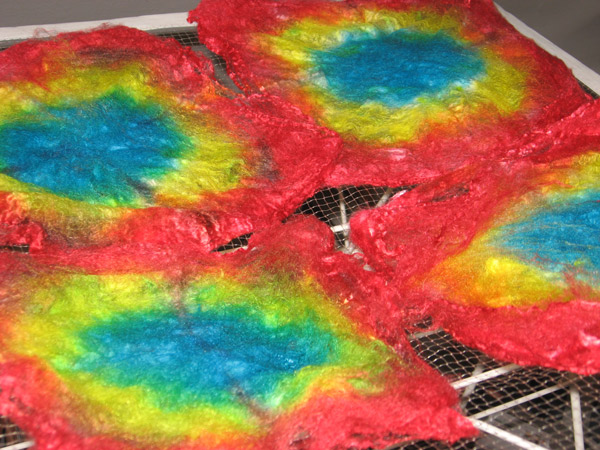
Finally, though, the dish was at room temperature -- so I washed the hankies (using a soap I knew would remove any unfixed dye), rinsed them thoroughly, and opened them up... with pleasure!
This was a satisfying result, indeed! The dye penetration was good, the colours are clear, with just enough blending between colour zones to delight the eye -- in fact, I didn't find anything in this dye batch to be unhappy about! The photo (left) gives the impression that there are varying intensities of colour in the batch, but that's an illusion caused by the camera's flash -- in real life, the five hankies are a matched set.
Of all the variables at play, I think the concentration of vinegar was probably the most important. The dyes definitely attached themselves to the fibre more completely in this batch than they had in the first one. I'll have to do a few more batches to prove to myself that this series of steps is really reliable -- but it looks quite promising to me. :-)
So, you may ask, am I now a convert to dyeing by microwave?? ...Probably not. It's still more fiddly than dyeing in the big dyepot, and it still requires more dye solution (and more vinegar!) than the stovetop method.
But it's another technique, among the many -- and it's good to understand it!
04 February 2012
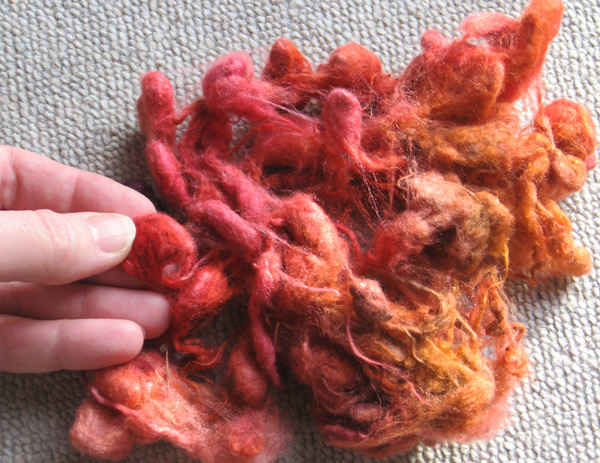
Spinning hankies
They're too pretty. I can't just roll them up and tuck them away in the stash. I mean, look at them! Even with the colour shifted by my camera, they're downright glorious.
Who could possibly resist????
"Not I," I said, pulling out my medium-sized spindle and setting the hankies where I could reach them. (And then, in my best Little Red Hen voice, I replied, "So I guess I'll have to spin them myself!") O Happy Day.
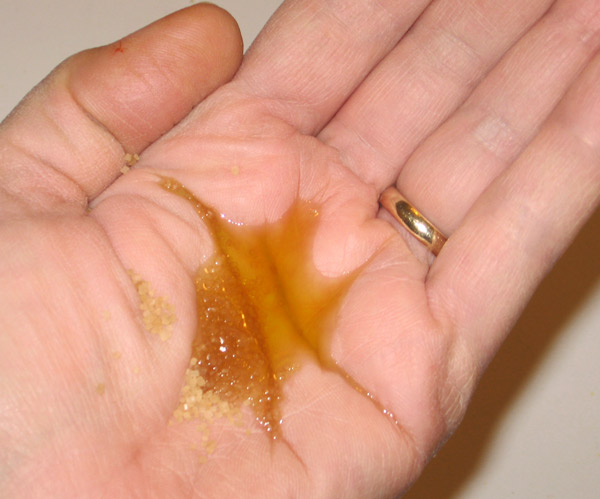
One of the first things any of us notices when handling silk hankies is how amazingly rough our hands are. Even smooth hands will snag the little filaments of silk. Therefore, the first step in spinning hankies is to Prepare The Hands (right). This is not a great photo, but if you click on it, you'll see an enlargement with more detail....
What you see here is a tried-and-true method for getting your hands very, very smooth. It's messy, so is best done near the kitchen sink. It works like this: pour a small amount (maybe 1/2 teaspoon) of olive oil into the palm of your hand, then add a little bit (maybe 1/4 teaspoon) of granulated sugar (the photo shows pale brown granulated sugar, but white sugar works just as well). Now make hand-washing movements with this unlikely mixture, gently rubbing the oil and sugar all over your hands, front and back and fingertips. Do it a little longer than you think is really necessary -- then rinse your hands with water (but don't wash them!) and dry them on a paper towel.
The sugar crystals act as an abrasive that doesn't harm your skin in the scrubbing process. The oil acts as oil. ;-)
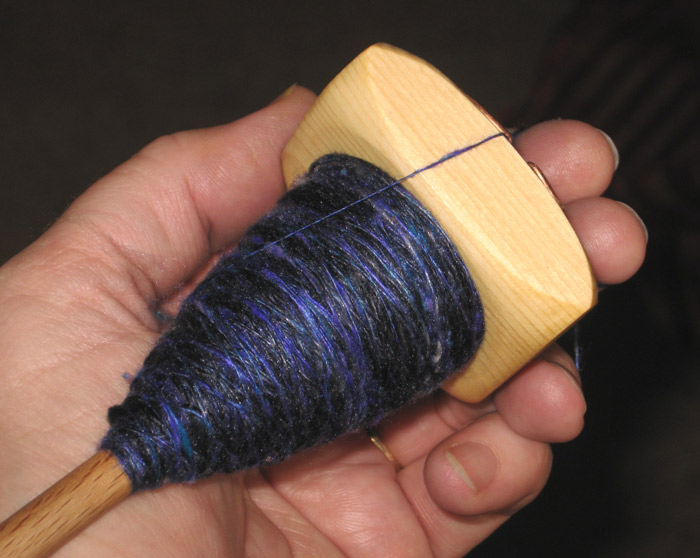
I didn't take pictures of the spinning process itself, but it was a pure delight. (I love spinning hankies!) First, you peel off a gossamer layer of silk, then join a corner of it to the yarn already forming on the spindle... and the twist enters the lovely, long drafting zone... and the world becomes a splendid place.
This view (left) shows the singles-in-progress after spinning about two hankies' worth of silk. The hankies were space-dyed, and this photo shows a section with quite a bit of Navy -- but I love the gleam of the other colours peeking through!
Hankie yarn always has more texture than you'd expect in a yarn spun from other preparations of silk -- but that's part of the charm. A certain number of nubs and bumps can add a lot of interest to the yarn, and the parts where the filaments run nearly parallel are heartbreakingly shiny!
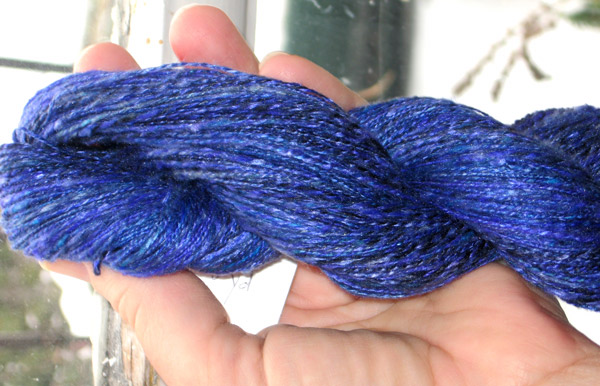
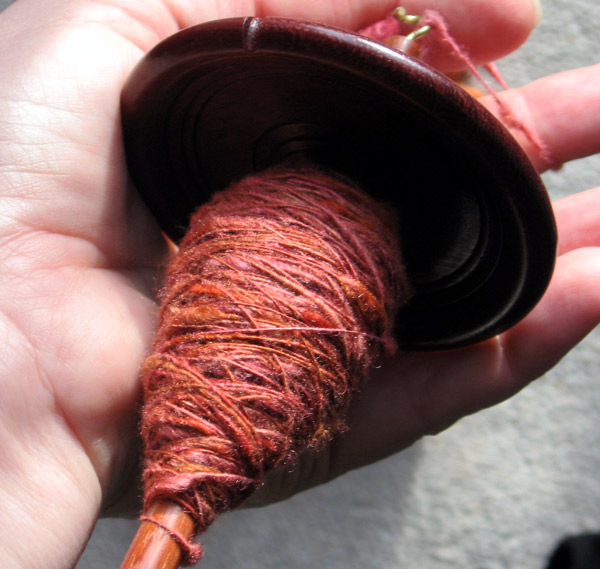
After spinning four hankies' worth of singles, I decided I was ready to ply -- and so I did. The result (shown after washing, right) is 129 yards of two-ply: etherially light, with a sheen (and colour depth) that doesn't really show in the photo, and I'm now quite eager to see it woven into cloth....
The postscript brings a sour note into all this rapture, but in the interest of Full Disclosure I don't want to leave it out.... The hankies making up this first skein of yarn came from the batch dyed in the microwave. Some of the colour moved onto my fingertips during spinning (left).
Granted, that's not a lot of colour, given that it happened over a full evening of spinning (I've experienced worse from some commercial preparations!) -- but it pokes me right in one of my pet peeves. A good dye job stays where it's been put. Dye that transfers onto your fingers is ba-aa-aa-ad.
It shows that some of the dye (notably Navy) didn't get properly fixed onto the fibre during the dye process. There could be several reasons for this. Was there not enough heat? or a too-short cooking cycle? Was it a shortage of vinegar? Was it simply inadequate washing (though I was certain I'd washed it thoroughly)?
Clearly, now I need to do more microwave dyeing to find out....
31 January 2012
The lure of "easy" dyeing
This is a story for which there are (so far) no pictures. The words will have to do their work without help.
I do almost all my dyeing in a satisfyingly big dye pot on top of the stove. The process uses quite a bit of water and more than a little time, but because I know how to control the results, that doesn't bother me.
Still, for years now I've been hearing people talk with excitement and fervour about dyeing in the microwave. Here are the wonderful claims I've heard and read (various sources, various times):
(1) Dyeing in the microwave is fast.
(2) Dyeing in the microwave is tidy, because you use small containers.
(3) Space-dyeing in the microwave is easy to control.
(4) Dyeing in the microwave is economical.
A couple of days ago I space-dyed five silk hankies in my normal stove-top way (scroll down a ways to read the description -- with pictures). Today I decided to try the microwave method, just to compare.
Here goes!
I pre-soaked another five hankies in vinegar and water, as usual, then started arranging them in a pyrex dish. �I put a bit of dye in the bottom of the dish, placed a hankie on it like a blotter, then arranged the other hankies in layers on top, adding dye solution and poking and prodding to get rid of bubbles. �Zapped for 2 minutes -- then took it out and took a peek.
That was the first moment of disappointment. Bad, bad dye penetration! �So I added more dye, poked and prodded and rearranged some more, then zapped the dish for another 2 minutes. �From what I could see, it looked pretty good, so I let it cool in the dish, then washed the hankies.
The result?? �Not the best one could wish. �There was pretty much no dye migration, so three of the hankies looked tie-dyed with distinct colour zones and white streaks punctuating the areas of colour. �The remaining two hankies had such poor dye penetration that I decided I would have to overdye them. :-P
(My disappointment and disgust are the reasons we have no photos today.)
So, you may ask, what about those nice benefits of microwave dyeing?? ...The operation used more dye solution than dyeing in the pot had used, plus it was messier, because my dyeing squirt bottles "burp" when you turn them upright after dosing out some dye, and the modest pyrex container wasn't big enough to catch the droplets. �(That's worth at least ten demerits -- I strongly dislike making a dye mess!) In addition, with all the extra massaging and prodding and poking, I ended up spending more hands-on time with the microwave dyepot than with the stovetop dyepot -- so even though the cooking time was shorter with the microwave, there wasn't any real time savings.
In short, with regard to the benefits listed above, the conclusive results were: No, No, No and No. And just in case I didn't get the message, the colour results were far from spectacular.
Today's experiment did not transform me into a fan of dyeing in the microwave. ...It did, however, prove to me that space-dyeing in the big stovetop pot is actually an efficient way to go!
That said -- I suspect if I were more diligent in my approach to microwave dyeing, the results would be better. Because of that, I'll probably do it again. And again. Until I get it right.
It's still winter, after all -- the season for honing our skills!
27 January 2012
Another show, another cold

I've just returned from England, where I had a nice visit with my friend Joan and joined her in the FLEWS booth at the Creative Crafts Show in Esher, Surrey.
My return is marked by a cold. More specifically: bronchitis. Much coughing, ghastly wheezing and no voice. :-P
It's a virus. There's nothing to do but wait it out, drink gallons of tea, nap as much as possible, stay warm... and dye!
Hankies have been on my mind lately. I'm talking about silk, of course -- not the delicate woven treasures from the dresser drawer, nor the crumpled paper variety.
 Silk hankies: stretched cocoons. Long fibres, high sheen, fascinating texture. Yum. Double-yum. Few things are more willing to take on beautiful, rich, resonant, deliciously deep colours in the dyepot. :-)
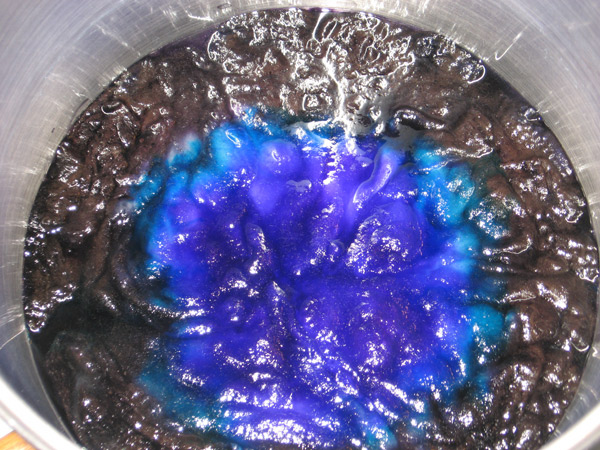
For some time now I've wanted to make a scarf woven from hankie-silk, and something about late January set me dreaming of ripples of purple and navy, with the occasional touch of turquoise. So that's what I put in the dyepot (right). (Unfortunately my camera doesn't "do" these colours very well. That dyebath actually showed a centre of vivid purple outlined in turquoise, with deep navy all around the edges.)
I was playing, dyeing silk just for me, so I neglected to take photos of the whole process. Here's the basic operation:
(1) Pre-soak five silk hankies in a shallow bath of vinegar and water.
(2) Pull the hankies out of the soak and arrange them in the pot.
(3) Pour in just enough soaking liquid to get everything sloppy wet.
(4) Dribble dye solution onto the hankies and prod them to get rid of bubbles.
(5) Simmer the pot for 30 minutes.
(6) Let the hankies cool in the bath, then
(7) Rinse, wash, and spread out to dry.
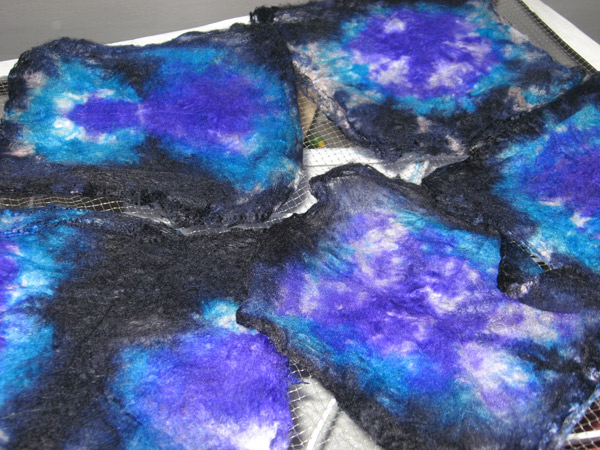
They're quite pretty! I enjoy space-dyeing in the big dyepot, because it gives nice control over where the dye goes and lets the colours blend prettily -- and as long as the liquid in the bath remains shallow, there's never too much colour migration... and the pot cools down quickly.
I folded all the hankies in this dye batch into little wedges, and as a result there are some interesting "tie-dye" marks in white -- places where the folds in the hankies kept the dye from penetrating. I rather like that. It will make for little gleams of light in the spun yarn.
And what comes next??? Once these hankies have dried, I imagine I'll be spinning! They're very tempting, even damp. :-)
10 January 2012
Reflections of last summer
When winter weather settles in like a dark blanket, it's nice to bask in thoughts of summer. The scent of sun-warmed flowers is hard to conjure in January, but thoughts of friendship and nice times past can brighten the dark days almost as well.
Fibre folk are lovely people. Vendors at conferences have ready smiles and a nice sense of the absurd (left). Friendships spring up when you least expect them... and they last.
Last summer's ANWG conference (the Association of Northwest Guilds) took place in Salem, Oregon, and it was a great chance to get back in touch with a lot of fibre friends. I was working in the Vendor Hall with my friend Shirley and her husband, Peter, and we visited with most of the people there -- both vendors and attendees.
There were some surprises. :-)
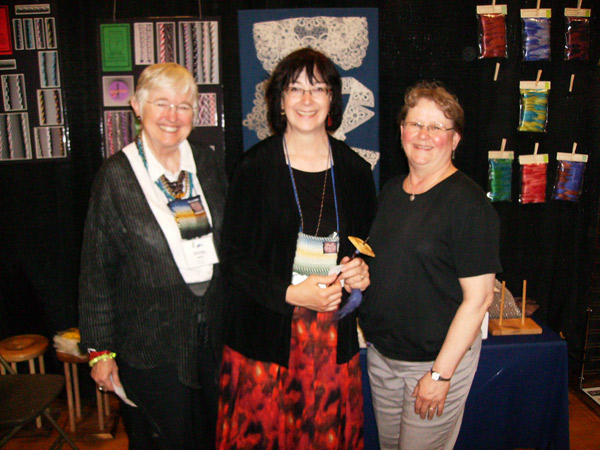
When I'm in the Pacific Northwest there are always people I want to call or see -- usually more than my calendar will allow. Last summer I knew I'd be in Salem and really wanted to get in touch with Connie and Steve of the SpindleWood Company -- they're located in Monmouth, a nice town not too far away....
To my great delight, Connie found me! Here we are (right), Shirley, me and Connie -- and in the photo I'm holding one of the reasons that we're all smiling so happily.
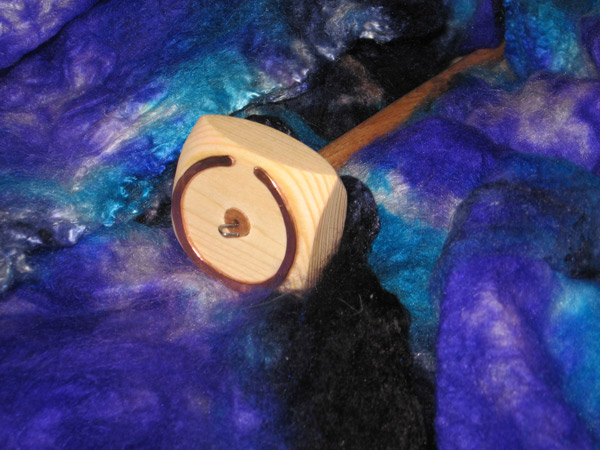
Here's a full-face view of the lovely, lovely happy-maker (left). Isn't it beautiful?? It was a complete surprise, ordered especially for me by my good spindle-spinning friend in Germany (thank you, my friend!). Like all SpindleWood spindles, it's absolutely flawless.
In the hand, the wood finish is like satin. The whorl on this spindle is irresistibly smooth -- it's impossible to hold it without running your fingertips around and around that lovely circular track on top. I don't know that I've ever encountered such a touchable spindle.

The tapered shaft is smooth and beautifully shaped (click on the photo, right, to see the elegant detail). Touching the spindle to launch it into motion or to wind on is an unending delight -- just delicious!
And, of course, it's perfect for silk. :-) It spins smoothly, steadily and naturally at the optimal speed, with enough weight to be stable, enough momentum to spin without interruption, impeccable balance -- lovely, lovely, lovely.
The best part, though, is the friendship that goes into every part of it: the relationship of the maker and the wood, the reciprocal respect of those who do things with their hands, a shared delight in excellence, the pleasure of giving pleasure.
I spin with gratitude and heart-warming appreciation.
If that's not the best way to dispel the winter blues, I don't know what is.
End notes, for inquiring minds
♦ The SpindleWood Company has a website (here) where you can learn more about Steve and Connie, their beautiful spindles, their nostepinnes, and much more.
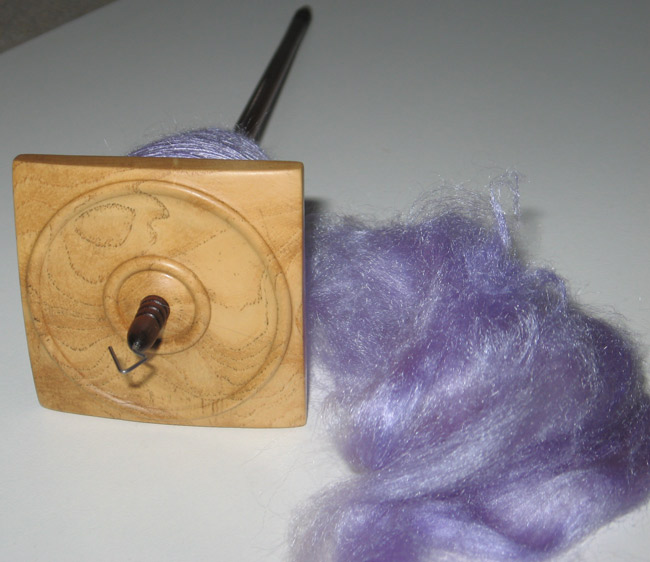
♦ The silks appearing in the spindle photos are all tussah, dyed in my kitchen. The first is Lilac; the second is a lovely grey-green that I call North Sea. Lilac is available on the Silk Fibre page, and North Sea will appear there also -- as soon as I convince myself it really is a repeatable colour.
07 January 2012
The 13th day of Christmas
Sometimes you find yourself in a state of Grace. You don't know why, you can't be sure just how it started -- it simply is, and you're in the middle of it, and everything is very, very right.
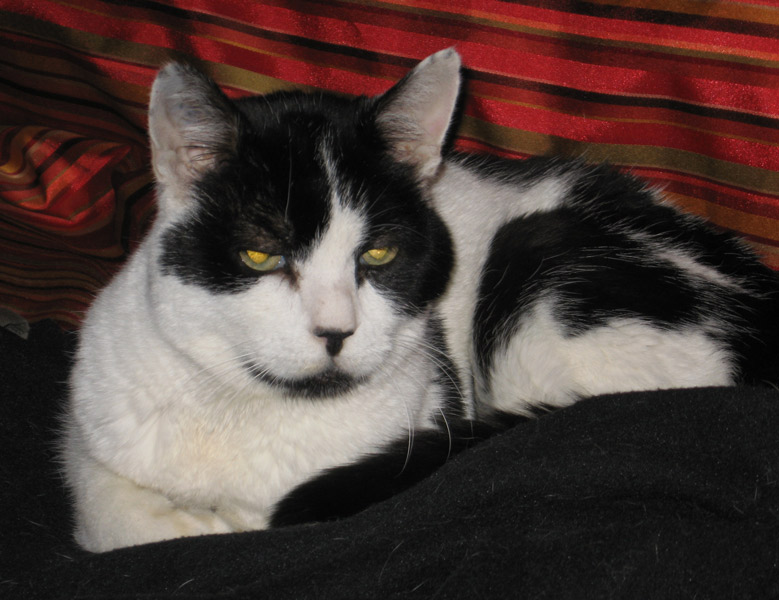
When Big Guy (the miracle cat) moved in with us just over a year ago, we were sure we were doing kitty hospice. He'd been an outdoor cat for 19 years. He was old and sick. He had FIV, was missing most of his teeth, had a dull coat and couldn't hear. He was a nice cat, though, and he'd had a pretty rough time living outside. We figured that if we could make his final month or two comfortable, it would be well worth it.

He embraced apartment life with gusto. Everything about it suited him: the soft chairs, the new cat food, the conversations, even the other cat (who took her time about it but finally decided he was all right). My husband (already a big fan) announced after less than a week that Big Guy was "the most huggable cat who ever lived".
Big Guy was a social animal and rapidly worked his way right into our hearts. In the mornings he was my constant companion: kitchen, laundry, dyepots, office -- it was all good. He followed the visual arts, gazing at screensavers, watching films, enjoying sports on TV. He was exceptionally fond of weaving. He was Internet-savvy and engaged in light programming. He loved travel and thoroughly enjoyed our brief vacation in September, standing up tall to marvel in fascination as scenery slipped quickly past the car windows. What we did, he did. What he did, we did.
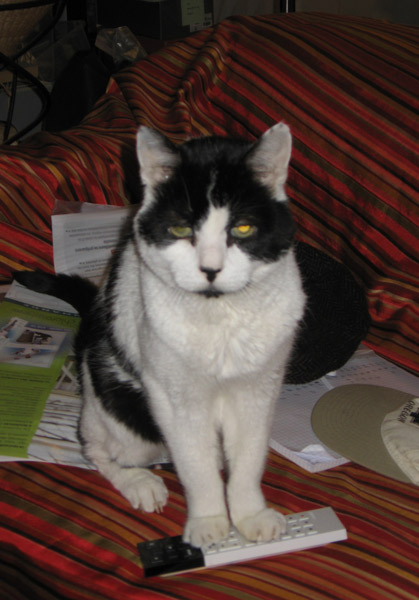
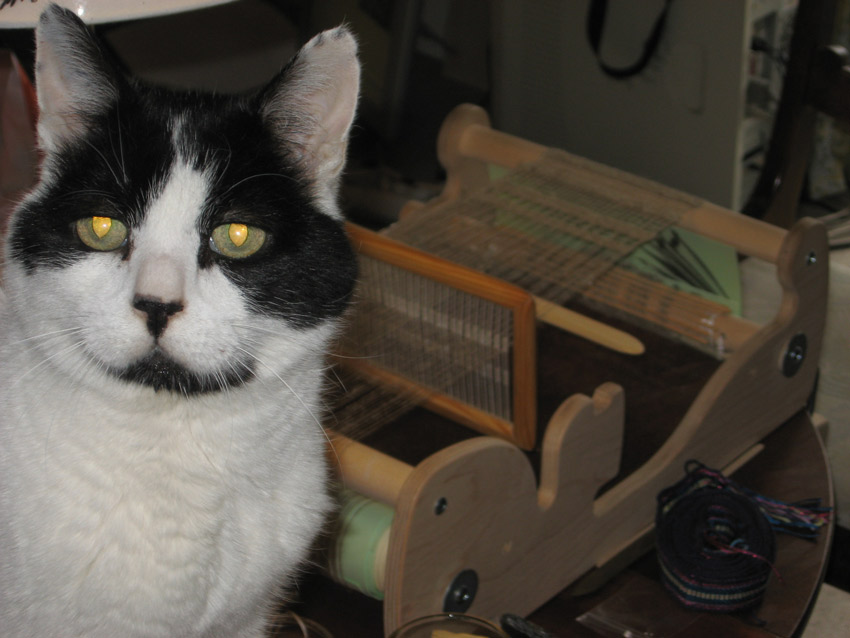
In the evenings he enjoyed proving he was "All Guy" by zapping through channels with the TV remote (left). He got such pleasure from it that no one ever complained.
He'd been young and wild when we first met him nearly 20 years ago. He moved in with us when the light was dimming and the world was covered in snow. He generously rewarded us with a full year of his calm, patient sweetness and his Yul Brynner walk.
We learned a lot from this big sweetheart. Family. Love. That's what's important. A state of grace.
Good night, sweet prince;
And flocks of angels sing thee to thy rest.
03 January 2012
The new-born year opens its eyes
A new year is full of promise. It's like a fresh notebook: all the pages are clean and crisp, and who knows what marvels they may eventually contain? Anything's possible!
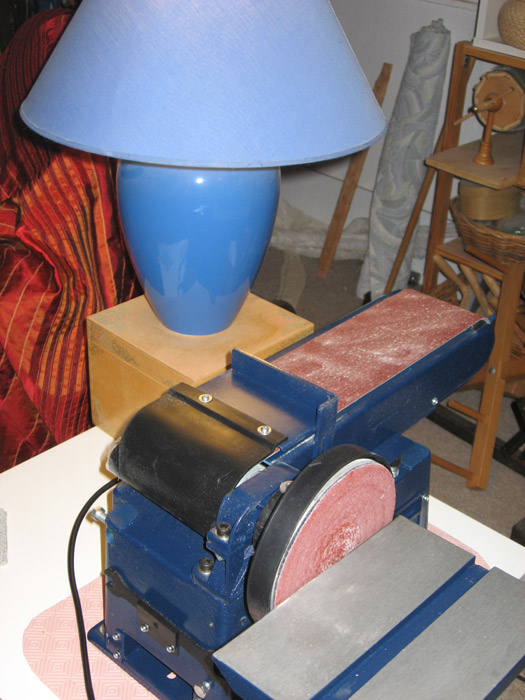
My new year begins with a touch of redecoration (left).
I understand that most people don't have a belt-and-disc sander in the living room -- but I now do, and it makes me happy the same way a fresh notebook does. Many good things will come of this. Most importantly, the process of making new spindles will get easier.
The new Squared Circle spindles are more popular than I'd imagined they would be, and much to my surprise, I needed to make my Making process more efficient. Rather desperately.

(Isn't that grand??)
Meanwhile, in another part of the apartment, a different kind of work is afoot (right). This is another Crackle weave structure, arranged in patterns of stars and trees. Here in the dark of winter, I wanted to combine strong contrast with a hint of sparkle -- so on the ecru warp, two pattern wefts work together: ultra-deep navy and black with twinkly lurex. They combine to act as one thick yarn and bring out their pattern lines with firmness and texture.
The sharp-eyed reader will notice that on the loom, the weaving shows visible reed marks. They are much more pronounced in the body of the cloth than they were in the header, which I'd woven with finer wefts. Unfortunately, the marks don't all disappear in the wash. ...Since taking this photo I've started alternating pattern picks with tabby, inserting a fine weft shot between each thick shot of pattern; and it looks as though that will help.
On the loom, the sparkle is amazing. I know it comes from one of the weft threads; but it seems to hover above the web, shifting as I change position, gleaming like light on ice crystals. It's a lovely effect, very difficult to photograph -- but you can get an idea with the photo at left.
And what will this be, this length of cloth patterned with ultra-deep navy and sparkles?? It was a web without a purpose when I started -- but now I think it will be a table runner. The cloth is rather heavy and not suitable for a garment, and though it could be pressed into service as cushion covers, I think it would be much nicer as a length of pattern cascading end-to-end on the dining table.
In any case, it's absolutely wonderful to be weaving again -- full-width cloth, not just bands! More woven projects will follow as the winter progresses. I won't be stopping -- it's too perfect a pleasure, watching patterns form under my hands. :-)
30 December 2011
New Year's Eve Eve

The year 2011 is taking its last waltz across the calendar page, and my thoughts turn to weaving and spinning, present and future.
Even though this website has been quiet pretty much all year, my workspace has been groping its way toward order and light -- timidly, but with a patient steadiness. As I tame each little zone of chaos, a sensation of Plenty wraps its fuzzy arms around me.
I have a pretty incredible stash. :-)
(For the sake of truthfulness, let me quickly point out that chaos still has the upper hand around here. The pools of orderliness are small -- but I can see them, all shining with potential.)
One little zone of chaos stubbornly resisted my efforts to tame it. Its focus was a mixed bag of silk fibres, all dyed in beautiful colours, all quirky, all purchased because I desperately wanted to be at home spinning (instead of "away" -- if you've ever spent considerable time on the road you'll know what this is like),
 and also because I was hungry for texture and knew these silks would deliver it.
After shifting the bag from Point A to Point B and back again, I finally concluded the best way to deal with the stuff was to spin it!
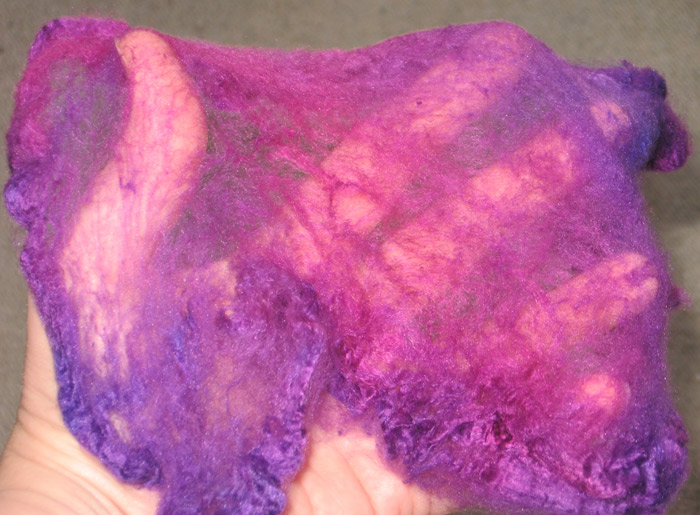
The dyed hankies (right) were the first to come out of the bag. They're a strong purple mixed with an opinionated pink. They'd been dyed in a large batch, so their edges weren't as distinct as hankie edges sometimes are; but they could still be pulled into layers, as you can see in the photo.
Spinning hankies is a treat. My favourite way is to spin them with a medium-weight spindle -- it's fast enough to be satisfying, but slow enough so your hands don't get tired as you pull the long fibres out into an amazing, elongated, beautiful drafting zone. This time, alas, I grabbed a rather heavy spindle for the job -- and spinning was less than the joy-filled experience I'd imagined. That's a shame. Silk is made for total pleasure. Something clearly had to be done....
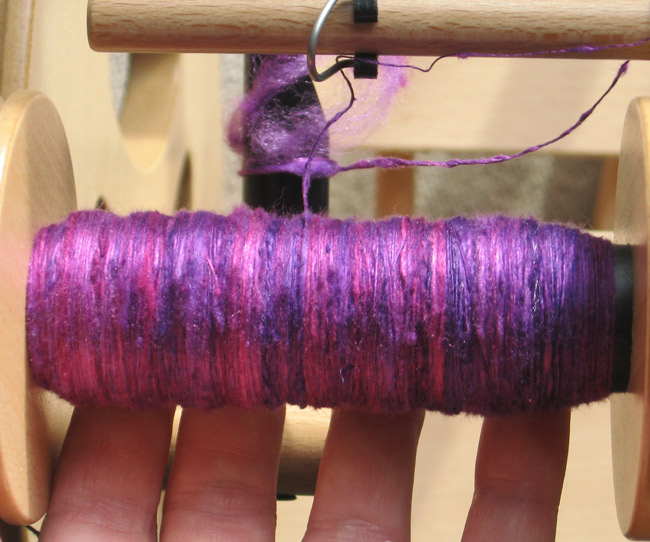
After transferring the yarn onto the bobbin of a wheel (left), the world became a better place. ...And I love the yarn!
Yarn spun from silk hankies is very hard to photograph. It has bumps and matte areas, and it also has lengths and lengths of high-sheen magic. Those lovely variations and contrasts delight the eye, but the camera seems oblivious to their charms. If you click on the photo for a bigger view, you can at least get a sense of this yarn. High sheen, yes. Occasional matte nubbles, yes. It's really amazing.
Next to come out of the bag?? Dyed cocoons (right). They may look messy, but they're really quite interesting. They were degummed (and divested of their pupae!), then dyed in a batch, where they tangled themselves in stray fibres from other cocoons and took on colour in varying intensities.
If you lift a handful, you get a long mass of them. They hang together like elements of an incredible boa, all silk bobbles and knots.
I found them irresistible and bought masses in three colours: red-orange, a rich bordeaux, and a foresty green. They're fun just to touch -- but it turns out they spin pretty well, too!
If you think about hankies and caps, they're nothing but stretched cocoons -- so (I figured), why not take cocoons themselves and stretch them as part of the drafting process? If they're degummed, it should work.... And it does (left).
A medium-weight spindle is perfect for the job. Drafting-and-stretching requires careful attention, because some of the fibres on the outsides of the cocoons (and on their innermost surfaces) are short -- so the fibres available to you range from spitwad-like neps to short tangles to long (incredibly long) mats. They do draft, though -- and the yarn is very pleasing!
This yarn has less of a sheen than the hankie yarn, but it is strong and has a lovely texture. It's lightweight and pleasant to touch. It may end up being woven -- it, and its nubbly silken siblings. ;-)
End notes, for inquiring minds
♦ The silks shown here (both hankies and cocoons) were dyed by Jean Oliver, a master dyer living in the north of England. Trading as Oliver Twists, she and her company attend a number of shows as vendors and also do mail order. She has no website, but you can click here for contact information and descriptions of her work.
♦ The spindle shown above was made by Ken Ledbetter, a well-respected spindle maker in the States, and purchased from the Handweavers Studio in London. Click here to see the Handweavers' catalogue and learn more about their shop. They're something of a legend in the UK -- not just a valuable supplier, but also an excellent resource centre.
24 December 2011
Christmas Eve -- in a flaxen mood
Happy Christmas, everyone!
It's a quiet day here, and the house is filled with the smell of ginger cookies. :-) The sky is grey, but not too dark, and the temperature is cool without being cold. The heaters are all working just fine. All is well. ...In short, it's a perfect day for more reflection.
Big Guy (the miracle cat!) has spent a good amount of this year working diligently as my weaving supervisor. He's more interested in his heating pad just now -- but he was recently in charge of a linen project, which you can see in the background of this action shot (left).
This was back when the weather was a good deal warmer than it is now. It started with flax, a spindle and a waterpot; but by the time I'd decided what I wanted to do with the yarn, it had become a spinning-wheel and loom project as well.
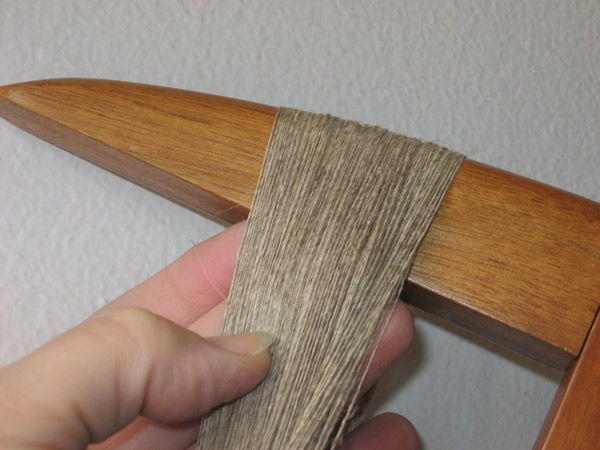
The linen singles (right) seemed like the perfect material for an airy, lacey band. Never mind that it had been spun from flax roving (which I have lots of) instead of flax line (which I prefer!) -- it looked pretty good, so I threw caution to the wind: as a singles, it became both warp and weft.
(Side note for my non-spinning friends: the reason the two kinds of flax make different yarns has everything to do with the length of their fibres. Flax line is nearly-full-length fibre, with each fibre in the mass measuring 2 to 3 feet from tip to toe. You spin flax line from a distaff -- a device whose job is to hold the fibre so you can pull off what you want, and only what you want, as you spin. Flax roving, on the other hand, is made of fibres that have been either mega-processed or cut down to a specific length. Each of its fibres is between 2 and 5 inches long, and you spin it without a distaff. Alas, the yarn it makes is weaker and more subject to abrasion -- all because it's made from shorter fibres.)

Because I knew this linen singles would be fragile, I decided the best kind of loom to use would be one which could be used with "minimalist" sheds, so the yarns wouldn't be stressed too much by the action of weaving. I decided to use one of my own heddles, placed inside the framework of a Cricket loom (left, as seen from the back) -- my heddle would be kind to the yarns, and the Cricket would provide a tidy way of storing (and protecting) the warps until it was time to use them.
The good news: the warping process went easily, with no snags or hitches. The not-so-good news: the yarn was, indeed, fragile. Even after dressing, the warps had a tendency to occasionally sigh and let go (you can see a temporary warp repair in the photo -- a little knot).
But oh, was it ever worth it! The finished woven band is about 6 inches wide and more than 3 meters long. It's firm, but not stiff, and lightweight without being fragile. It's solid and open at the same time, a pragmatic kind of lace.
In this detail view of the in-progress weaving (right), you can see the two woven lace patterns: Brooks Bouquet (top) and Leno (below), separated by stripes of plainweave.
It looks pleasant enough in this detail photo -- but when you see a full length of the stuff, all laid out as one long piece, it's pretty darned spectacular (if I do say so myself). It's going to be part of a garment early next year -- perhaps the focal point of an understated linen jacket....
Big Guy is a good supervisor. I couldn't have done it without him.
May he continue to prosper so we can do more wonderful things together!
End notes, for inquiring minds
♦ For a more complete presentation of this project, take a look at the write-up on Weavolution, here. Click on the larger photo at the top to open it in a slideshow-like window and see the photos that follow.
♦ If you're interested in weaving, but don't yet know about Weavolution -- here's the chance to get into a Good Thing! It's a nice online community, created specifically for weavers. Everything is visible to visitors (in case you want to just peek in the windows), but you need to join if you want to post something. Joining is free-of-charge and won't result in any kind of spam. Really, it's a great thing. Click here to open the entry page.
♦ Brooks Bouquet and Leno are documented in a large number of weaving books. Here's a quick sampling of titles (this is absolutely not a complete list!):
— The Weaver's Idea Book, by Jane Patrick
— Hands-On Rigid Heddle Weaving, by Betty Davenport
— The Art of Weaving, by Else Regensteiner
— Linen - Handspinning and Weaving, by Patricia Baines
— Many of the new books available to rigid heddle weavers
♦ The Cricket Loom is a compact rigid heddle loom (cute as a bug!) made by the Schacht Spindle Company of Colorado. It's available from many, many dealers. For more information about it, click here.
21 December 2011
Suddenly Solstice
Here we are at the winter solstice, a time for calm reflection -- and as I reflect, it's quite clear I haven't been opening this window into my workroom much these past months. In case you've wondered, I haven't been whisked onto another plane of existence, nor have I been sitting around doing nothing. I've just been... quiet.
It's not that it's been a bad year. It's just been a non-verbal one.
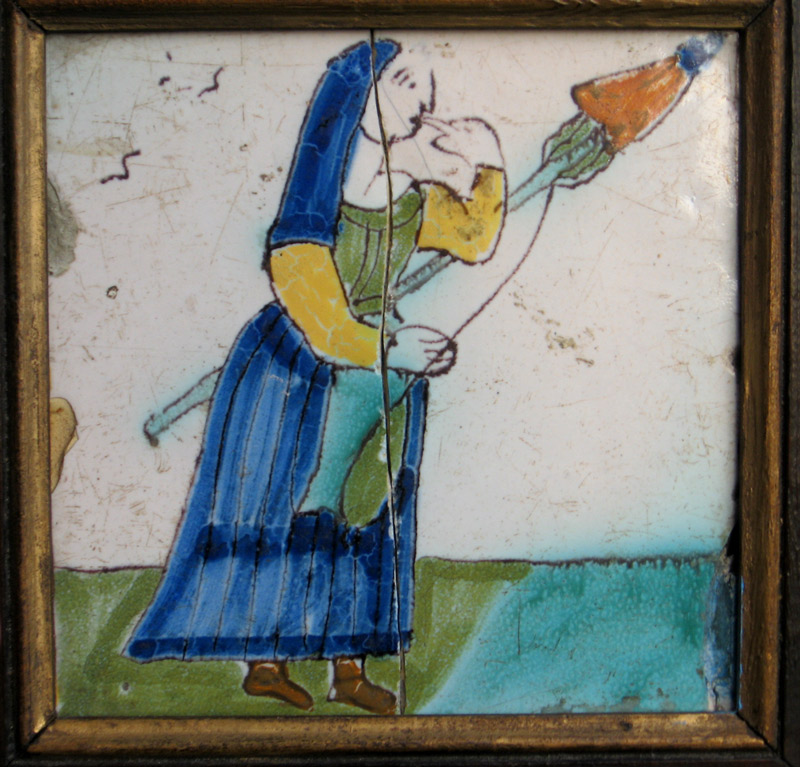
This lovely spinner (left) is one of the many things I didn't pop in here to tell you about. She was waiting quietly in one of the stalls at "Les Puces", the Paris flea market -- and I simply couldn't leave her there. I was in love.
This tile was probably originally mounted near a fireplace or stove, and most likely in a building that was more humble than palatial. The dealer told me it had been dated to the 18th century -- which means the colourful picture was painted onto the clay at about the time of the French Revolution (and the American Revolution as well). ...Whether that's true or not is an interesting question.
For the most important clue about its age, look at what the spinner is doing: she's equipped with a spindle and a long distaff, and her hand is to her mouth.
Why that curious gesture? Is she puzzled by something? ...No, not at all! It's because she's spinning flax!!
Okay, it's true, she might be spinning hemp rather than flax; but in both cases, the smoothest thread requires the spinner to moisten the yarn as the fibres spiral into place. We modern spinners usually dip our fingers into a water pot of some kind to moisten them -- but from time immemorial the handiest source of moisture has always been right there in the mouth. Think about that: it's a built-in water pot, and you never leave home without it. ;-)
Such a gesture would be painted only by someone who saw it so often that it was simply known to be integral to the spinning process.
The picture provides other interesting bits of information, too. Her spindle is the whorl-less style that bulges in the middle and tapers to a point at both ends.
 Similar spindles were widely used throughout northern Europe, and they were still used in the most rural parts of France at the start of the 20th century. These old French spindles from my own collection (right) show something of the variety these spindles can have, without straying from that characteristic shape.
The distaff shown on the tile is quite long, which was typical of distaffs in France -- and it was so well appreciated by French spinners that they often kept using long distaffs even after switching from spindles to wheels. It's hard to see just how the fibre on the distaff is arranged, but it seems to ripple in parallel with the distaff shaft, with the fibre mass gathered into a rough cone shape and protected by a "coat" of cloth. That cloth wrapping would shield the fibre from wind and rain and also keep it tidy for spinning as long as possible.
Looking at these details, and the form of her dress, I see nothing to refute the dealer's claim of this tile's age.
There will be more flax spinning in my near future (projects that have been interrupted and postponed for too long), and I will try her method of wrapping the top of the distaff with a piece of cloth. Besides offering protection, it may give extra control in drafting, too -- well worth an experiment.
In any case -- it's a fascinating little tile. The colours are enchanting.
But it's her gesture of moistening the fingers that made me fall in love. :-)
Return to the Archive directory page
Return to the Now spinning page