The archives
Return to the
Now spinning
page
Winter explorations
December 2006 - February 2007
23 February 2007
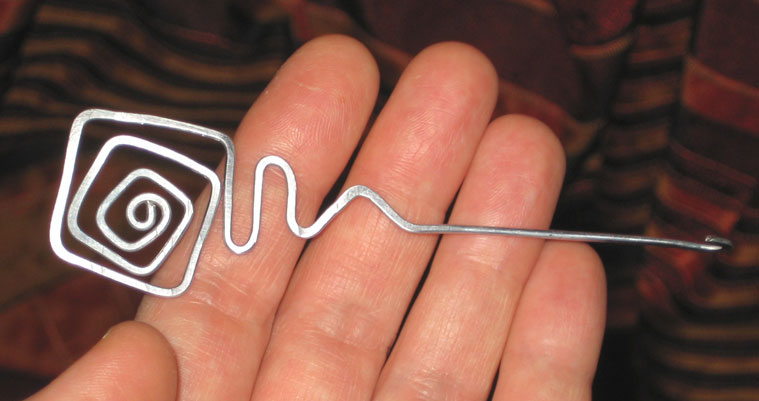
As I was spinning a fine silk yarn the other evening, I desperately needed my fetch hook....
Fetch hook, threading hook, orifice hook -- whatever you want to call it, when you need one, you need one! My companion for many years, my tried-and-true, faithful hook that had never let me down, was made from a simple hairpin. And it had gone missing.
My hair is shorter now, and the hairpins are all gone. In desperation I looked for them, high and low. I even checked the space behind the washing machine {shudder} in case one had fallen back there and was lying unnoticed; but no.
They say Necessity is the mother of Invention: my search uncovered a reel of galvanized steel wire -- and a hammer, and a little anvil. The result (left) is beyond pleasing. I'm absolutely delighted with it!
The thing you can't tell from the picture is how it feels in the hand: dense, smooth, and fine. It's such a pleasure to use and hold that I don't know why I didn't do this years ago.
So, as it turns out, it's not always such a bad thing when the tail of your yarn slips out of your hand and whisks itself through the orifice and onto the bobbin. Sometimes it can lead to something unexpected and wonderful!
19 February 2007
There's something in the air: it's spring cleaning time (early) at our place!
That means projects have been unusually focussed these past few days, as stacked books migrate from one room to another and the stash boxes get a glimpse of daylight and a fresh rummage. Notebooks unveil their secrets. Tools that had been set aside come to light. There's buried treasure everywhere!
I'm fond of narrow weavings: bands, tapes, ribbons, inkles -- I love them all. Among the buried treasures was an unfinished band in yarns I like very much. It had been set aside because its long warp had been wound onto a stick, and the warp was misbehaving.
This wasn't my first struggle with this problem. I've recently been using a paddle loom (a tall rigid heddle made of wood and supported between the knees while weaving), and while it's a wonderful weaving tool, its warps become awkward beyond a certain length. The message was clear: I needed a warp reel for narrow weavings!
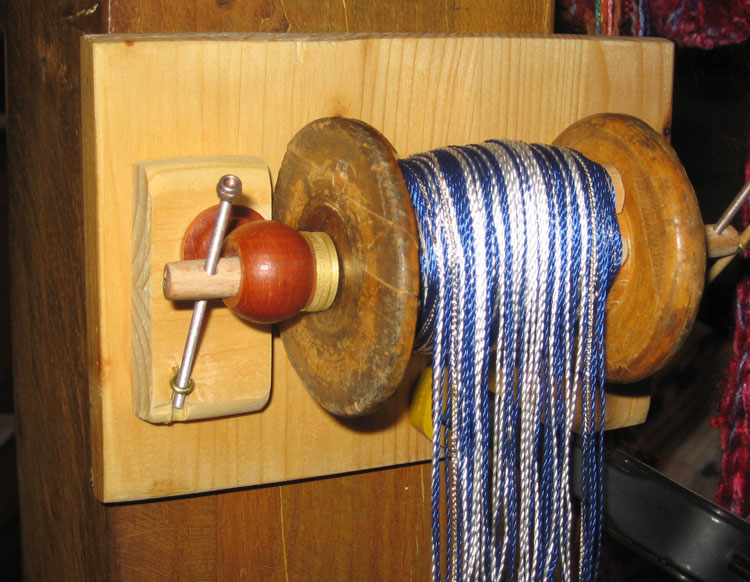
The solution suggested itself at my desk: an old spool sitting decoratively next to the fax machine was exactly the right size!
It took several days to put the thing together -- not because the structure is complicated, but because my peculiar brand of impatience puts up with thinking slowly about things, but insists that I do the thing only once.
Happily, once was all it took! The spool is mounted on a dowel that serves as the axle and shimmed firmly in place with toothpicks. The axle is held by curtain-rod supports, which are attached to the pine base the same way they'd be attached to a wall. The long bolts at each end of the axle are actually idle bits that serve as brakes to keep the reel from unwinding while in use. They slide into place through holes drilled through each end of the axle.
The cost was minimal, but the tool is good! It may not win any beauty prizes, but it keeps me from saying bad words as I weave off my long and slippery rayon warp -- in happy comfort.
16 February 2007
Winter weather howls outside -- and Temptation lifts its beautiful, terrible head.
I know I'm not the only one who goes shopping online when indoor activities start to lose their charm. My eyes wistfully linger on pictures of new fibers. I wander the danger-laden hallways of eBay. Exotic spinning wheels beckon, then haunt me.
In just the past week, I've been sorely tempted by two spinning wheels on eBay and a couple of new models available from several online suppliers (and believe me, I've visited them all these past few days!). I've squinted at photos to squeeze the finest detail out of every picture. I've scoured the Accessory pages of websites to find the widest range of drive ratios available for each wheel.
It's a sorry state of affairs. I've been around this stuff long enough to know better. I look, and I want.
To combat this yearning, here's the trick I'm trying now: identify exactly what is tempting me in each case, then go to my own collection of wheels and see if I can meet that need. Meet it without buying anything new. Meet it with the stash and tools currently at hand.
It's a tough assignment. So far, Temptation has led me to hanker for speed, super-chunky yarns, and breathtakingly fine linen thread. Here in my living room, I'm still working on it....
13 February 2007

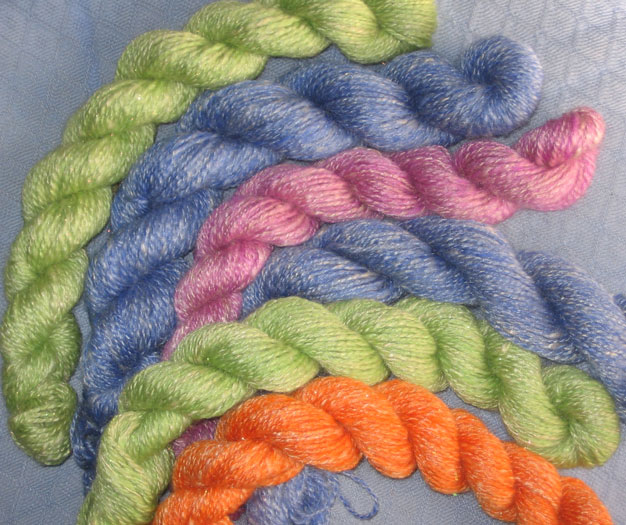
My dyepots have been busy these past few days (click on the photo to see a larger version).
Before Ooohing and Ahhhing over these blues and purples, though, you ought to hear the whole story. It's what we used to call a Cautionary Tale -- or at least, it could have been one.
It started late last November, when I needed to dye some cotton yarns and didn't have much time to do it. In mixing up the dye stock solutions, I decided to "save time" by using my electronic scale instead of my tried-and-true balance with its little weights.
Luckily the exact shade of my dye results didn't matter! It turns out that my electronic scale has a minimum threshold for what it weighs: its measurements are accurate to one gram, but that's true only for things weighing more than 10 grams. :-P ...I remember thinking the quantity of dye powder seemed larger than usual, but I didn't pause to reflect on that -- until I saw the intensity of color in the dye solutions (at which point, of course, it was too late).
Time was pressing, and the cotton yarns got dyed anyway (in strong colors!). ...Because fiber-reactive dyes have a short shelf life, the dye solutions would normally have been discarded that very day; but this time they were so concentrated that I couldn't throw them out (I'm too cheap!). I was sure I'd get back to the dyepots within the week.
And then came December, with its flurries and holidays. The dye solutions were forgotten.
They came to light toward the end of last week -- three bottles: yellow, turquoise, and pink. Their colors were still strong (oooo, baby, were they ever!); but their viability as dyes was now uncertain.
Rather than jump into potential disaster with both feet, I decided to space-dye something -- just to make sure the dyes would still "work". The target: a length of Shetland roving left over from last year. ...I pre-soaked the wool in warm water and vinegar, squeezed out the excess liquid, lay the roving on a tray, drizzled dye solutions onto it, and quished them around. The turquoise and pink solutions looked pretty normal; but the yellow had some solids in it, so I discarded it after splashing out just a couple of dots of color. The fibers "batched" for about two hours, then I rolled them in saran wrap and steamed them to set the dye. ...The results are on the left of the photo above, in pinks, greens and mauves.
The pink and turquoise solutions seemed just fine; so I decided to use them on silk. The results, from left to right in the photo above: a 200-yard skein of handspun tussah silk (purple), some fine silk cord (blue), and a length of tussah top (the purple mass at the right). The tussah top was interesting, because it has pink streaking in it --not intentional, but quite pretty.

It's not enough to just dye things -- you also need to use them; and the first stuff to leap to the task was the Shetland wool. It had originally been a medium-dark grey roving. You can see that its darker fibers mute the color a bit when it becomes yarn (right).
I've overdyed dark wool before, and the results always please me. The dye colors get muted, deepened, or enriched by the natural shades in the wool. I wasn't sure what this grey wool would do with space-dyeing, but I do like the way it turned out!
Since taking this photo, I've finished the yarn by washing it and weighting it slightly as it dried. I plan to use it as a singles, woven as the pattern weft in an overshot... something-or-other. There isn't enough yarn to do anything larger than a two-sided cushion cover. It may end up as trim on the lower edge and cuffs of a jacket (lovely thought!).
End notes, for inquiring minds
♦ The dyes, Shetland roving, and tussah silk top came from Fibrecrafts in Surrey, England (click here for more information).
♦ The wheel whose flyer you see in the yarn photo was made by Louet and can be seen elsewhere in these pages.
06 February 2007

Before getting to today's "business", let me share the wonderful vision of this last round of fiber-blending (click on the photo to see a larger version).
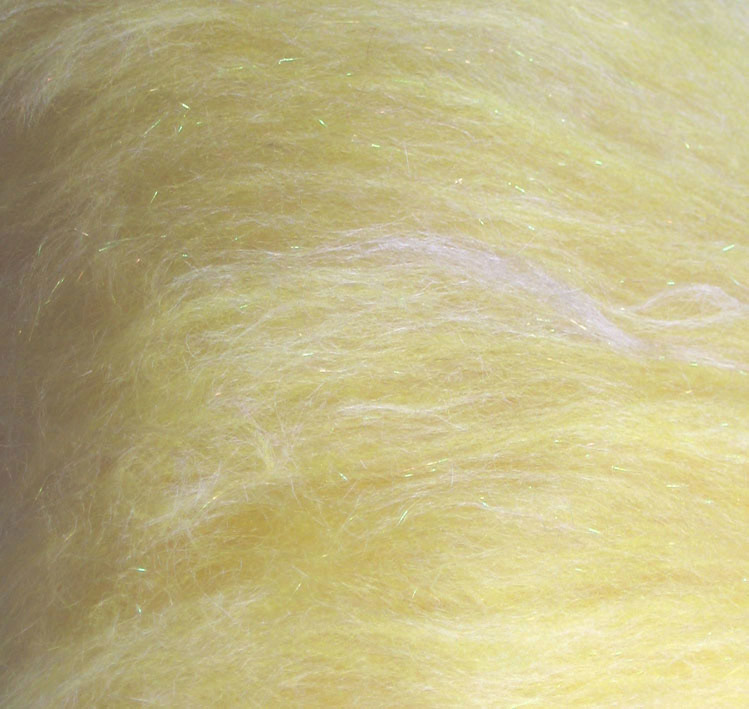
The primary fibers in the blend are merino wool and tussah silk; but because the yellow blend looked like it needed a little spark, I added some Angelina to the mix (lower left in the fiber photo). This particular Angelina is from a baggie labeled Aurora borealis, and it's fine and transparent, with tiny flashes of gold, green, and orange. And yes, it's a synthetic fiber; but it's so fine that the hand can't feel it in either the fiber blend or the yarn. As you can see in the detail view (right), only a small amount of sparkle has been added to the mix. It doesn't take much to make a delightful difference in the yarn.
The yellow in the photos is not as lovely as it is in person, but it gives you a rough idea. This yellow wool is the last of the vividly-dyed merino to be blended.
The next step for this yarn, of course, is to find its purpose in life. Its loft would make it lovely for knitting, but it's also smooth enough to play a nice role in weaving. In either case, there's just enough yarn for one luxuriant scarf -- and as my natural inclinations are toward the loom (rather than the knitting needles), that's how I decided to sample.
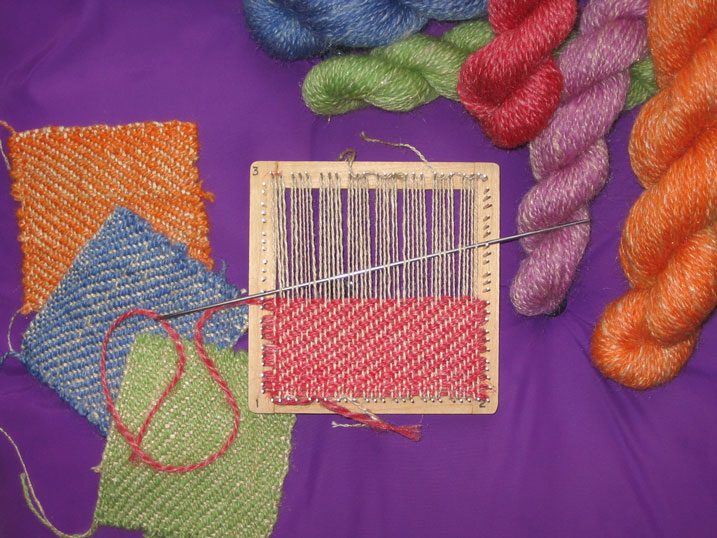
Most spinning resources will tell you to first plan a project, then spin the yarn needed for the project; and that's excellent advice. Unfortunately, I usually do it the other way around. ;-) The amounts of each color of these blended yarns described the limits of my future scarf: there's not enough of any one color for the warp, and the sum of all the yardages put together would probably come to just the right amount for either warp or weft -- but not both. Thus, I sampled on a warp of a different yarn (left). This warp is a 2-ply yarn of tussah silk (the same tussah used in the blend).
I wish you could feel these little samples! They're soft, supple, and breezily lightweight -- like small squares of warm air. The "finished" squares in the photo have been washed, so the yarns have relaxed into their final shapes and positions. There's quite a difference between the washed and the unwashed: fresh off the little loom, the square looks a lot like it does on the pegs; but after being wetted and gently agitated, a subtle play between silky sheen and matte wool comes to the fore. (The magic really is in the water!)
I like the way this yarn feels woven on a silk warp. But that's not the end of the story: now I need to decide just what color that silk should be. The dyepots are calling. Stay tuned!
End notes, for inquiring minds
♦ The lovely wool top is DHF wool from Crafty Notions in England (click here for more information).
♦ The tussah silk top came from Fibrecrafts in Surrey, England (click here for more information).
♦ The Angelina fiber is from ARTS Studio in Pennsylvania (click here for more information).
♦ The small loom on which the samples were needlewoven is a Weavette from Buxton Brook Looms (click here for more information)
28 January 2007
Here's the harvest from the full week of viral downtime!
(Click on the photo to see a larger version.)
These yarns are all merino-silk blends, created in the same way as the yarn described a few days ago (see below).
The blending softened the original colors (even the orange, despite what this photo might lead you to think) and gave the yarns a gentle sheen. To the hand, the yarns are delicious: smoother than plain merino, more squeezeable and elastic than pure silk. The yarn also seems surprisingly abrasion-resistant; I think it will wear well.
It's amazing, but everything about this blend is delightful.
What a wonderful way to start the spinning year!
27 January 2007
The minimalist carder mentioned and pictured in yesterday's entry (see below) is a home-made machine. If you'd like to read about it and the steps that went into building it, click here.
26 January 2007
A new year, a clean slate, and a healthy stash!
Holidays and travels whirled the end of 2006 into a blur; but the new year stretches out before us with its unmarked pages and wide-open eyes. We can do some amazing things here.
Alas for my plans: someone who'd shaken hands with me recently had had a bad cold, and by the end of last week it had hit me full-force. It started in the sinuses, then knocked me down with everything it had; so for the past seven days I've been sleeping, sipping tea and cider -- and spinning! (This probably won't be the last time my stash has rescued me!)
Last fall a friend in England gave me a large goody bag filled with nice 'bumps' of merino top. The colors were vibrant: electric blue, acid green, bougainvillea purple, sizzling red, sunny yellow, and traffic-stopping orange. The bright colors caught my feverish eye, so I decided to put them to use.
Merino is lovely stuff in use; but merino yarns always look a little grubby to me. (They're so matte!) With a healthy silk stash, though, that's easy enough to fix!
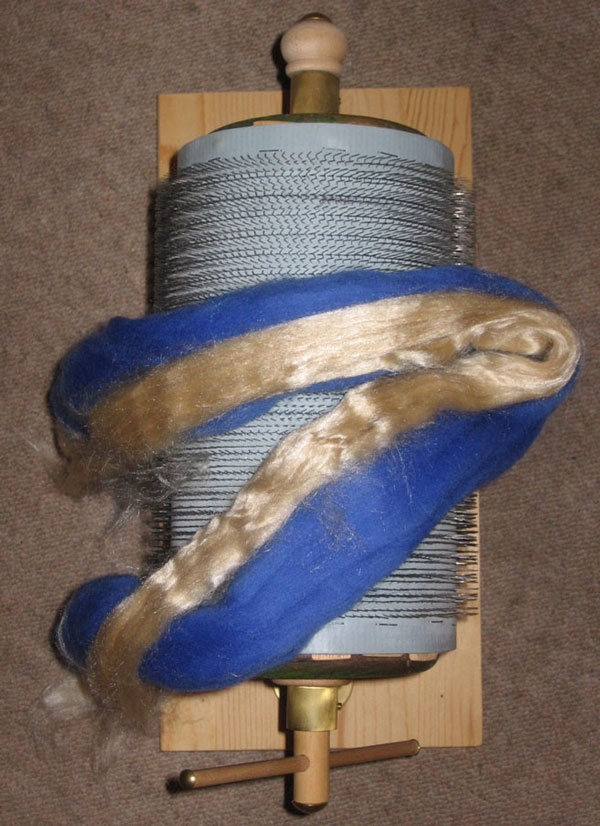
Usually in blending, I'll weigh the fibers before carding to get a consistent blend; but this time (virus oblige) I contented myself with the unscientific "equal lengths of top" (left). I figured the strong colors would come through well even with that much dilution, and the sheen of the silk could do no harm at all. ...Besides, what's more comforting on a snuffly winter's day than a delicious handful of merino mixed with silk?
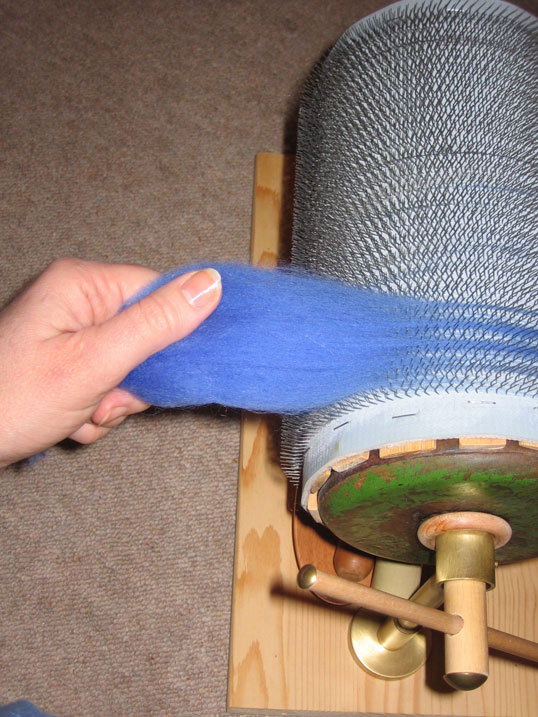
My carder is a simple, single-drum machine. I need to feed it fiber from my hand because it has no licker-in drum; but the hand-feeding means I can easily control just where on the drum the fiber goes, and how much fiber gets spread along the drum.
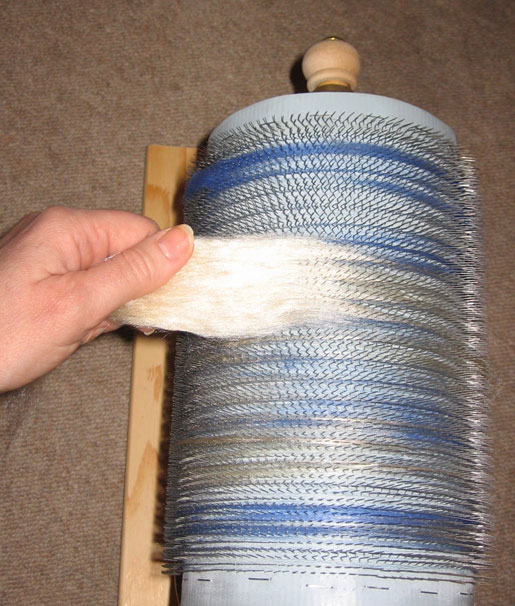
I started by feeding on a thin layer of the merino (right). As the drum turns, I let it pull fiber from my hand. I'm holding back on the fiber a little bit so it will run in a fairly straight line through the wires of the carding cloth.
As you can see in the next photo (left), the layer of merino was not thick enough to completely hide the surface of the drum (not a problem!). My intention was to make a blend that was fairly consistent, with just a few tiny streaks -- to yield a yarn that had the color and softness of the merino, but with a soft sheen and a slightly "heathered" look. The plan for the blending, then, was to put on a thin layer of merino, a layer of silk, a layer of merino, a layer of silk....
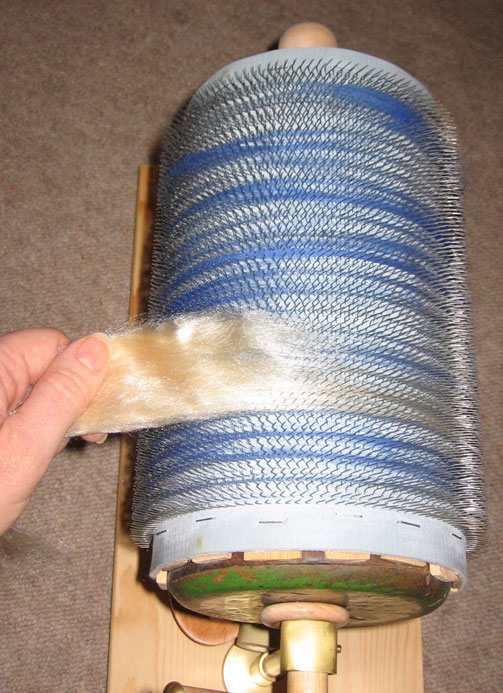
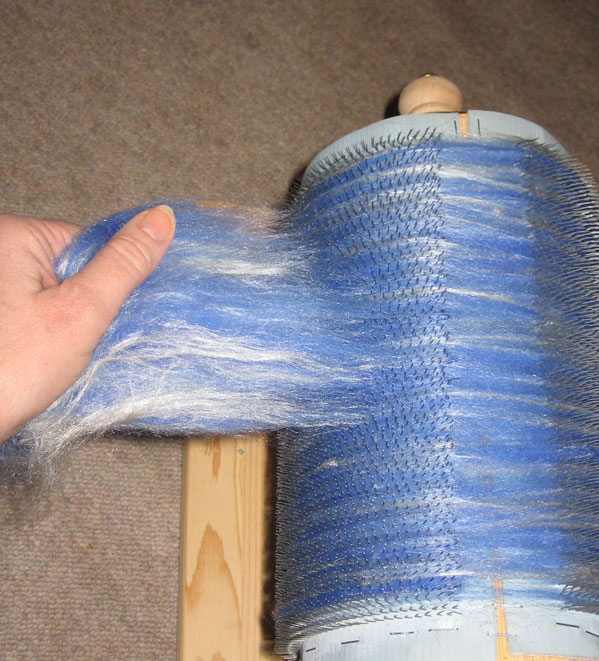
Thus, a layer of silk follows...
...and continues (right). The length of silk top used for this layer was the same as the length of merino top used for the layer preceding it.
Feeding silk fiber to a carding drum like this is trickier than feeding it wool. The silk is so smooth that it's happy to just flow through between the wires and not get "caught". To get good coverage on the drum, you're obliged to make the silk take an occasional "jog" in its path.
It's a pleasant sensation, having silk fiber flow out of your hand onto a carding drum.
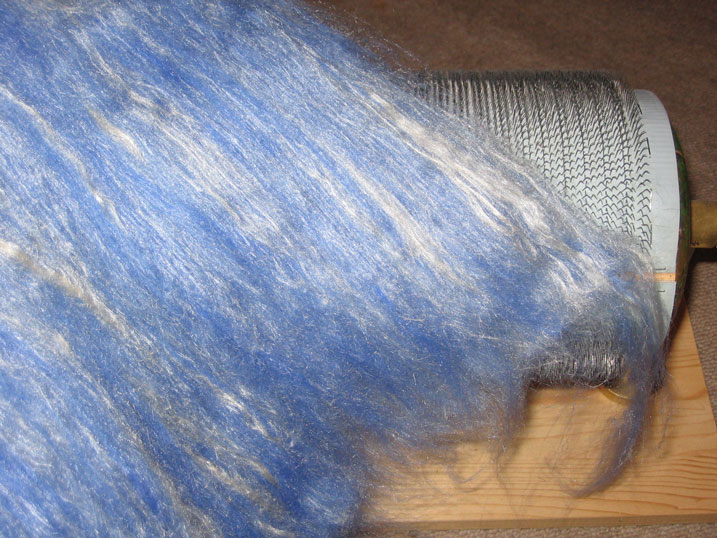
You can see some of the silk's wandering paths in the next photo (left). You can also see that the silk sometimes comes onto the drum in a "blob". That's generally not a problem, because the next rounds of carding will even things out; but I will shift things with my fingers if the blob seems too big.
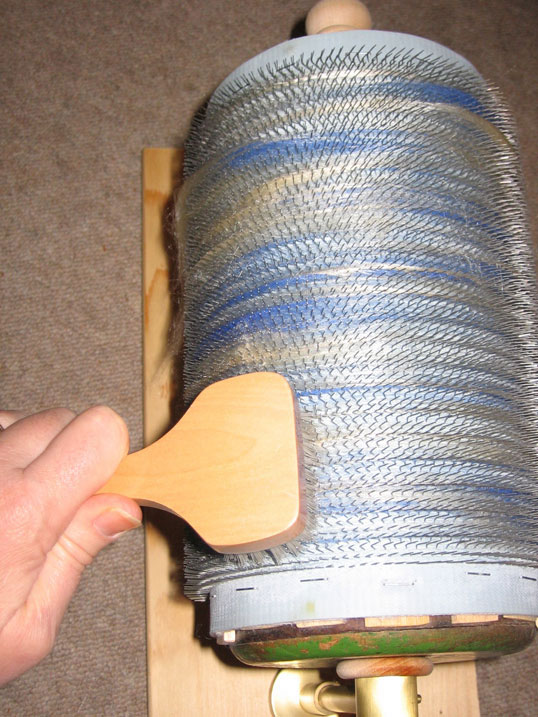
When the layer of silk has been applied, I'll "burnish" the fibers onto the drum with a soft brush (this one is a cat brush with nylon bristles). Burnishing completes the carding process, helps encourage the fibers to run straight through the wires, and presses the layers of fiber together on the drum.
To keep things orderly in the batt, this blend will get burnished after every silk layer has been added. It's an extra step, but it really makes a difference.
The carder is "full" when the fiber comes about 2/3 of the way up the wires. If the batt is thicker than that, it's hard to doff; but I'll often stop when it's thinner -- and that's what I did this time. This batt came about halfway up the wires of the carding cloth.
Here's what the blend looked like after the first pass of carding (right). Not very consistent, is it?? Even with those huge streaks, though, you can see that the two fibers have been nicely mixed. Another round of carding will make it look more like a blend.
So on we go, to the second round (left)! The batt has been torn into strips to make it easy to feed to the carder. By looking at the fiber already on the drum, you can see that this second round of carding will make a big difference; it's already looking quite a bit smoother.
The gap showing on the topside of the drum in this photo is the space known as the "doffing channel". It's a flat space without carding wires that lets you get the fiber off the drum (that's what doffing is). To doff, you slide a sort of spike underneath the fibers in this space and lift the fibers away from the drum. The fibers separate; and you end up with a batt with two ends, rather than a ring of fiber rolled around a drum. To get the batt off the wires, you just roll it onto a tube, the same way you'd roll wrapping paper onto a cardboard-tube core.
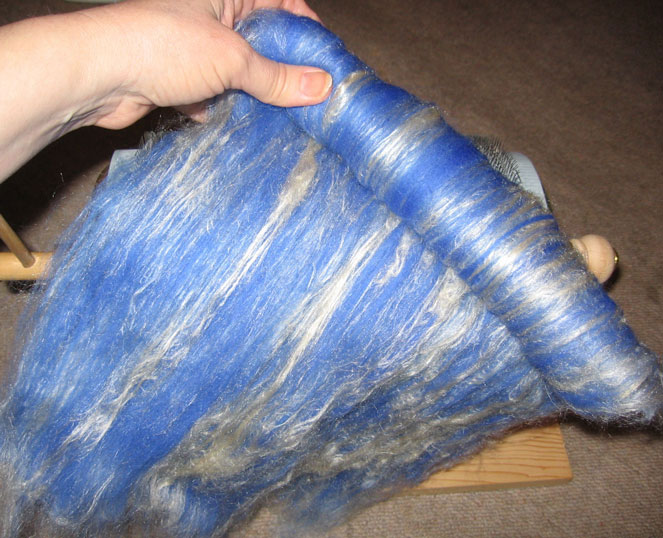
After two rounds of carding, the blend is looking much nicer (right)! The streaks of silk (and streaks of blue merino) are still visible, but they're smaller and softer than before.
The batt needed another round of carding if it was to give me the shimmery, heathery yarn I'd envisioned; so that's what we did. After that third round, the blend had only tiny streaks -- and was deliciously inviting!
If I'd been more attentive to the silk blobs during the first round of carding, the blend would have been ready to spin after carding it just twice. (In the batts that followed this one, that's what I did.)

Now to proof that pudding: to the spinning wheel we go!
It was just as lovely in the hand as it was to the eye. The silk and merino behaved just beautifully in this blend. Their fibers were close to the same length, which helps immensely; some silk blends are "difficult" because the silk has been blended with shorter fibers (silk and cashmere, for example, or silk and camel down). There were none of those problems with this blend.
A streakier blend would have been a little trickier to spin, because the silk and the merino have slightly different needs in drafting; but this blend was uniform enough that the two fibers really worked together. It was an exquisite spin.

The finished yarn is 2-ply, and though I don't know exactly what I'll do with it, I'm certain it will end up as some kind of garment -- yarn like this needs to be in a place where it can be touched!
The photo (right) doesn't do justice to the sweetness of the color; but it gives you an idea. The yarn is just as I'd envisioned it, or maybe just a little nicer. It's going to be wonderful to work with.
Normally all I have to show at the end of a week-long virus is a large bag of used tissues. Having this yarn to show instead is a great improvement!
End notes, for inquiring minds
♦ Lovely wool top like the one used here is available from Crafty Notions in England (click here for more information).
♦ The tussah silk top shown here was purchased from Fibrecrafts in Surrey, England (click here for more information).
♦ The wheel whose bobbin you see in the photo is the Haldane "Lewis" wheel, shown elsewhere in these pages.
Return to top of page
Return to the Now spinning page