The archives
Return to the
Archive directory
Return to the
Now spinning
page
Explorations, Late Summer
August - September 2010
27 September 2010
Cold, cold, go away.
I'll blow my nose another day.
Though frankly, this is more than a cold -- it's the autumnal virus.
I love this time of year and resent having to stay inside, gazing longingly out the window. The winds blow, and everything changes. The green in the leaves shifts, gets momentarily brighter, goes sombre -- then bursts into an entirely different colour. ...Maybe this afternoon I'll console myself with a properly autumnal dyepot.
Even the little plants on my balcony are showing signs of the season. It's a good time of year, perfect for digging into the stash, pulling out a big bag of fibre, and settling into a nice, concentrated spinning session.... It seems I've been doing lots of weaving projects lately, and some dyeing -- but precious little spinning.
When I've succeeded in beating this virus back into hiding, we'll remedy that!
21 September 2010
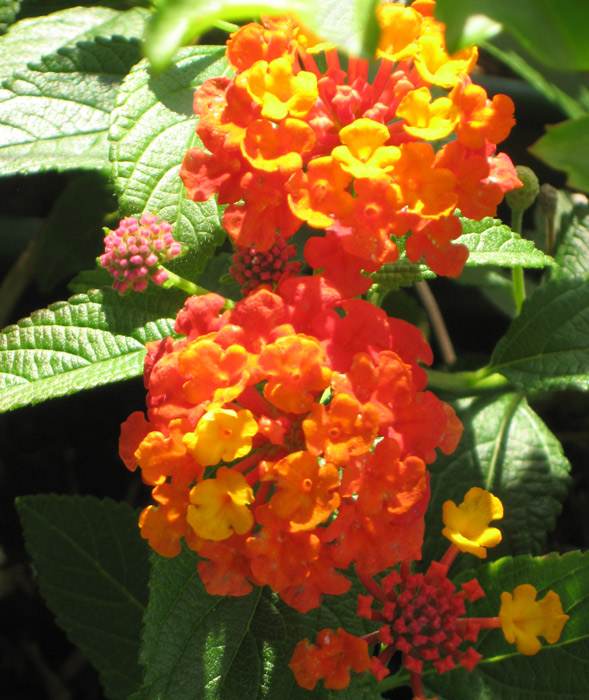
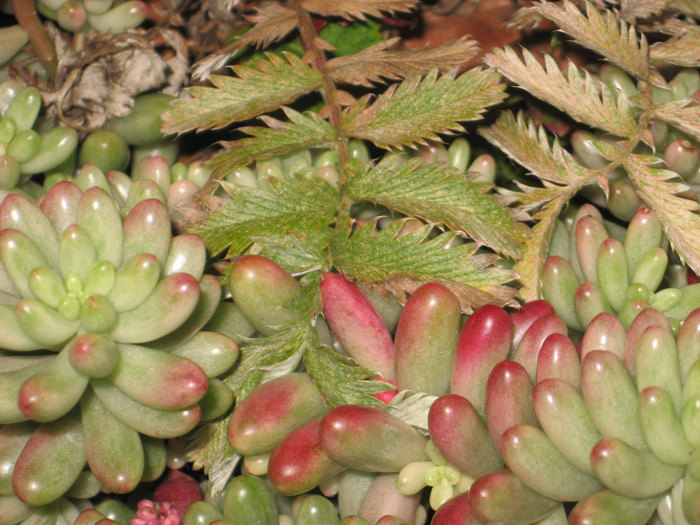
It's the last day of summer, though the flowers on my balcony don't know it yet. It's a lovely day, too -- nice and bright, worthy of such cheerful blooms! As I sat warming myself in the sun this afternoon, a small lizard came to do the same on the other side of the window....
Alas, since Sunday night I've been slowed by a cold... or as we say here this week, I've bid slowed by a cohd. Miserable luck, to be achey and drippy when it's so lovely outdoors. Never mind -- it will pass!
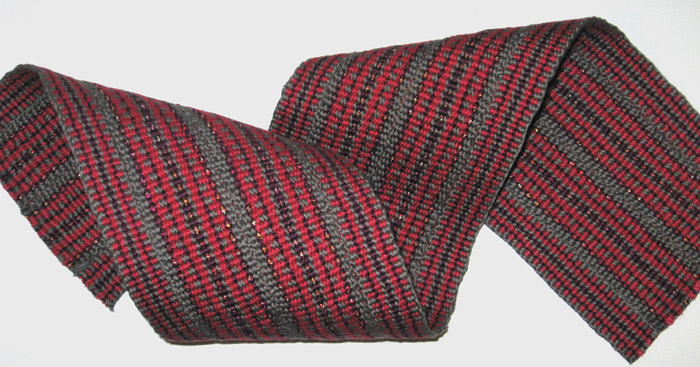
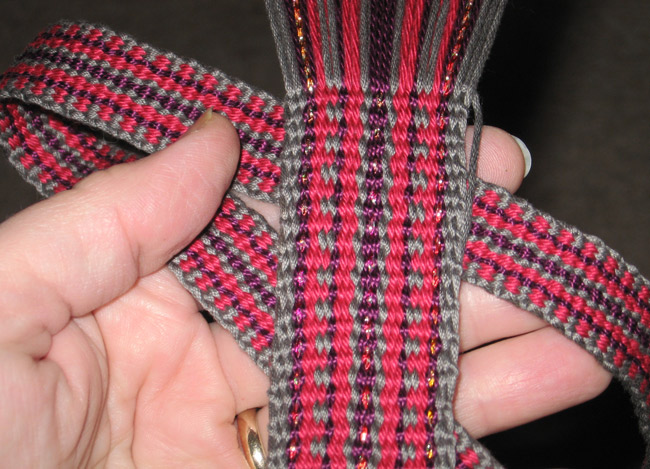
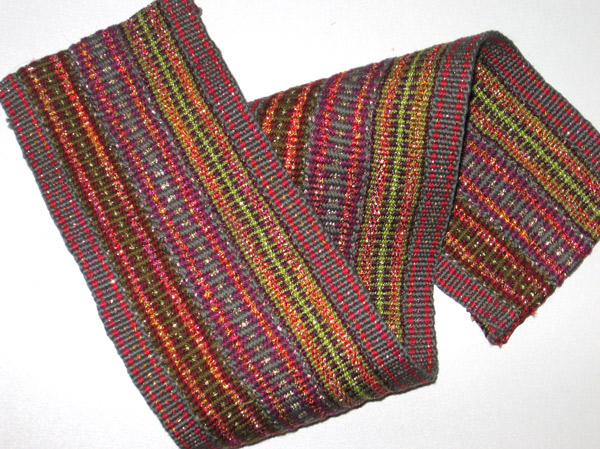
In the meantime (between naps), the bands making up the "business" part of the red backstrap have been sewn together! After pressing, it's really, really pretty, if I do say so myself (right). ...It hasn't yet had the casings sewn on each end, so what you see in the photo is a "Fray-Chek" finish -- but that will be remedied very soon.
Honestly, I hadn't intended on launching into a series of backstrap-making projects, but they're so neat that I can't seem to stop myself.
More than that, though, as I work on these things, all kinds of wonderful images are popping into my imagination. A fitted vest made of woven bands. A short jacket made of bands, with contrasting bands appearing as border trims along the lower edge, the cuffs, and at the neckline. A beautiful shoulderbag, made entirely of bands. A coin purse, a weaving bag, a spindle travel pouch.
I could weave bands for a long, long time. :-)
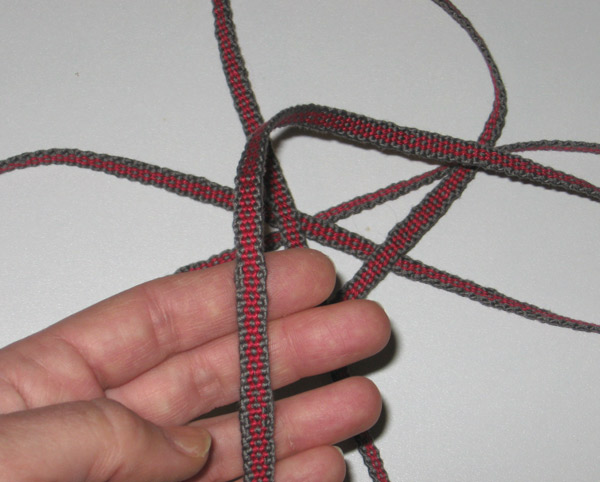
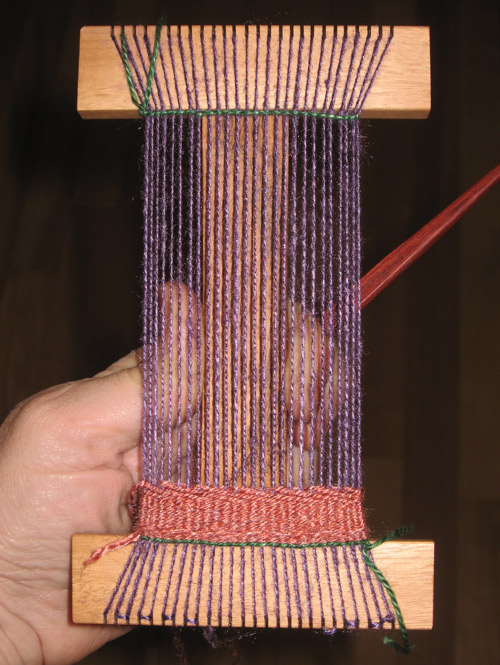
These weaving projects are still "active", though. I've just finished weaving a tiny little band to serve as the "cord" at each end of my backstrap (left). This one is longer than it really needs to be, but having extra is never really a problem.
Another tiny band with a hint of sparkle is halfway done, getting itself ready for use on the ends of the "demo" backstrap. I'm wrapped in blankets and hankies just now and more interested in tea than in weaving -- but the band will wait for me.
Isn't it interesting how projects unfold themselves, then unfold even further to spawn new projects? This started as a simple desire to finish some unfinished weavings -- then it became a project of making a backstrap from existing bands, then augmenting those bands, then making an entirely new backstrap....
Oh yes, this may be going on for some time.
19 September 2010
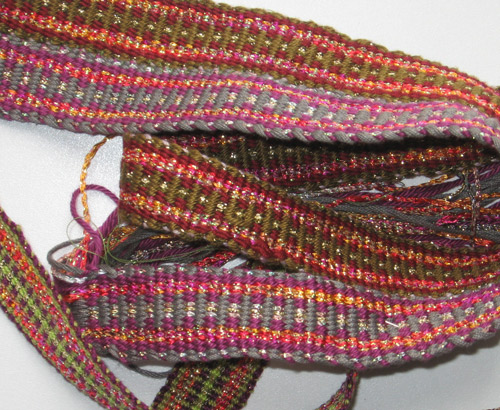
Some of us just can't finish one story before we start another. These bands (left) will be yet another backstrap!
The grey-and-red extensions I wove for my "demo-band" backstrap looked so nice that I decided to see how their colours would work in a backstrap that (strange but true) was designed and woven on purpose. Experiments just never end around here. ;-)
I wove the narrower pieces first. They'll be the outer edges of the backstrap, framing the wider bands. The wider piece looked very promising as I worked on it (right).
Along with their photos, I wish I could upload the way these bands feel. Most of the yarns in this are cotton, but the band has a wonderfully smooth solidity. It's very pleasing -- to the eye, to the hand, and in the weaving.
Enjoyable processes always go quickly.
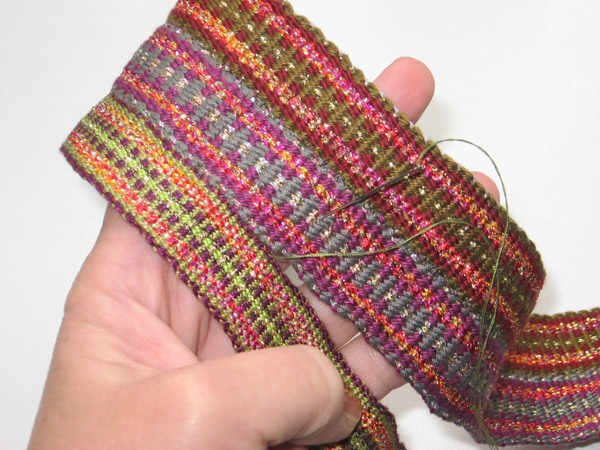
 When I'd finished weaving the wider band, it was time to Fray-Chek the ends of the bands and stitch them together (left).
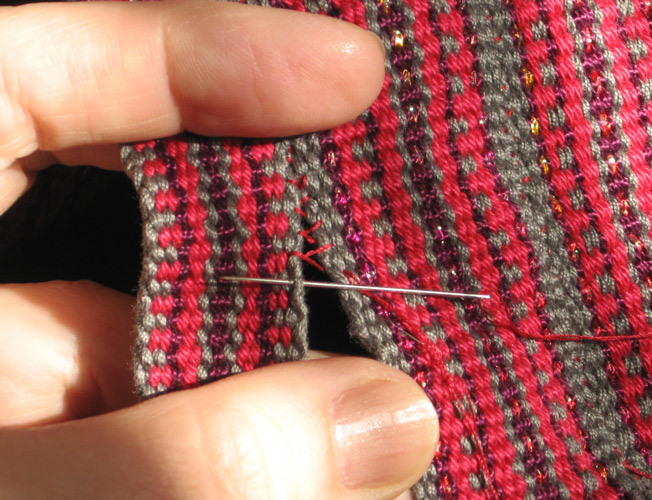
This photo gives you a better idea of the joining stitch than the earlier photo did. (Click on the thumbnail for a closer view.) It's a nice join that barely shows when you've pulled the thread taut.
Here's a great tip for making this kind of join: it works best to take three or four stitches, then pull the thread to tighten them up. If you pull the thread taut with each stitch, you end up with uneven tension in the stitches (and a few puckery bits where it's gotten too tight).
So far, it looks great! Joining bands like this changes their appearance in a wonderful way -- and the wide belt made by joined bands looks very, very promising. Stay tuned....
13 September 2010
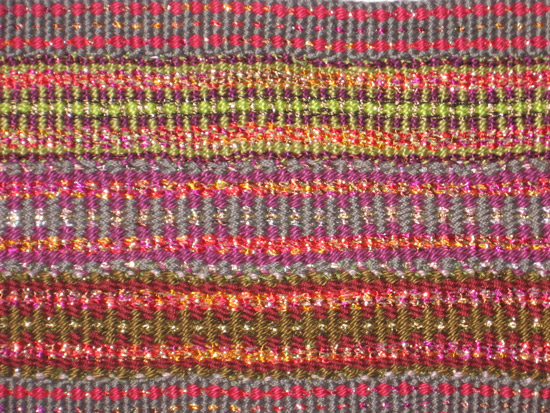
More news on the backstrap story.... The additional little band wove up quickly, and instead of sewing it to just one edge of the backstrap, I decided to put it on both sides. After stitching it all together, I put some Fray-Chek on the ends of the bands and trimmed them, then gave the whole thing a light press with the steam iron. And gee, it's pretty!
Adding the new (slightly narrower) bands on each side gave the strap a couple of things it was lacking. They provided extra width (of course), but they also tied the colours together nicely by echoing the yarns of the center-most band.
They also supply solidity. The photos can't show it, but the band with the lighter green is made of finer yarns than the others, and as a result, it's more supple. Having the new edge band beside it firms everything up. I think it's going to be a super backstrap.

After turning the ends of the strap under and stitching them down about 1/2-inch from the end (this will be a casing for the cords), I found myself worrying about my Fray-Chek-finished ends. I stitched over them again, just to be sure they were "safe" ...but they looked exposed and vulnerable, and now that I was in love with this backstrap, I didn't want to leave them that way.
The "fix" was to sew a narrow satin ribbon over the raw edges (click on the thumbnail for a bigger view). Now it looks great -- and all it needs before it can be used is a cord!
Having gotten to this point, of course, I've decided to weave a super-narrow band to use as a cord for the thing. So the story's not quite over yet! To be continued....
10 September 2010
Home from travels and having taken care of the urgent things on my list, I was ready to sit down and weave! I'd been looking forward to it for a while.
First and foremost, I wanted to weave off two in-progress projects, both of which were set up for use with the backstrap. So I opened my (still-packed) suitcase... and alas and alack! My backstrap had gotten lost someplace in my travels! It was gone.
Luckily, disappointment is not a permanent condition. Rummaging resourcefully in my boxes of Stuff, I unearthed a group of bands woven as demos sometime in the recent past -- and deciding they went together Well Enough, I set forth to put them together as a backstrap.
This was good in oh, so many ways! First, I'd have a new backstrap. Second, some bands that had been languishing in the dark of a box could now have a purpose in life. And third -- well, it was kind of neat. :-)
To join the bands, I set them side by side and sewed their selvedges together, using a stitch that's sometimes called the "baseball stitch", and sometimes called the "figure-8 stitch". Basically, you pass the needle through one selvedge and pull the thread through, then pass your needle through the other selvedge and pull the thread through. Nothing complicated.
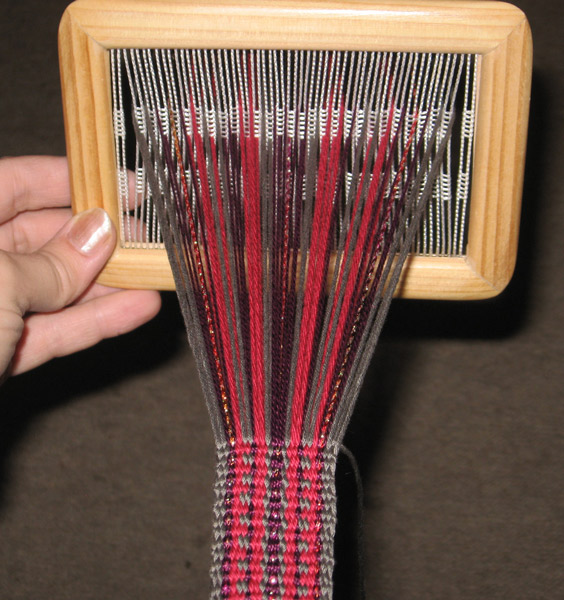
Of course, even a simple project like this one needs a few twists and turns.... Looking at the three joined bands, I decided it wasn't quite wide enough to be a comfortable backstrap -- so I've warped up another little band to weave and stitch on as an addition. Stay tuned....
06 September 2010
A swirl of dyepots and spindles
Back from vacation, with a full agenda -- and pretty happy about both.
In my suitcase, a bag of pristine lyocell fibre waited to be dyed, and quickly -- as you may recall, Janice Arnold needed an array of colour for the very next part of her current felt installation. ...Time to get to work! :-)
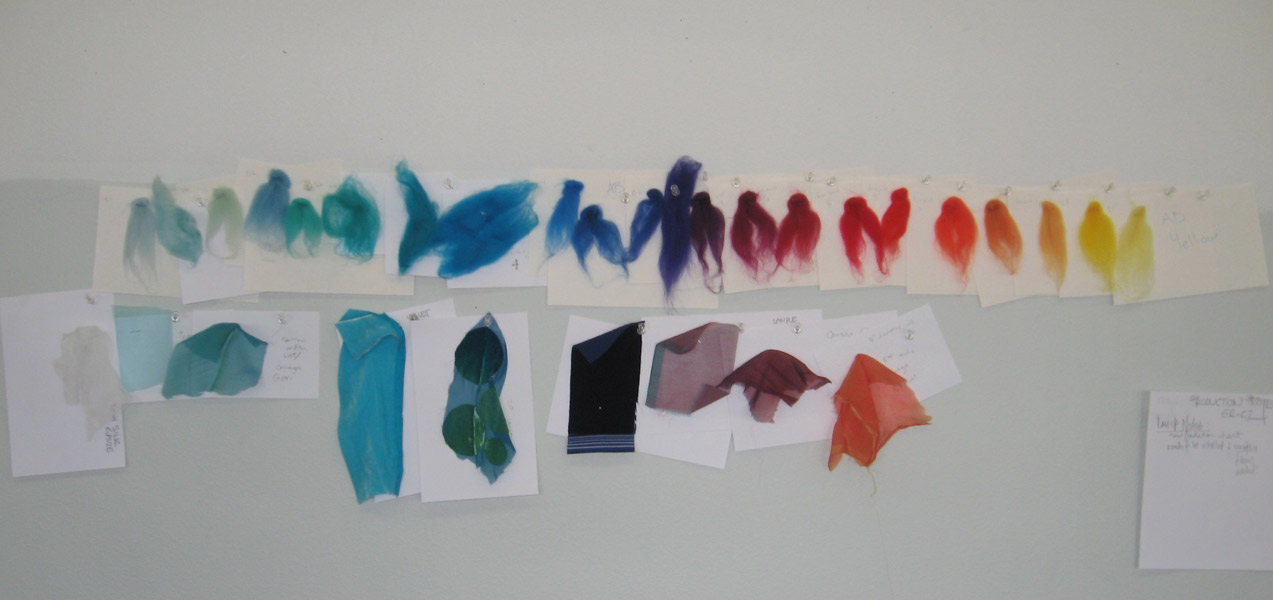
This photo (left) was taken in Janice's studio on the day of our visit, to guide me in the dyeing process. It shows samples of the wool she planned to use in her "Chroma Passage" -- in all, 24 different colours. The lyocell needed to be dyed in colours that matched and blended nicely with this array.
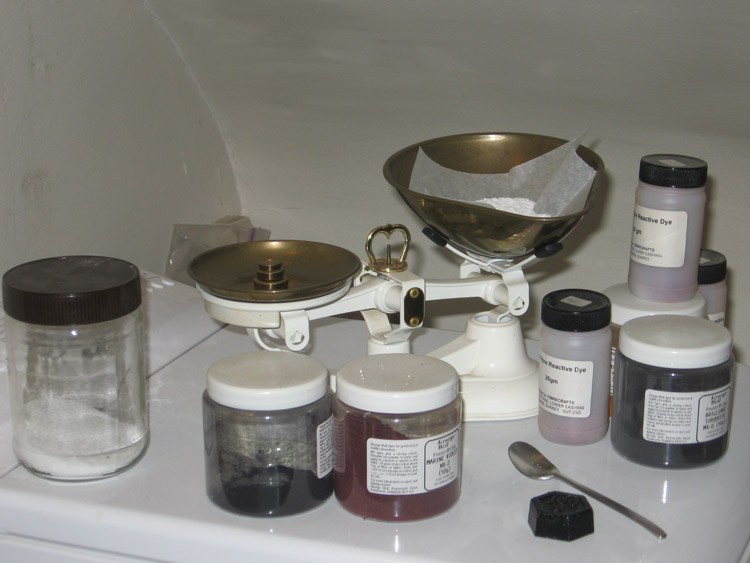
The first step, as usual, was to weigh things (right). As I pondered ways to organize this project, I weighed dye powders and mixed up the dye solutions (5g of powder plus 500 ml of water makes a 1% solution). Then I measured out the lyocell fiber, dividing it into bundles of about 225g each. I would also be dyeing some cotton gauze in each dye batch, in lengths that weighed about 25g each -- so I measured those out as well.
With those initial steps behind me, it was time to figure out the most efficient way to dye all this fibre!
It had been a long time since I'd dyed much cellulosic fibre. The process isn't difficult, but fibre-reactive dyes require a lot more "babysitting" than the acid dyes I've been using so much lately. Here's the basic "recipe" for success (notes on quantities follow):
(1) Mix salt and water, then soak fibre in this solution for 10 minutes, stirring occasionally.
(2) Remove fibre, add dye solution, replace fibre, then soak for 30 minutes, stirring frequently.
(3) Remove fibre, add soda solution, replace fibre, then soak for 45 minutes, stirring frequently.
(4) Rinse in cool water until water runs clear.
(5) (optional) Simmer in soapy water for a minimum of 10 minutes.
The dyes I use are Procion MX, and though my approach is a little old-fashioned, it works really well -- so I'm sticking with it! ...To calculate quantities for my "recipe", I follow these guidelines:
Water: 20ml per gram of fibre.
Salt: varies with depth of shade (DOS) desired:
less than 0.5 -- salt at 20% weight of goods (WOG)
0.5 to 2.0 -- salt at 50% WOG
2.0 to 4.0 -- salt at 90% WOG
more than 4.0 -- salt at 110% WOG
Dye stock solution: WOG x DOS x % of colour
Washing soda: WOG x 10%

Despite how it looks at first glance, it's not all that complicated -- but because there are so many more variables than you have when using acid dyes, it's a really good idea to keep notes!
This photo (left) shows the starting and ending points of the fibre-reactive dyeing process: in the stainless pot, white fibre soaks in saltwater, while to its right the dyed fibre in the enamel pot heats gradually to a simmer. (You can't really tell, but both pots are sitting on top of my tiny and ancient gas stove.)
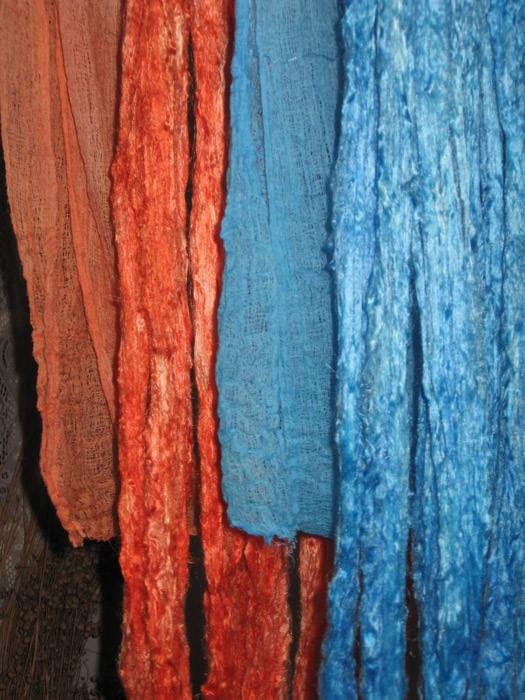
I decided to begin by choosing certain colours in the array as "main" colours and dyeing those, then filling in the gradation between those main hues afterwards. Before leaving the States I'd managed to dye a couple of different yellows and send them to Janice -- so the yellow-most end of the array was already covered. That left the blues, purples, and reds -- in other words, most of the colour range!
Here (right) you see results of the first batches: a medium blue-turquoise and a coral-leaning red, both chosen as "main" hues because each of them lies more or less at the mid-point of its colour family, at least in the context of my guideline array of colour. The scarf-like fabrics accompanying the lyocell are pieces of cotton gauze. (Click on the image for a closer view.) ...Janice uses gauze in some of her felt pieces for a wonderful lacey effect -- airy, organic, intriguing. I love thinking about what kind of effect it will give her in full colour!
The down-side of starting with "main" colours is that they look unrelated. My living room soon sported hanging hanks of lyocell in pale aqua, medium turquoise-blue, rosey red, and coral -- all very nice, indeed, and very shiny... but not particularly inspiring. That all changed when I started dyeing the intermediate hues....
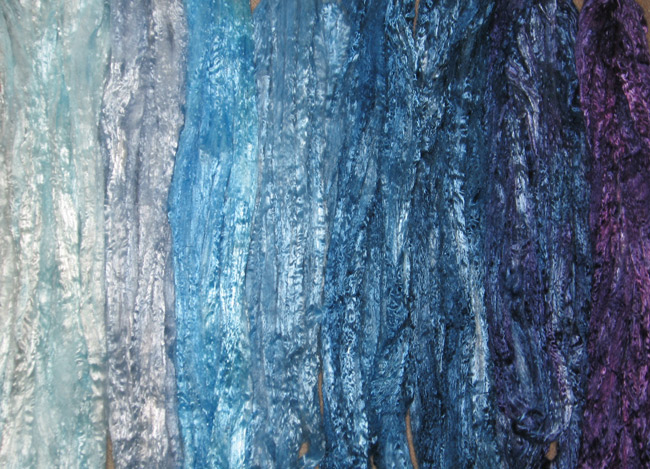
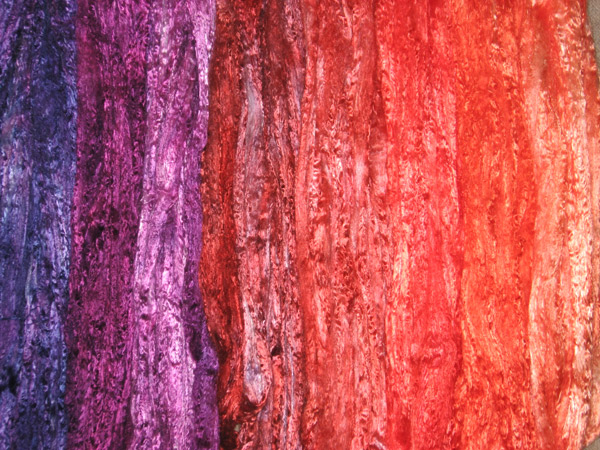
One by one, the "in-between" colours emerged from the dyepot. As the collection grew, so did my excitement.
Why does a full spectrum of colour sing in a way that no single colour can? ...I have no idea. I just know that when all these colours lined themselves up to dry, there was joy. Pure, wordless joy.
When they were all dried and ready to package, I was sorry to see them go! The package I shipped off contained 16 colours of lyocell -- and with the four colours I'd shipped earlier, that would give Janice a palette of 20 lyocell colours to add ripply sheen to her Chroma Passage.
I absolutely can't wait to see pictures of her final work! It was wonderful to be able to play even a small part in such a wonderful piece of art, and such a beautiful effort. ...It's also grand to make the acquaintance of a lovely, lovely person -- which Janice very much is.
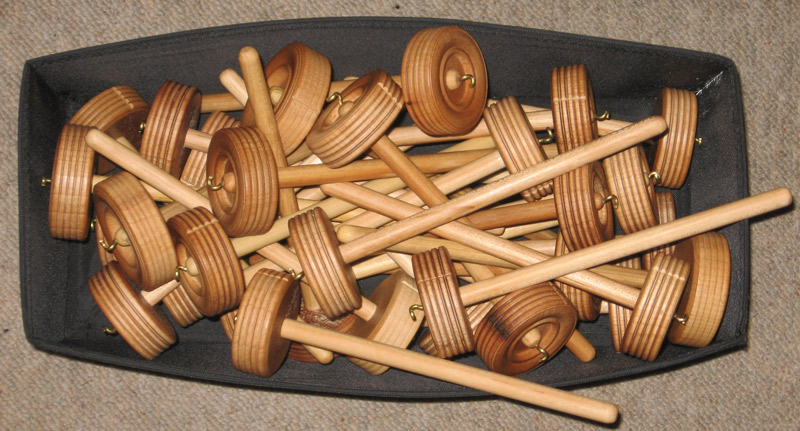
So, you might ask, what does one do while the dyepots are doing their dyepot thing? ...One makes spindles, of course!
These spindles (left) are for another lovely person who will be teaching a spinning class in Germany in mid-September. In this photo, they've just received their final coat of wax and are waiting to be packaged. Pretty, aren't they?
These are satisfying times. Busy, and satisfying.
End notes, for inquiring minds
♦ Janice Arnold is an accomplished artist working with felt in astonishing and breath-taking ways. Her website (click here) gives a nice tour of both her works and her philosophy, and on its Contacts page you can find a link to her wall on Facebook -- the place where you'll find the latest news about her current work.
♦ For dyers, a word about washing soda: do not, do not assume that this is the same thing as baking soda! Baking soda is sodium bicarbonate. The soda you want to use here in your dyepot is sodium carbonate -- not at all the same animal, despite the similarity in name.
♦ For further reading on approaches to use with fibre reactive dyes, check out Linda Knutson's book, Synthetic Dyes for Natural Fibers. I think it's now out of print, but it's still an excellent source of information, thoroughly tested and carefully written. Used copies are readily available from the usual sources.
31 August 2010
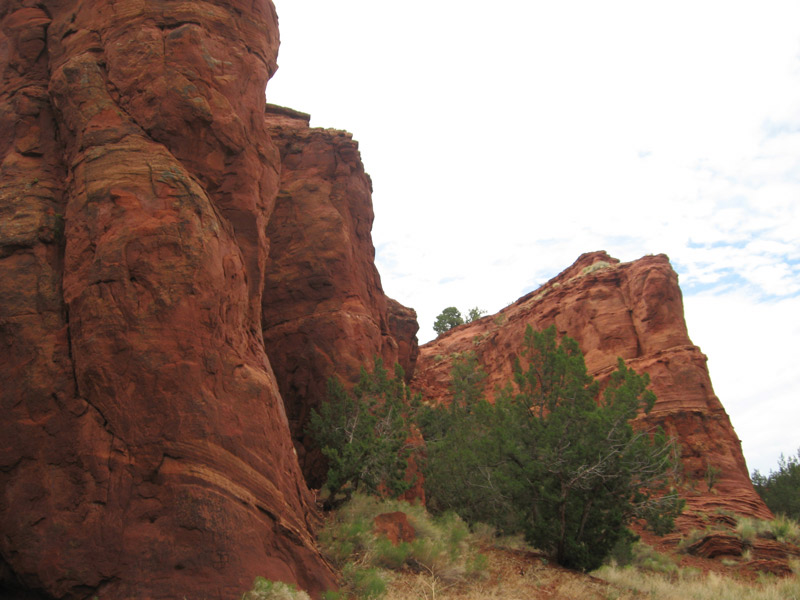
This is the final episode of What I Did On My Summer Vacation, and coming in the wake of tales from New Mexico, it's appropriate to start it with a Georgia O'Keefe-inspired photo.
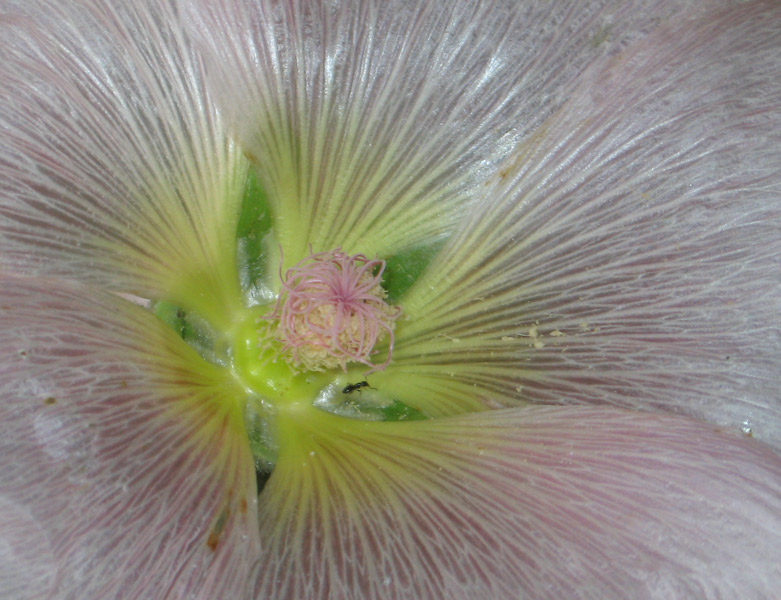
Hollyhocks (yes, it really is one) are amazing plants. They grow, seed themselves -- and even when neglected, they make incredible flowers. The dark ones have such intensity that I collected them one year to see how they'd work as dye plants. The dyebath was beautiful, but alas, none of the pigments would stick to the fibre, no matter what I did!
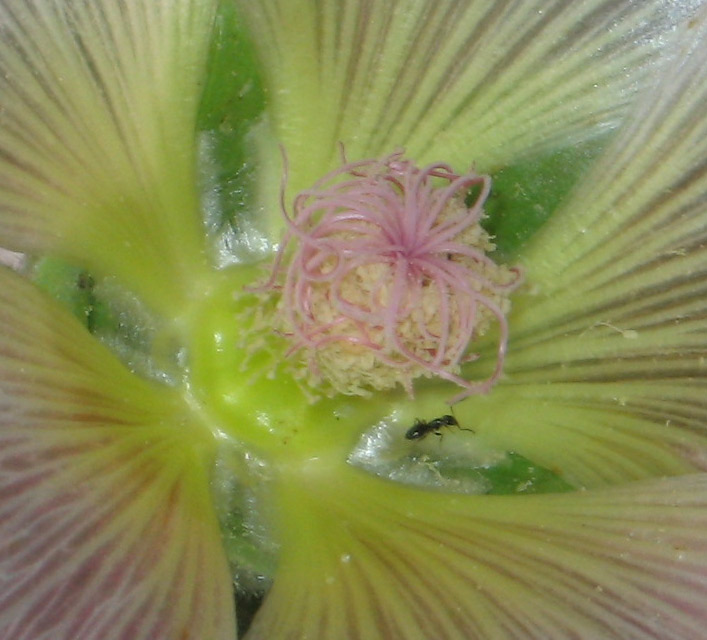
Have you ever looked closely -- really closely -- at the centre of a hollyhock? It's worth the effort (click on the photo at right for a bigger view). ...But I digress. Colours and textures distract me. ;-)
As it turns out, this final part of my summer vacation featured colour and texture quite prominently. It all started with a longtime friend (we won't say "old friend" because she'd object) and a newspaper article. She'd clipped the article and saved it -- and more than a year ago started telling me that the next time I was in town, we really, really had to go up and see this felt artist in the middle of Washington State, because she just knew I needed to meet her.
When she finally presented me with the article, I recognized the photos -- I'd seen this woman's work described in a major online magazine! I started thinking, "Oh, geez, she's really well-known -- no way will she have time to talk with us!" So I stalled, just a little. But my friend (who knows the artist's father and just knew it would work out) insisted -- and thanks to her it happened: after a few phone calls and calendar adjustments, we arranged a time and hit the road.
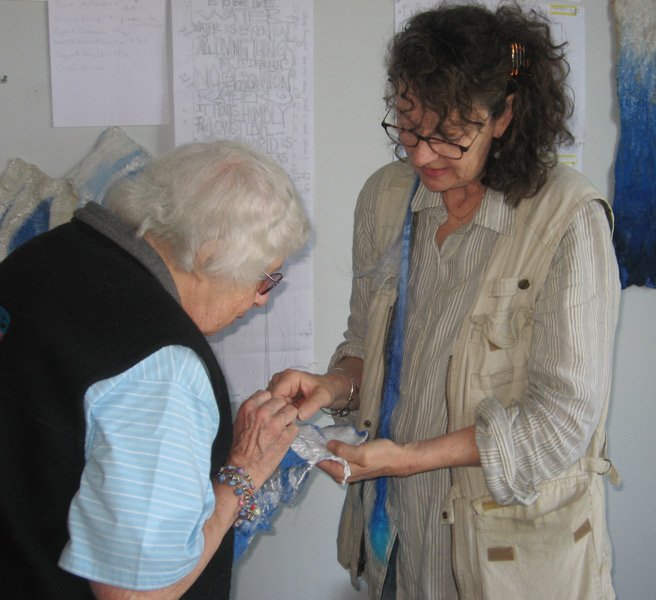
What we found when we arrived blew us both away. The felt artist's name is Janice Arnold, and despite her very tight schedule, she received us graciously at her "dry" studio in Olympia. From late morning into the afternoon, she generously spent time with us, explaining the processes involved in her work (left), then showing us her current work-in-progress.
This was felt like no felt I'd ever seen. Janice works on a very large scale -- room-sized pieces -- and her work is stunningly beautiful. It has a presence to it that lifts you out of yourself and makes you eager to see more, to be enchanted, to hear a whispered message beyond words -- and yet, it is, indeed, felt: a non-woven textile, held together by interlocked wool fibres and usually thought of as pretty humble stuff.
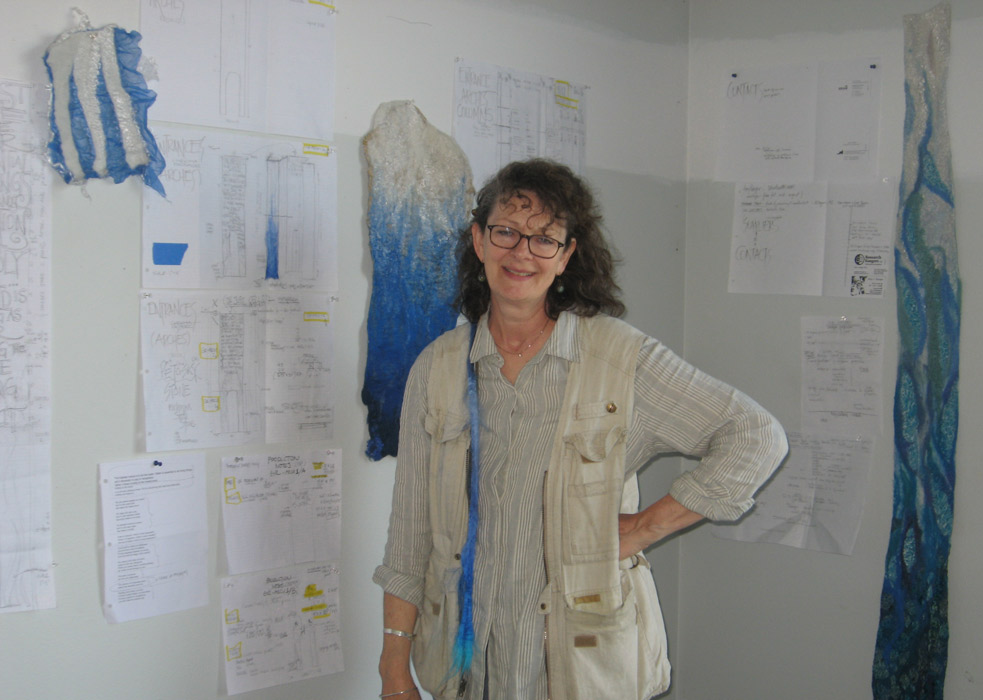
Her current project will be installed in the Grand Rapids Art Museum (Grand Rapids, Michigan) this fall. In terms of its physical presence, it will cover and adorn the towering entry to a long hallway, then drape the interior of the hallway itself -- end to end, top to bottom. Even that inadequate description conjures images for me that blow my mind. How could you ever figure out how much wool and other materials you'd need for that much felt? How could anyone possibly design something that big?? And (heaven help us!) how on earth would you go about actually doing it??? ...In this corner of her studio space (right), Janice is surrounded by sketches, lists, samples, examples, and plans. Even on paper, it's a major undertaking!
But now let's talk about what this project actually is. If you looked attentively at the samples in the photo at right, you may have gotten an impression of water: water flowing, tumbling, swirling, eddying, in blue and white, matte and shiny, textured and smooth. And it's true: this installation flows all around the concept of water.
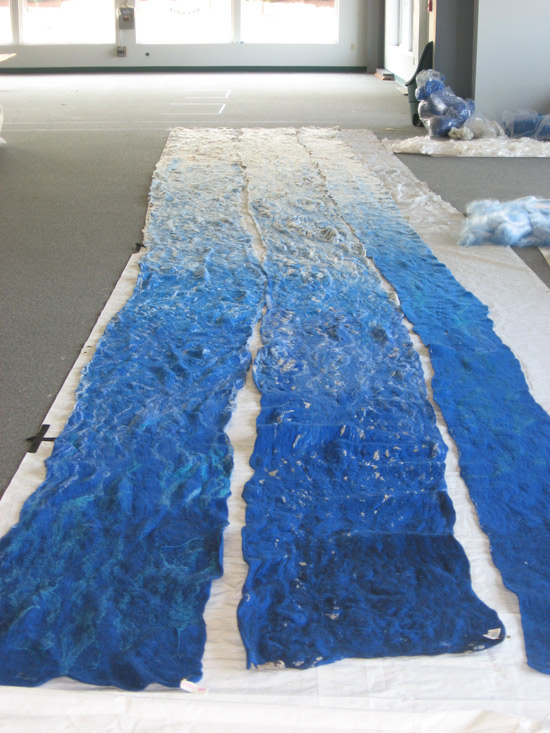
The entrance to the hallway at the museum is framed by two tall concrete pillars, both of which will be enrobed in felt. This photo (left) shows the three panels for one of those pillars, felted, fulled, and ready for packaging. Each panel is as long as the pillars are tall: 38 feet. Even at this distance, you can make out the swirling water patterns.
Between the pillars, a felted overhead archway presents the visitor with a text taken from the Tao Te Ching, its words presented in a play of colour and transparency -- and all, of course, in felt. To give you a taste, here's part of the passage:
Nothing in the world
is as soft and yielding as water.
Yet for dissolving the hard and inflexible,
nothing can surpass it.
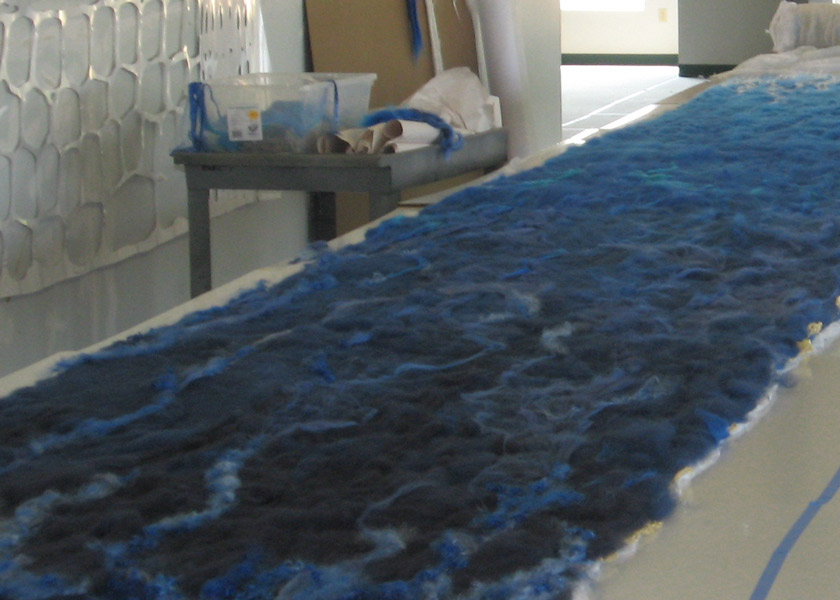
Before being felted, of course, the fibres need to be layered and arranged, a process Janice calls the "lay-up". In this photo (right), you see fibres being prepared for a panel for the second entry pillar. Because the felt shrinks significantly when it's processed, the lay-up needs to be quite a bit longer than the finished piece. In this case, to end up with a 38-foot-long panel, the lay-up needs to be well over 70 feet long. You can just see the far end of the lay-up rolled at the end of the table.
This lay-up is not quite finished. The wool and underlying structures are in place, but it is waiting for the final swirls of shiny fibres on the surface. ...Click here for a close view of part of the lay-up.

My friend good-naturedly stands next to the lay-up table to give us a clear idea of the scale of the work (left).
What comes next? Well, after passing between the pillars and moving beyond the archway with the text from the Tao Te Ching, the museum visitor enters the hallway. The physical hallway is very luminous, its windows being the dominant feature. What the visitor will see, though, is a chroma passage: walls of felt descending from the the centre of the high ceiling outward to the walls on both sides, then draping downward. The light passes through in a play of opacity and translucence, and the visitor walks through a progression of colour from a pale aqua through strong blues, to deep indigo and blue-purple, through violet to red, then through orange to yellow -- and then, having passed through this amazing textured rainbow, the visitor exits the hallway.

Just imagine being the visitor. You came to the art museum thinking you were going to see, well, Art -- and here you'd be, stepping through an entryway that already leads your mind and spirit onto different pathways, then into a hallway that surrounds you with colour and texture in a swirling enchantment that completely lifts you from your everyday life. By the time you reach the other end of the passage, what would be happening? As the colours and patterns wash over your senses, you couldn't help but be touched, if not swept away!
It was a stimulating, inspiring day -- and we were both very grateful to Janice for taking the time to unveil and explain this amazing project. As we talked about the work still waiting to be done, she mentioned that she loved working with lyocell (the shiny fibre that shimmers and ripples on the surface of many of the felt pieces), but regretted not having time to dye it in all the colours she wanted for the chroma passage, and didn't know anyone locally who could take on the dye project in the tight timeframe required for this job.
One thing led to another in the conversation, and -- guess who volunteered to help? Eagerly, seriously, and whole-heartedly! ...Stay tuned for the next installment: the story of what I did after my summer vacation!
End notes, for inquiring minds
♦ Janice Arnold's work is beautiful, stirring, spiritual, nourishing, and human. Although a representation on-screen isn't as satisfying as seeing (and being surrounded by) the full-sized work, her website does an excellent job of presenting her as an artist, with her thoughts, her past installations, and a delicious gallery of her work. (Make sure you follow the "Process" and "Results" links!) Click here to tour her website. Her Contact page carries a link to her page on Facebook, where you can see the newest developments in her current project.
♦ Lyocell is the generic name for the fibre many people know as Tencel (a trademarked name). Lyocell is a regenerated cellulose fibre -- and if that sounds too strange to you, just think of it as a thoroughly modern rayon. It shares many of the characteristics of rayon, but doesn't share some of rayon's "undesirable" traits, such as weakness while wet and a tendency to wrinkle. Wikipedia has an excellent article about lyocell -- click here for a fascinating background on this (frankly gorgeous) fibre.
29 August 2010
This installment of What I Did On My Summer Vacation begins with red rocks in New Mexico -- because (yes!!) I went to Albuquerque for that amazing biennial weavers' function known as Convergence. The first stop: the Complex Weavers Seminars.
Complex Weavers is one of the best organizations I've ever had the pleasure of meeting. Its membership is open to anyone willing to learn and share -- and its members do learn from each other, and we do share! The CW Seminars take place every two years, usually in the neighbourhood of Convergence. The Seminars really are seminars -- you attend a couple of two-hour classes each day, and there's often a speaker at lunchtime and an evening program. In atmosphere, though, it has more the feel of a retreat than a large-scale conference -- which may have something to do with the comfortable confidence of the Complex Weavers themselves.

As usual, I learned a lot! In the seminars I took, we explored complexity, delved into weaving history, tried out a fan reed for its undulating effects, and looked at different approaches for weaving velvet. This time I also taught a seminar -- an exploration of tassels, with their history, uses, and structures (mostly show-and-tell, which is always fun).
This year a few special events spiced up what was already a wonderful week. Lillian Whipple was honoured with a reception and retrospective exhibit of her work. Lillian is one of the many who so generously shares her knowledge, and she has had a tremendous impact on innumerable weavers all over the world. It was a real treat to see her honoured this way. (And also a treat to see her weaving history! We all really do weave our own lives.)
The other special event was listed as The Surprise on the official calendar -- and while we heard some whispers and giggling on the sidelines, there were no information leaks; so when it happened, we were duly surprised!! I won't keep you in suspense, though -- well before the seminar, twelve Complex Weavers secretly communicated and collaborated, each weaving in black and white in his or her corner of the world -- to create an all-woven animation (yes, really!) entitled Weave!. We were the audience for its world premiere.
Better than any description I could possibly give you, just take a look for yourself (and note that this is streaming video, so if your connection is kind of slow at the moment, you might want to tune in again later):
After Weave! made its debut, then played again as an encore (we loved it, as you might imagine!), we were invited to come over to a table running the length of the room -- a table that had been veiled and mysterious until this point. With the veil lifted, we saw all the woven panels making up the imagery of the film laid out on display, each appropriately identified by title and weaver. We ooohed, ahhhed, and handled. ...And as though that weren't enough of a treat, we also had dessert!
The moral of the story, if there were one, would be this: Keep weaving. There are always new and exciting places to explore.
The Complex Weavers Seminars came to an end -- and we all suddenly realized that we'd just spent three full days indoors! Immersed in our landscapes of woven textures and ideas, we had forgotten there was a whole other world just outside the door....
I joined a group of special friends whose visit was already underway, and after a night of talking (yayy!), we got up early and descended en masse on Convergence. One of my friends had a piece on display in "Small Expressions", so that's where we went first -- and succeeded in taking a photo of her with her weaving, with permission of the attendant "No Photos Please" guardians! (Unfortunately, it wasn't my camera, so I don't have that photo to share!).
The displays were amazing. I went back several times -- and would have gone more, had our schedule allowed.
And then there was the Vendor Hall. :-) Besides being a place where I encountered lots of friends and met some new and interesting people, the Vendor Hall was a place of dreams and treasures. The Vendor Hall did very well by me. Everything I bought magically fit into my suitcase -- and most of it was actually on my shopping list (no, really, I'm serious!).
One booth that inspired several purchases that weren't on my list was Hokett Would Work. His little loom (right) struck me as Just The Thing for being able to take your weaving along on an airplane. Besides the little loom you'd need only yarn and a wooden needle -- and if you didn't have a wooden needle, you could use a plastic coffee-stirrer instead. Very clever.

The most amazing event at Convergence for me was meeting one of my weaving heroes: Helene Bress. I have all her books, and (even more significantly) I've used them all. They've helped me develop, helped me slide easily through what could have been rough spots as I was learning to weave, given me inspiration on what I might like to explore "next". Her book Inkle Weaving remains the best book yet written on weaving inkle bands; her Weaving Book (which has just come out in a new edition) is a full weaving course unto itself; her Macrame Book is timeless, despite the comings and goings of fashion; and her amazing Coverlet Book still leaves me speechless.
And there she was, smiling and generous, seated next to her son in the Flower Valley Press booth. We exchanged stories. I told her about the matched inkle looms my Dad and I built from her plans, and how Dad had become an enthusiastic band weaver by studying her inkle book. I told her about my mother's unexpected childhood memory of a neighbour who wove coverlets professionally -- a memory triggered by The Coverlet Book. She told me a little about doing coverlet research, about meeting weavers. It was a lovely, lovely moment.
A bit later I saw her again at the Weavolution booth and introduced her to a friend sitting there -- and when my friend jumped up and said, "Helene Bress! You're famous!!", Helene replied, "Only here." :-)
There's only one word for a trip that educates you, inspires you, amazes you, and lets you meet up with old friends and make new ones. Su-perb!
End notes, for inquisitive (or acquisitive) minds
(This reveals all about my shopping!)
♦ To read more about Complex Weavers, view a gallery of works, see what's happening, learn how to join, shop for books (there are some great compilations), and more, click here.
♦ For information about Convergence or its parent organization, the Handweavers' Guild of America, click here. The HGA also has an online store and offers discounts to members.
♦ Do you know about Weavolution?? You should! Weavolution is an online social network for weavers (and others), and in the first year of its existence, it has blossomed, offering many forums and focus groups and an ever-growing pool of talent and knowledge. Click here to see what all the fuss is about.
♦ The excellent books written by Helene Bress are all published by Flower Valley Press. To read about her books, check the latest news, or look at some of the breath-taking images from The Coverlet Book, click here.
♦ Jim Hokett of Hokett Would Work does not have a website, but he's present at shows throughout the year, and a number of shops now carry his goods. He makes small weaving tools and handspindles. Straightforward and nicely done.
♦ C. Cactus Flower looms are small looms made for tapestry or weaving of Navajo-style miniatures. They're also darned clever! I now own two. ;-) They're good for tapestry and miniature rugs, but also for needle-weaving and experimenting with pattern. Click here to check them out.
♦ If you love yarns, colour, and quality, you need to know about Just Our Yarn. Incredible, gorgeous, and they get me every time! Click here to learn more.
♦ Last, but absolutely not least -- shopping wouldn't be shopping if a beautiful Bluster Bay shuttle didn't come home with me. It did, and I'm happy. Bluster Bay's website is here -- check their schedule for places to meet them in person.
28 August 2010

Looks like it's time for that annual essay, What I Did On My Summer Vacation. This saga is more "bloggy" than usual -- but that's the nature of vacation tales....
To begin at the beginning -- I went to the States for family visit. The family isn't as large as it once was, but we make up for that as well as we can; and to prove it, before I'd even recovered from jet lag, my sister whooshed me out of town for a couple of days "up-river".
"Up-river" can mean lots of things -- but to me, with my roots in a mill town on the Oregon-Washington border, it means one thing only: through the Columbia River Gorge, toward the east side of the world.
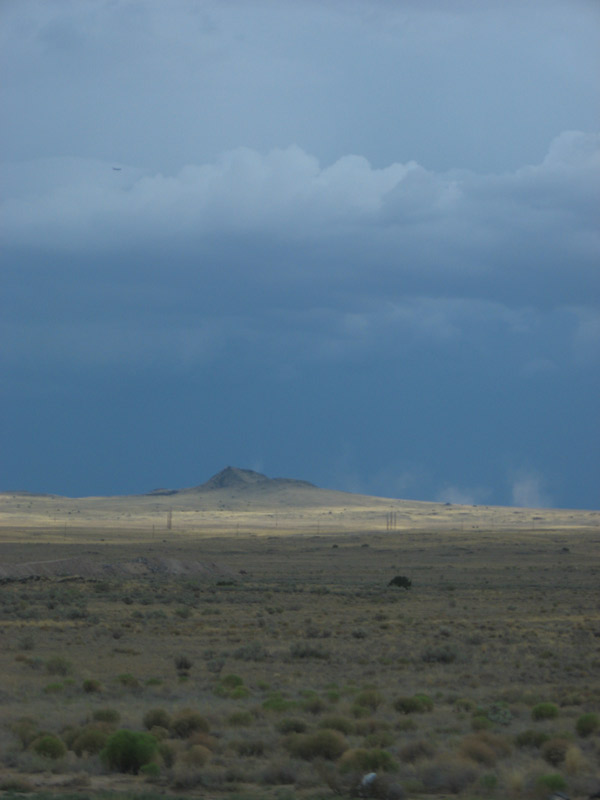
The Columbia is a big river, and the Columbia River Gorge is an amazing place. Carved by the earth-changing Missoula Floods some 10,000+ years ago, the walls of the Gorge look down serenely at the people passing by. We bustle through our little lives -- but the Gorge is massive, quiet, older than imagination.
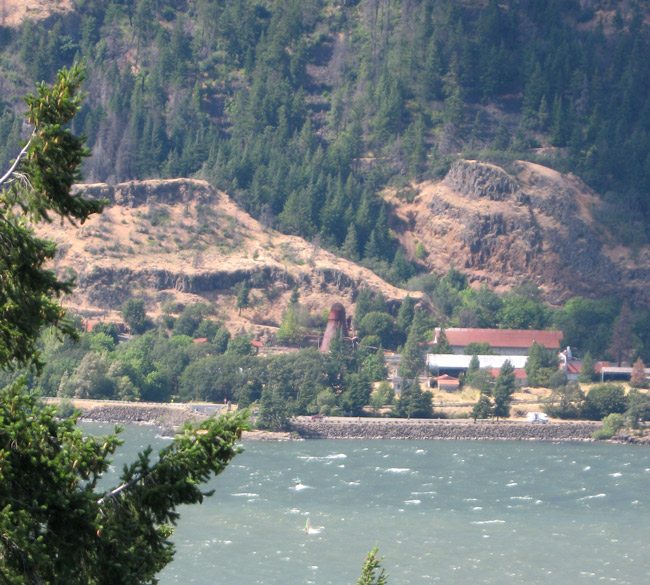
Our hotel was on the Oregon side, looking across toward Washington -- and if you look carefully at the photo (right), just below its centre point you'll see something that was commonplace in my childhood, but is now rare: a wigwam burner. It's big. They were all big. They burned slash at the edges of logged areas, burned sawdust and scrap at sawmills, and at night small bursts of sparks would swirl upward from their screened tops, showering the black night sky with tiny dancing lights. Little stars, sparkling orange and yellow, then vanishing forever.
This particular burner is at the old Broughton Mill, the end-point of an unusually long lumber flume (made famous in a memorable episode of "Lassie" in 1967). The sawmill is shut down, and the flume has fallen into disrepair -- but you can still see its vestiges on the Washington side, its path following the contours of the hills, supported by impressive trusses and bringing back memories to old men. And to me.
My sister and I did some grand tourism, packing a lot of stuff into just a couple of days: wine-tasting, a scenic drive, a visit to an alpaca farm (yes, of course I came home with fibre!), some shopping, a soak at the hot springs.... We did not go wind-surfing. Just wanted to make that clear.
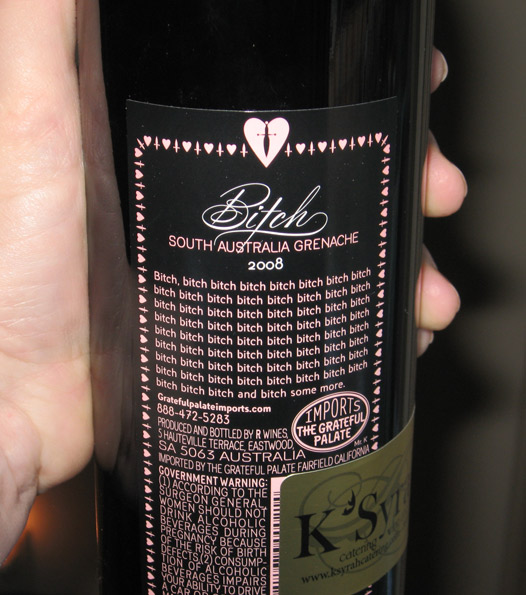
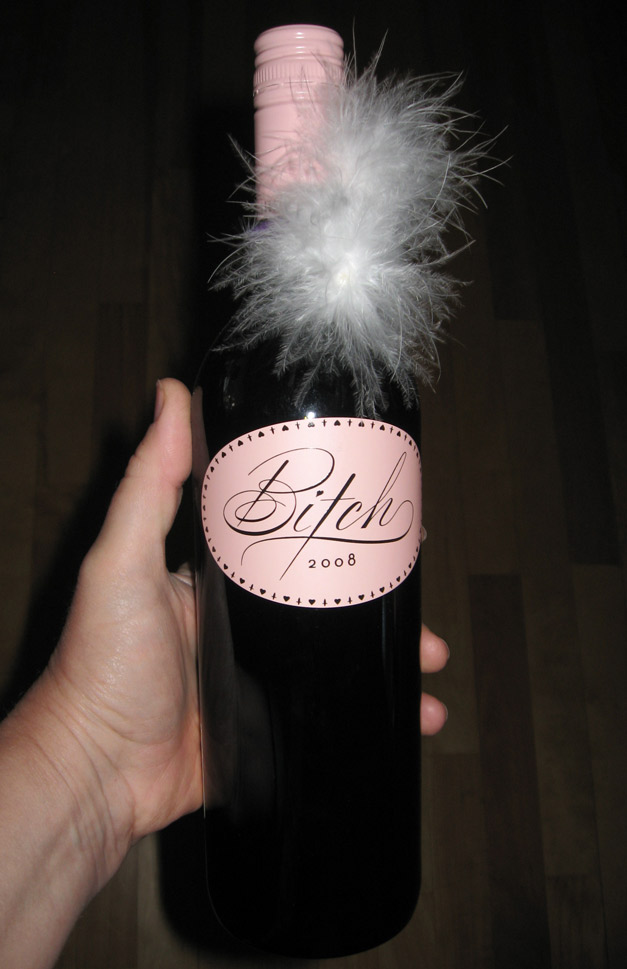
Meanwhile, our brother apparently missed us -- because this bottle of wine was waiting for us when we got back! (He knew I'd appreciate it. I did.) ...Do be sure to read the wine description on the back label.
We visited. We barbecued. We sat outside in the evening until the mosquitoes drove us back in. We shopped. We puttered. We planted nice flowers.
It was good. :-)
End notes, for inquiring minds
♦ The Broughton lumber flume does not have a visitor's centre, but if you'd like to know more about it, a Portland man has collected and documented its history. Click here for his online essay, accompanied by excellent photos.
♦ The wine was pretty good! And the feathers stayed fluffy until the last drop was gone.
Return to the Archive directory page
Return to the Now spinning page