The archives
Return to the
Archive directory
Return to the
Now spinning
page
Explorations - the year 2011
(a good year, but not very verbal)
28 April 2011
Sing a Song of Soumak
My springtime rummaging unearthed two exciting things. First, I found a small loom with a weft-faced weaving-in-progress. Second, I found a copy of Jean Wilson's Soumak Workbook.
Soumak is an ancient technique that falls somewhere between weaving and embellishment. It involves wrapping warp yarns with weft while the weaving is in progress. In traditional textiles, it's widely used as an accent in kilim rugs, and it appears in many different forms in tapestries. Modern weavers use it in tapestry and rugs, but also as a textural accent in fabrics for clothing and accessories. Whether your approach to it is simple or complex, soumak can give you fascinating textural effects.
In the past I'd dismissed soumak as a technique that might be interesting "for some", but not for me -- I understood the concept, and that was enough. ...But suddenly here I was with a mini-loom, warped and ready, and a book of well-explained techniques. I couldn't say no.
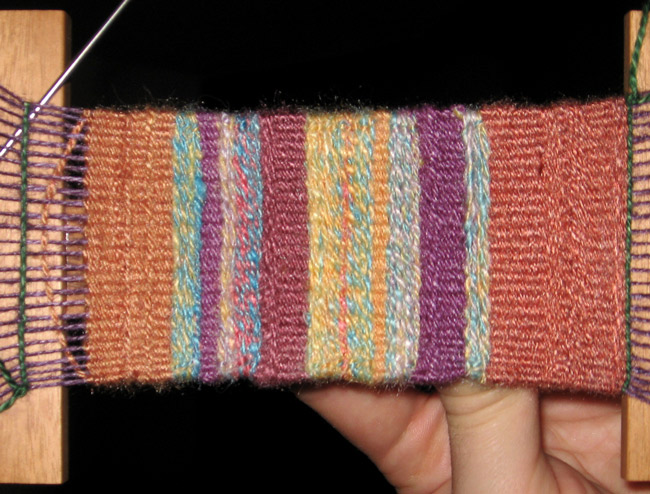
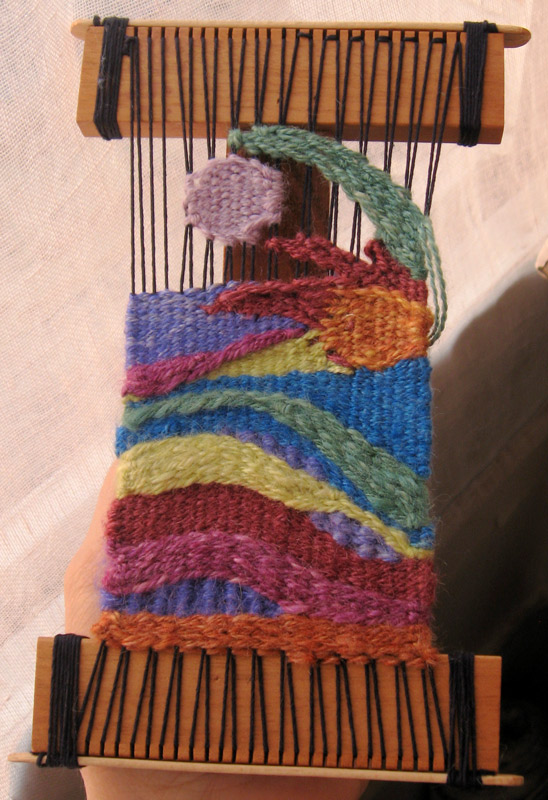
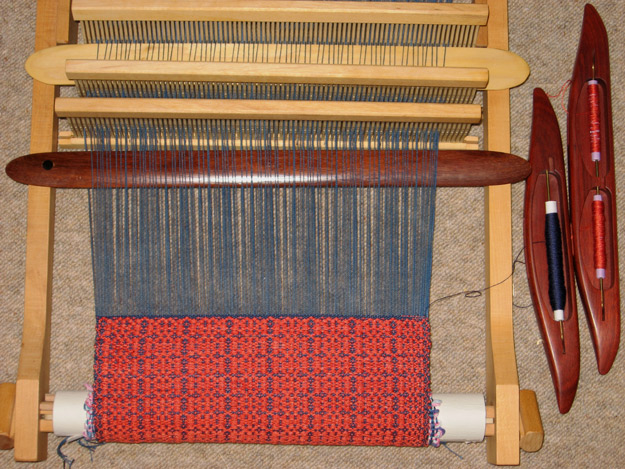
Used on its own as the sole weft-fill technique, soumak makes an elastic fabric -- not as sturdy as a regular weave, but thick and plush. Used along with plainweave, the cloth keeps all that texture and is more stable. But stability isn't the only reason to mix structures: the wrapping technique lets you put a raised border around other areas as an outline, opening the doorway to fluid, freer designs (right). The outlines can be filled with any weave structure -- or with more soumak.

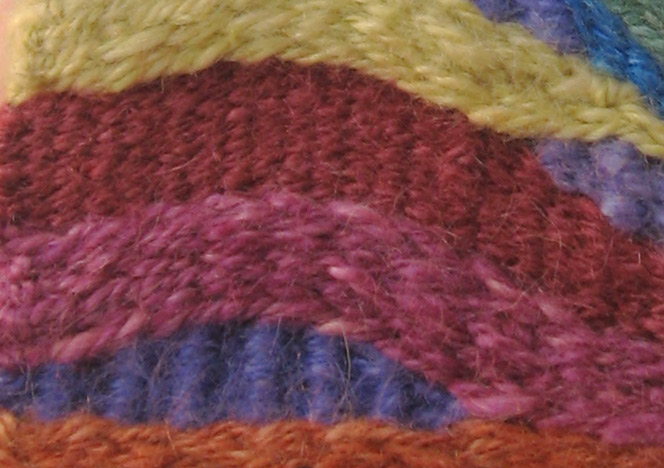
Looking at this same piece obliquely (left), you can clearly see the raised areas of soumak. This piece is very simple, mixing plainweave with one of the most basic soumak "stitches".
Whatever their exact structure, the soumak sections are thicker than the areas of plainweave, and they also look very different on the two sides of the weaving: on one side, you see the yarns floating across the surface; on the other, you see the wraps stacked up in columns.
This is slow weaving. Instead of the weft travelling straight through the warp on its appointed path, it goes a short way then stops, wraps around a warp (or two, or more), re-emerges on the surface, travels a short way, then stops and wraps again.
But oh, the texture!
End notes, for inquiring minds
♦ The mini-loom in these photos was made by Jim Hokett of Hokett Would Work. He doesn't have a website but is a regular vendor at large fibre conferences in North America.
♦ Jean Wilson's Soumak Workbook is out of print but occasionally shows up at used bookstores. Soumak techniques are explained in many other weaving books as well. Here's a small sampling:
— The Weaver's Idea Book, by Jane Patrick
— Woven Treasures, by Sara Lamb
— Hands-On Rigid Heddle Weaving, by Betty Davenport
— The Techniques of Rug Weaving, by Peter Collingwood
— Most books on tapestry weaving
24 April 2011
Welcome Easter
It's Easter: the first Sunday following the first full moon after the Vernal Equinox -- in Nature, the welcome, undeniable reaffirmation of life and renewal.
Easter comes to refresh and revive the winter-weary. Even the Allergic welcome the sudden gaudy explosions of colour, and clouds of yellow dust exhale like magic from trees. Birds race past in pairs, the first dazzled butterflies wander aimlessly, and humans slip out of their shoes for the first delicious taste of warmth underfoot.
It's impossible to stay inactive with all this Stuff going on outdoors. Even under the influence of antihistimines, we stir, bestir, and are stirred.

In my workroom, it's the season of lists. I contemplate the year ahead, imagine what might be possible, scratch dates on my calendar, and bask in the warmth of possibility.
Everything blossoms with promise. Even freshly dyed silks, wound into 25-gram "bumps", aspire to inspire with floral overtones.
How did the world get so beautiful?
Now that we have it, what will we do with it?
20 April 2011
Highly seasoned

Back in the time of the cherry blossoms, oh-so-not very long ago, spring seemed slow in coming -- so we tried yet another conjuring trick....
This was a good one. Its magic worked beyond all expectation: we're now experiencing an accelerated springtime!
The flowers of April-May-June
Have everyone humming a tune.
All logic's turned lyrical,
All reasoning, spherical.
Springtime has shed its cocoon!
Blame it on the pollen. Or on refreshing green drinks.
19 April 2011
A weaving interlude
A few weeks ago, as spring was still in its earliest stirrings, I had an irresistible urge to weave. As it happened, it was time for the sample exchange of the Complex Weavers Crackle Study Group -- so I dusted off my 14-inch rigid heddle loom and threaded it in Crackle.
It's hard to explain how good this felt! There have been so many disruptions in my life in the past few years that weaving (other than band weaving) hasn't really been possible. I mean, usually if you're going to weave things, you first have to live somewhere.
With the act of weaving, I was taking up residence in my own life. :-)
Crackle weave is a twill derivative -- which basically means that it's a twill with some extra threading rules. It's an intriguing weave to explore, because there are rules that really must be obeyed (or else it won't be Crackle), but many more "rules" that aren't really rules at all. Shifts of tie-up and treadling can lead to delightful and unexpected patterns -- and then there's polychrome crackle, which is on my list for this year, hovering there in my future like a tantalizing dream....
The pattern I chose was a very tidy one: Wheel and Cross, as presented by Marguerite Davison in her "Handweaver's Pattern Book" (a.k.a. "The Green Book"). It appealed to my sense of order, and I liked thinking of the result I'd get with my chosen yarns.
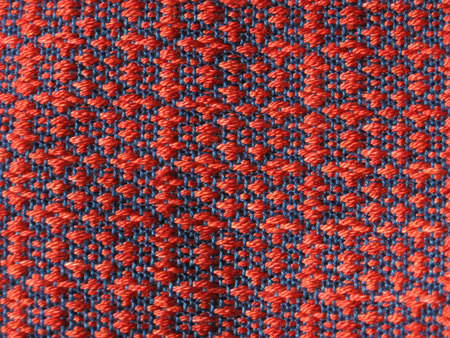
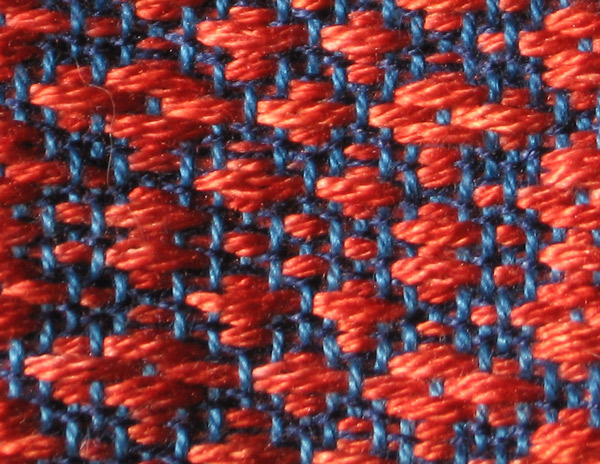
Even before finishing the first repeat, I could tell: the result is even better than I'd hoped (right). The variegated orange-red pattern weft shows beautifully against the navy warp -- and heaven help me, I really want to wear this fabric!
For my friends who don't weave, there are three different yarns used in this cloth. There's the warp -- a medium-navy in cotton. There's the pattern weft -- that shiny red-orange in silk.
 And then there's another weft that you can barely see, whose job it is to keep the cloth stable. It's finer than the warp threads and is a deep navy blue.
All three of those yarns are visible in the detail photo (left - click on the image for a bigger view). The fine deep-navy weft is just visible in this close-up view, but not noticeable at all in the cloth itself.
All these photos were taken before the cloth was "finished" by washing. The pattern snugged itself together and got even tidier in the wash, and the cloth itself gained a wonderful suppleness.
The sample exchange is over, but I still have more yarn -- and plan to weave it off in this same pattern and make it into something I can wear this summer. It's just too pretty to do otherwise!
End notes, for inquiring minds
♦ Sharp-eyed readers will notice (in the photo of the loom) that I wove the pattern "wrong side up", looking at the "back" of the fabric instead of the "front". And yes, this was woven on a rigid heddle loom with three heddles.
♦ The cotton warp yarns were spun by UKI and dyed by me. The hand-dyed, variegated silk weft came from Fyberspates of Wales. The deep navy tabby weft is Orlec from Camilla Valley Farm.
♦ Complex Weavers is a wonderful organization dedicated to weaving, learning, and sharing information. To learn more, click here.
18 April 2011
The shape of things to come
One thing about springtime is certain: once it finally gets started, each new day brings fresh changes.
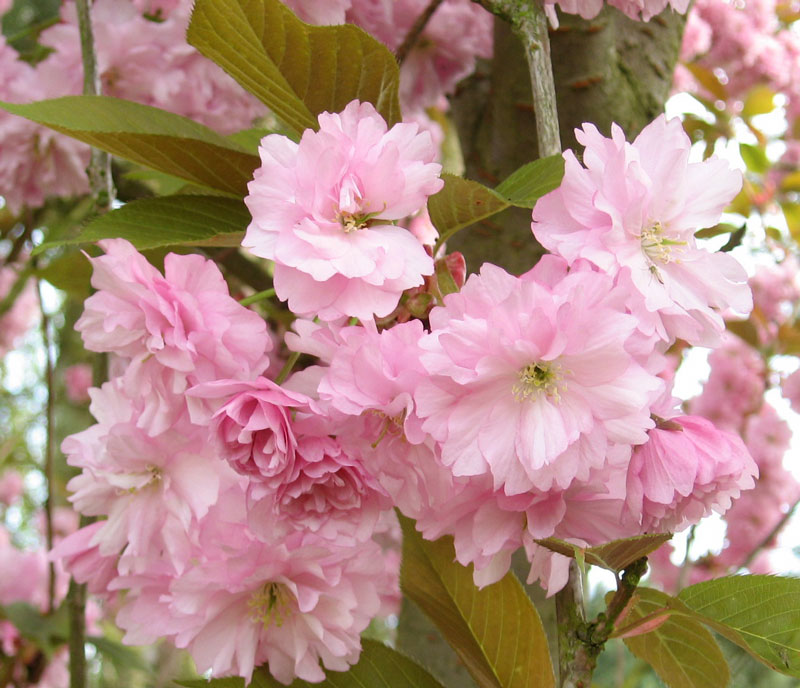
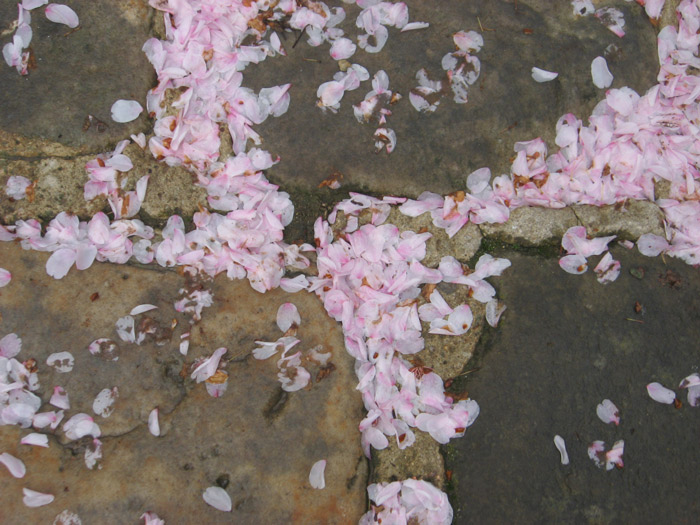
I admired the pale blooms of the cherry trees one evening at dusk, but the next day when I returned with my camera, at least half of their eerie pink glory had fluttered down onto the stones.

Petals on stone have another, different beauty. Their falling hints of other changes to come.
The seasons of rapid change have always felt exciting to me. Something about an Equinox sets the blood racing and inspires visions of -- it almost doesn't matter what. Change is in the air, that's the only important thing. You can smell it. It's poised to surprise you at every turn.
The spindles I make have remained pretty much unchanged since I started making them (six years ago? seven??). They had round whorls made of maple, and cute little spiralling hooks that encouraged new spinners to always turn the spindle the same way.
Surprise!! Change tiptoed out of nowhere and bit me! First, the cute maple whorls suddenly became unavailable. I still had a stock of them, though, and used those as I waited for the shipment that was expected "any day now". ...After a year of waiting, I sadly concluded that that boat would never come in. It was time to come up with another kind of whorl.
But wait, there was more! The all-brass eyelets used for making the cute spiralling hooks suddenly changed: they're now made of an inferior alloy, so as soon as I try to screw them into an almost-finished spindle, their heads break off (thus ruining the spindle -- not good).
My spindles are inexpensive, and that's important to me. After checking various suppliers in my area (looking for whorls) and visiting a couple of wood-turners, it became clear that to keep the price of my spindles down, I was going to have to completely rethink my whorls. So I did.
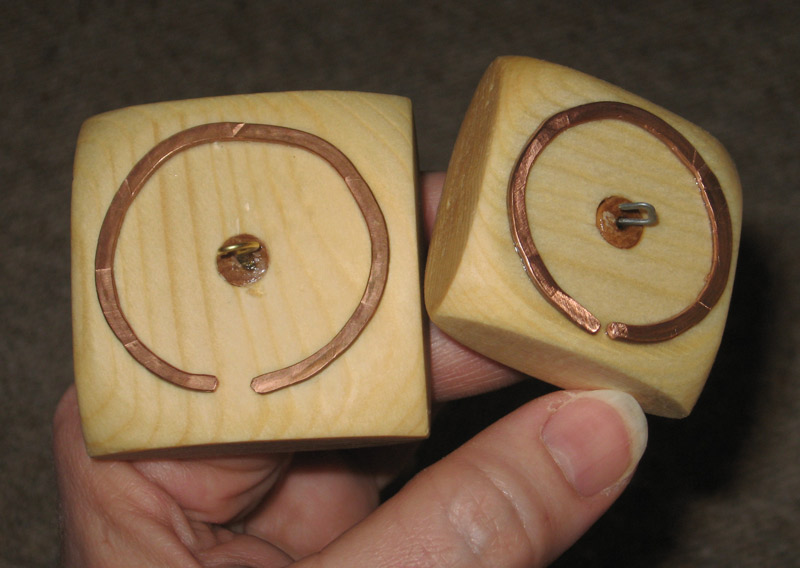
Without further ado, here it is: the shape of things to come! (left) A dear friend has dubbed these the "Squared Circle" spindles -- and so they are.
The two spindles shown here are both prototypes, so they're a touch "rougher" than the real spindles will be -- but they give you an idea of the two sizes: Small, and Medium. A heavier plying spindle may appear one day also, but I'm still prototyping that one....
As with the older-style spindles, everything you see here is functional. The square shape lets you set the spindle down on a table without its rolling off, but its tapered corners ensure a zippy spin. The copper circle provides momentum, so the spindle spins a long time. And the hammered steel hook is strong, fine, precise, and sturdy.
But here's the best part: they spin even better than the old spindles did. (I'm ecstatic!)
These spindles are coming soon to the Products page of this website!
08 April 2011
Catching up on lost time
My long silence doesn't mean I've been sitting still. In the wake of an unusually snowy December, I engaged in a series of conjuring tricks....
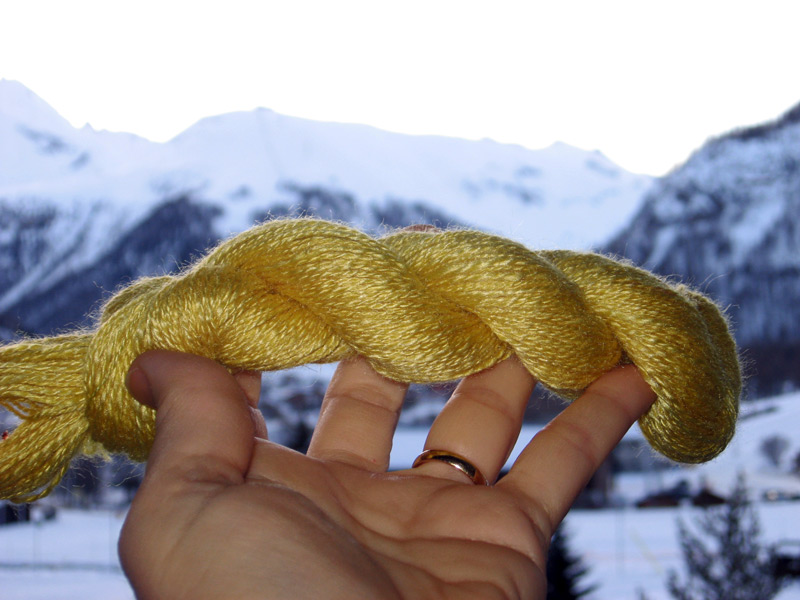
This sunny yellow skein (left) is one of them. It was spun in the Alps, and the combination of cheerful yellow and crisp mountain air was meant to shake me out of my winter blues. (Click on the image to embiggen it.)
It worked! :-) It also gave me a great excuse for refining some of my "have fibre, will travel" skills.
The spinning was done on a prototype spindle (you'll be hearing more about these very, very soon): tussah silk, dyed the colour of summer sunlight, the joyful radiance that's promised by early daffodils and echoed in the last of the autumn marigolds. It's a pure yellow. ...I spun it fine, filling the spindle until it wasn't comfortable to spin any more (testing the prototype!). When the spindle was full, I wound the singles around my hand and plied it into a pleasant 2-ply yarn -- still fine, the perfect weight for a summer scarf.
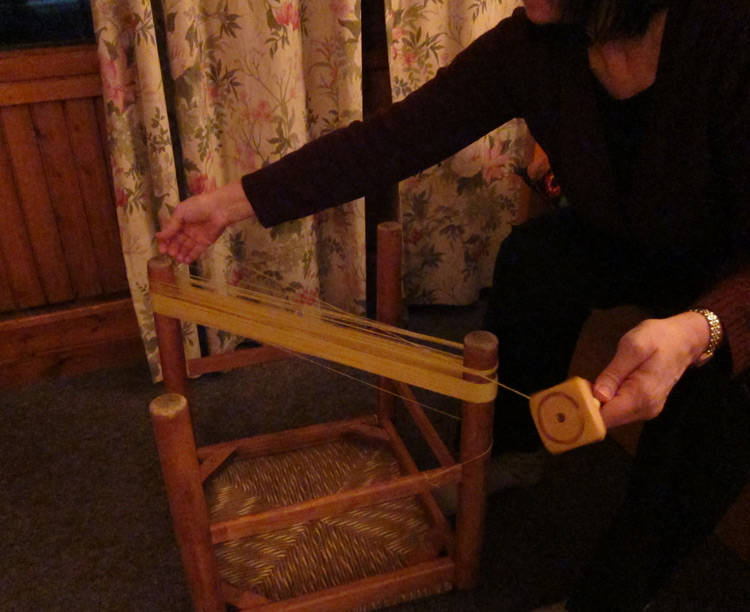
Then came the challenge of skeining the yarn. I could, of course, have wound a skein like a hank of rope around my forearm and elbow -- but there was quite a lot of yarn on the spindle, and I didn't want that much yardage on my arm (it's awkward, winding around the elbow; sooner or later the skein gets sloppy).
The solution presented itself in one of the stools in our rented lodgings (right). Turn the thing on its head, and presto! A perfectly viable skeining device.
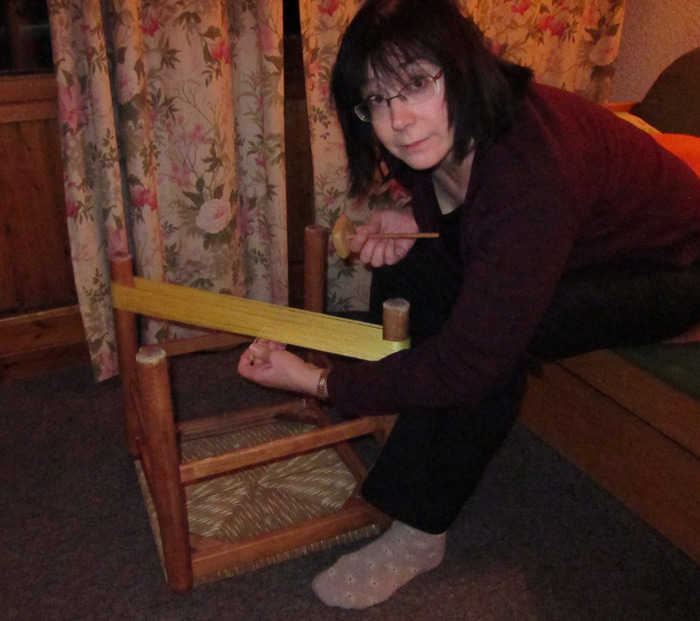
The straight legs of the stool made it easy to wind a nice, even skein, then tie it off in three or four places to keep it tidy.
It worked so well that I immediately started spinning another spindleful -- this time spinning silk hankies. (You need to put a prototype to work on as many things as possible, after all.)
The hankies worked beautifully, too. In fact, as this spindle was my "medium weight" prototype, the hankies actually spun up more easily than the tussah top -- it was a nicer match of spindle and fibre. ...And I was a happy spinner!
There's nothing like sunny silk for beating the winter blues -- especially if, in the process, you can use a few objects in ways their designers had never intended!
06 January 2011

It's a new year, the perfect time to start something new! ...Though in this case, the "something new" is actually quite old.
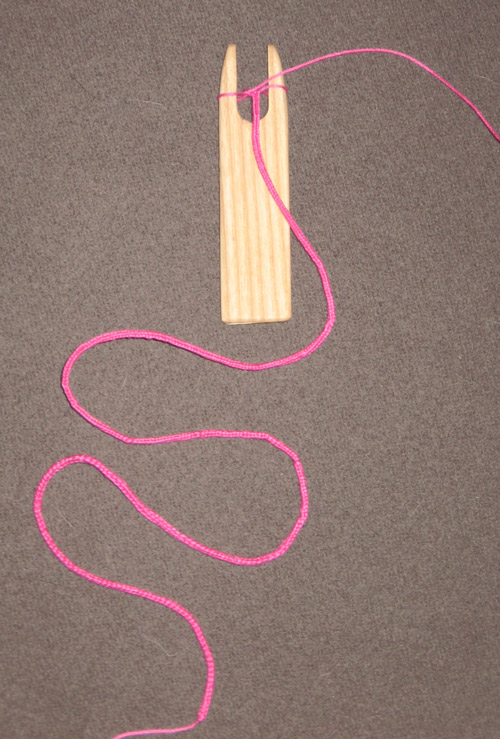
These (left) are lucets, also known as chain forks. They probably have a few other names, too, because they've been around for a long time. They're used to make a knitted cord -- but unlike i-cord or the tubular cord you get from spool knitting, the lucetted cord is only mildly stretchy. It's firm and in its most basic form has a square cross-section.
It's a useful cord.
All sources agree that the lucet is an old tool -- but it's not clear exactly how old it is.
 It's easy to imagine an origin for it, though: you can knit a cord like this with no tool at all, using two fingers (right).
You can see everything there in the photo: on each finger, there's a loop, and the "working" strand of yarn goes across the finger above the loop. If you've ever done spool knitting (Knitting Nancy), this setup will look very familiar to you.
To work the cord, you pick up the loop, lift it, move it upward to trap the working yarn and slip it over the end of the finger. (Yes, it's a knit stitch!) You then pull the working yarn toward the centre of the space between your fingers, without pulling the stitch itself tight. Then you bring the working yarn around the other finger and work the next stitch there. One finger, then another -- and the cord forms.

The disadvantage of working a cord on your fingers is that your hand is busy until the cord is done. If you take the cord-in-progress off your fingers, it unravels easily, often at high speed. The fix? You can "park" it by slipping a stick through the two loops (left) and gently tightening the loops. They're both knit stitches -- they can be eased open again when you're ready to resume cordmaking.
A second disadvantage to the finger method is probably the real clue to the lucet's origin: if the yarn you're using is fine, or hard, or not very "slippy", your fingers will soon become quite sore. And that, in my book, is an excellent reason to create a tool!
Before I go on, let me say a few words about textiles and archaeology. Textile finds from the long-ago past are rare, because unless they've been in an environment that preserves them (in a bog, for example, or buried in a desert), the materials just don't survive. Tools, on the other hand, often stay intact for centuries; and the history of textiles is rich with tools. ...The catch, of course, is that some tools look like they might be used for a textile-related purpose, but unless there's a companion textile find to support that appearance, you can never be completely certain.
The history of lucets is a case in point. There are several bone objects (which you can see here) found in an excavation in York that have been dated to the time of the Viking occupation. Unfortunately, there is no textile evidence (i.e., braided cord) to prove beyond doubt that they were, indeed, used as lucets.
Based on those finds in York, many people insist that lucets date back to Viking times. Whether they're right or not, it seemed like a good excuse for an experiment: I decided to see how well a lucet like the finds in York would work! The photos on the webpage cited above had an indicator of "scale", so I made a wooden replica (right). The space between its points measures 1 cm.
To jump to the conclusion: it's a perfectly viable lucet.
The first sample I tried was with a medium-weight yarn (nice and smooth), and it frankly didn't work well at all. When I switched over to a fine yarn, though, it worked perfectly! The pink yarn in this photo is a Number 10 crochet cotton -- not as "slippy" as it could be, but smooth enough to slide. In my hands, this style of lucet worked best with the "no turn" method; the squared, slightly wider base was awkward to turn.
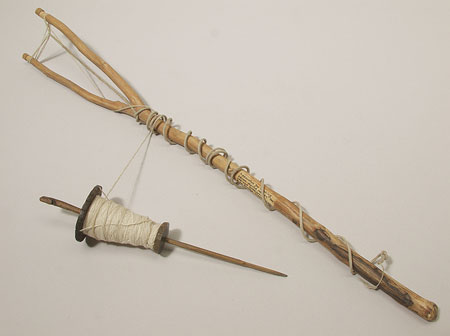
Because of early artifacts from York and Sweden, and the popularity of the chain fork in Victorian England, it's tempting to think of the lucet as a northern European phenomenon; but consider this interesting artifact (left). It is in the collection of the Pitt Rivers Museum in Oxford, and it came from the southern Sudan -- collected in 1926 and donated to the museum by Grace Crowfoot. It's big enough to tuck under the arm, leaving both hands free to work the cord and do other things as well. The yarn looks like cotton; the supply is generous.
For a closer view of the fork, click here.
Humans travel. They always have. Was the technique for braiding cord brought to the Sudan by visitors (or invaders) at some time, or did it develop there independently?
These are interesting questions to mull on a winter's day.
End notes, for inquiring minds
♦ For full documentation on the large African lucet, visit the Pitt Rivers Museum website here. This webpage includes full information about the artifact and lets you zoom in on the image for a highly detailed view.
♦ For a collection of (reliable) notes exploring the history of lucets, click here. It's not a fancy webpage, but there is excellent source information there.
♦ For a page of links about lucets, click here. Some of the websites listed are better than others, a few links don't work -- but if you're interested, it's worth the browse.
Return to the Archive directory page
Return to the Now spinning page