The archives
Return to the
Now spinning
page
Autumn explorations
Fall 2006
02 September 2006
It's the best way to start a new month: with a new fiber tool!
It came as a surprise, because I was looking in my spindle-making box for something completely different and found a wooden disc I'd picked up at the hardware store. It's supposed to be a "foot" for a piece of furniture, I think; but to my eyes, it looked like a perfect, ready-made spindle whorl.
It was a rainy evening, and I needed a project – so grabbing my pocket knife, sandpaper, a piece of dowel, and a drill, I set about helping the ready-made spindle whorl meet its destiny.
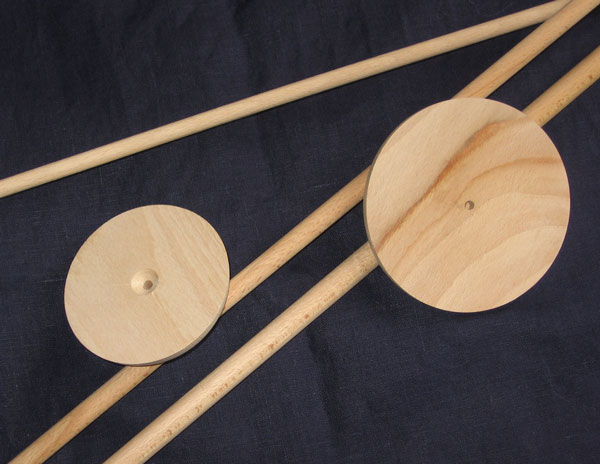
I'm mentioning all this here not because the result was wonderful (even though it was), but because making a splendid spindle like this one is within anyone's reach. With a wooden disc and a dowel as your starting materials, the only woodworking skills you need are whittling (with a pocket knife), sanding, and drilling a single hole.
Even I can do that! :-)
The first task was to decide the length of the spindle shaft. When the wooden disc first caught my eye in the store, I'd thought of it as the whorl for a drop spindle; but as I held it in my hands, it begged to become a supported spindle instead. That was fine; I like supported spindles. I have a nice Navajo spindle that's a lovely spinner, though it rarely gets used (it's so long that it lives in another room with the weaving tools). I decided to make this new spindle echo the proportions of its big Navajo cousin, on a smaller scale.
The hardware-store whorl was 3.5 inches in diameter. The piece of dowelling from my "miscellany" basket was about 16 inches long. Holding the two together at arm's length, the proportions looked about right. (Thus, the shaft length was just over four times the whorl diameter.)
Next came the placement of the whorl on the shaft. The shaft below the whorl had to be long enough to hold the whorl free of the floor while the spindle was turning; and above the whorl, there needed to be enough shaft for the hand to run the spindle (near the top) and for a good-sized cop of yarn to collect (near the whorl). Measuring by eye, it looked as though the proper placement for the whorl would be about 1/4 of the way up the shaft from the lower end.

Now it was time for the woodworking! The first step was whittling the shaft to shape. Because I wanted both ends to be "pointy", and because the dowel was hardwood, I started the shaping with a simple pencil sharpener (and I may have avoided a pocket-knife accident by doing so). Once the "point" for each end was started, the rest of the shaping was a snap.
The lower end was easy: the point on that end doesn't need to be precisely centered, and it doesn't need to be particularly sharp (left).
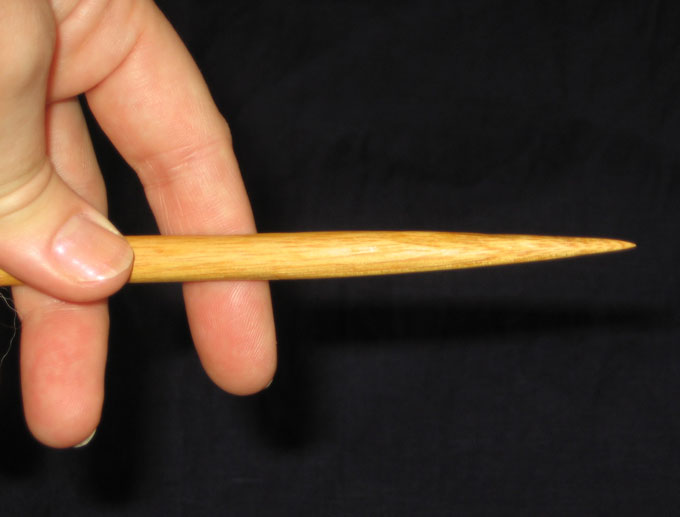
The upper end, on the other hand, needs to have its point nicely centered so it won't wobble while you roll the spindle along your thigh. I whittled the point, then rolled the dowel along my leg to find just how it was off-center, then whittled some more....
It took several rounds of whittling, but the point at the top of the shaft finally "held steady" when the dowel was rolled against my leg (right). In the picture, what looks like a wobble in the shaft is an optical illustion; in real life, the shaft is straight. The next step was sanding the shaft smooth – a pleasure, because it was the finishing touch to this bit of shaping.
The hardware-store whorl already had a small hole piercing its center, which made it easy to drill a hole in the exact middle of the disc. Most ready-made wooden discs will have some kind of mark to guide your drilling. I chose a drill bit that looked like it matched the diameter of my dowel, er, shaft; and the deed was quickly done.
Despite my best effort, the whorl didn't fit exactly on the shaft, so I used white glue (PVA) to convince it to stay where I wanted it. When the glue was dry, I finished the spindle with Danish oil (paint the oil on, wait 15 minutes, then wipe off the excess and let it dry), then waxed it the next day with paste wax for a satiny finish.
Of course, I was itching to try it long before all the finishing steps were done -- so as soon as it was reasonable, I did!
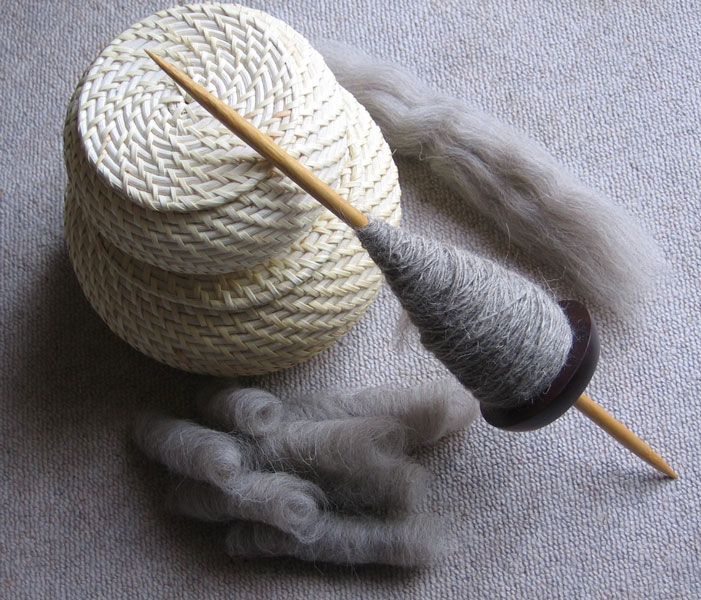
It's a heartbreaker, this spindle. You sit on cushions on the floor and roll the spindle against your leg, catch it in the "hook" between your thumb and the palm of your hand while it's still spinning, then roll it again. It just spins and spins and spins. It may not be as beautiful as the spindles made by real woodworkers, but it's truly an excellent tool.
A few tips for success when spinning wool on a medium-sized supported spindle like this:

♦ Rolags. This spindle loves to spin a woollen yarn, and it does it best from rolags. If you're not carding your own wool, break off lengths of wool top, pull and restack it so the little mass of fiber is just one fiber-length long, then roll that mass from fiber-end to fiber-end. That makes a mini-rolag (right) that spins just as nicely as the big hand-carded ones.
♦ Long draw. Briefly, this means let the twist from the spindle pull little clumpy spirals of fiber out of the rolag, so that pretty soon you have an underspun, lumpy length running from the tip of the spindle to your hand; then keep adding twist while gently pulling on the new yarn. The "lumps" will smooth out, just like magic.
♦ Time. Once you get the feel of it, spinning with a spindle like this is addictive. With its gentle movements and rhythms, it can fill a whole evening. Add to that the simple, profound pleasure of spinning on a tool you've made with your own hands, and —what else can I say? It's bliss.
Return to the Now spinning page